メインコンテンツにスキップ

HP EliteBook Folio 1020 G1 Motherboard Replacement

必要な工具と部品

  1. 注意: 手順 1-2 は、作業進行中としてマークされている ガイド から引用されています。

    HP EliteBook Folio 1020 G1 Motherboard Replacement, Lower Case: 手順 1、 1の画像 1
    • Use a TR8 Torx screwdriver to remove:

    • Six 5.3 mm screws

    • Four 3.3 mm screws

  2. HP EliteBook Folio 1020 G1 Motherboard Replacement: 手順 2、 1の画像 1
    • Use a nylon spudger to gently pry the lower case up and off.

  3. HP EliteBook Folio 1020 G1 Motherboard Replacement, Battery: 手順 3、 2の画像 1 HP EliteBook Folio 1020 G1 Motherboard Replacement, Battery: 手順 3、 2の画像 2
    • Gently pull and free the battery's bundled cable connector that leads from the battery to the motherboard.

  4. HP EliteBook Folio 1020 G1 Motherboard Replacement: 手順 4、 1の画像 1
    • Use a Phillips #1 screwdriver to unscrew and remove the six 4 mm screws that secure the battery.

  5. HP EliteBook Folio 1020 G1 Motherboard Replacement, Motherboard: 手順 5、 2の画像 1 HP EliteBook Folio 1020 G1 Motherboard Replacement, Motherboard: 手順 5、 2の画像 2
    • Remove:

    • Eight 4.6 mm screws shown in the circles using Phillips #0.

  6. HP EliteBook Folio 1020 G1 Motherboard Replacement: 手順 6、 3の画像 1 HP EliteBook Folio 1020 G1 Motherboard Replacement: 手順 6、 3の画像 2 HP EliteBook Folio 1020 G1 Motherboard Replacement: 手順 6、 3の画像 3
    • Disconnect the keyboard connections from the motherboard.

    • Disconnect by lifting the underside of the white tabs with a spudger.

  7. HP EliteBook Folio 1020 G1 Motherboard Replacement: 手順 7、 3の画像 1 HP EliteBook Folio 1020 G1 Motherboard Replacement: 手順 7、 3の画像 2 HP EliteBook Folio 1020 G1 Motherboard Replacement: 手順 7、 3の画像 3
    • Disconnect circled terminals. Disconnect by lifting the underside of white tabs with spudger.

  8. HP EliteBook Folio 1020 G1 Motherboard Replacement: 手順 8、 3の画像 1 HP EliteBook Folio 1020 G1 Motherboard Replacement: 手順 8、 3の画像 2 HP EliteBook Folio 1020 G1 Motherboard Replacement: 手順 8、 3の画像 3
    この手順で使用する道具:
    Tweezers
    $4.99
    購入する
    • Remove the circled tabs by pulling on the white support edges backward with a pair of tweezers.

  9. HP EliteBook Folio 1020 G1 Motherboard Replacement: 手順 9、 3の画像 1 HP EliteBook Folio 1020 G1 Motherboard Replacement: 手順 9、 3の画像 2 HP EliteBook Folio 1020 G1 Motherboard Replacement: 手順 9、 3の画像 3
    • Gently pull on the black pull tab on the top of the connector.

    • For the wires going to the Wi-fi card, remove both wires going to the top of the card using the tweezers.

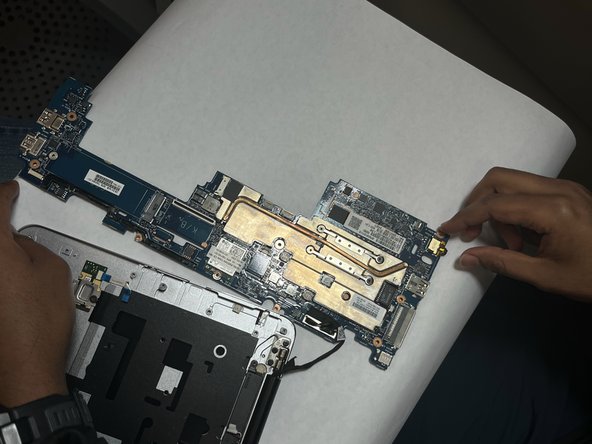
  10. HP EliteBook Folio 1020 G1 Motherboard Replacement: 手順 10、 2の画像 1 HP EliteBook Folio 1020 G1 Motherboard Replacement: 手順 10、 2の画像 2
    • Lift the now disconnected motherboard from the side shown in image 1. This side must be lifted to not damage the ports. The disconnected motherboard (aside from port removed in step 12) is shown in image 2.

終わりに

Attach terminals in reverse order of guide to new motherboard, reattach the battery and back panel.

作成者

4人の作成者と共同で作成されました。

Zachary Sinnott

メンバー登録日: 03/28/23

133 ポイント

1ガイドが承認済み

チーム

IUPUI, Team 2-1, Harley Spring 2023 IUPUI, Team 2-1, Harley Spring 2023人のメンバー

IUPUI-HARLEY-S23S2G1

3 メンバー

3のガイドは作成済み

0 件のコメント

コメントを追加

統計データ:

過去 24時間: 0

過去 7 日: 2

過去 30 日: 5

今までの合計 169