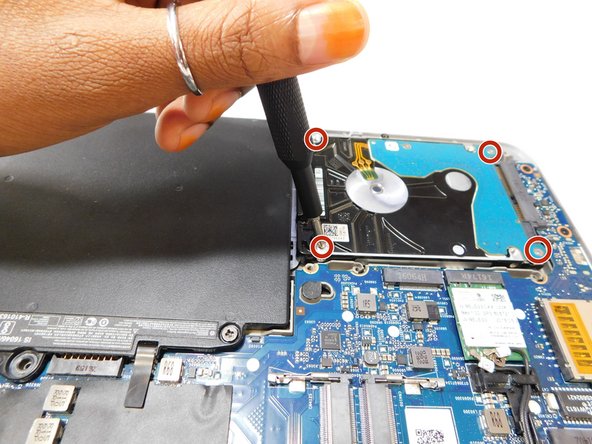
メインコンテンツにスキップ

HP EliteBook 820 G3 Hard Drive Replacement

必要な工具と部品

  1. HP EliteBook 820 G3 Hard Drive Replacement, Back Cover: 手順 1、 2の画像 1 HP EliteBook 820 G3 Hard Drive Replacement, Back Cover: 手順 1、 2の画像 2
    • Remove the eleven 3 mm screws with a Phillips #00 screwdriver.

    • Keep track of where the screw covers were attached to as there are four different sizes.

  2. HP EliteBook 820 G3 Hard Drive Replacement: 手順 2、 2の画像 1 HP EliteBook 820 G3 Hard Drive Replacement: 手順 2、 2の画像 2
    • Remove the SD card blank and the single 3 mm screw beneath it using a Phillips #00 screwdriver.

    • Lift off the back cover with your hands.

  3. HP EliteBook 820 G3 Hard Drive Replacement, Hard Drive: 手順 3、 2の画像 1 HP EliteBook 820 G3 Hard Drive Replacement, Hard Drive: 手順 3、 2の画像 2
    • Remove the four 3 mm screws from the hard drive using a Phillips #00 screwdriver.

  4. HP EliteBook 820 G3 Hard Drive Replacement: 手順 4、 2の画像 1 HP EliteBook 820 G3 Hard Drive Replacement: 手順 4、 2の画像 2
    • Slide the hard drive away from the system board connector to disconnect the hard drive from the system board.

    • Place it in a static dissipative bag.

終わりに

To reassemble your device, follow these instructions in reverse order.

ある他の人がこのガイドを完成しました。

作成者

3人の作成者と共同で作成されました。

Sarah Bisimwa

メンバー登録日: 08/25/22

247 ポイント

2のガイドは作成済み

チーム

Gateway, Team 1-1, Class Fall 2022 Gateway, Team 1-1, Class Fall 2022人のメンバー

GCC-CLASS-F22S1G1

4 メンバー

5のガイドは作成済み

0 件のコメント

コメントを追加

統計データ:

過去 24時間: 3

過去 7 日: 17

過去 30 日: 78

今までの合計 1,146