メインコンテンツにスキップ

HP ENVY Rove 20-k014us Fan Replacement

必要な工具と部品

  1. HP ENVY Rove 20-k014us Fan Replacement, Back Cover: 手順 1、 1の画像 1
    • Working on your device while it’s turned on is potentially dangerous and can result in electrical shock. Please make sure your device is completely turned off before you begin disassembling it.

    • Flip the device over so the screen is face down.

    • Make sure the stand is flipped down for the easiest way to work with the device.

    • Make sure that you put the screen on a clean surface to avoid scratching it.

  2. HP ENVY Rove 20-k014us Fan Replacement: 手順 2、 1の画像 1
    • Remove the SD card in the bottom of the computer by pressing the SD card in, and it will pop out.

    • Pull out the SD card completely and set aside.

    • If you have never put in an SD card into this slot, a dummy one will be there in the slot.

  3. HP ENVY Rove 20-k014us Fan Replacement: 手順 3、 2の画像 1 HP ENVY Rove 20-k014us Fan Replacement: 手順 3、 2の画像 2
    • Remove the two rubber screw covers on the bottom of the plastic cover using the plastic opening tool.

    • Unscrew the two 6.35 mm PH#1 screws that were underneath the rubber covers.

    • The screws cannot be removed, they just unscrew from the interior components of the computer.

  4. HP ENVY Rove 20-k014us Fan Replacement: 手順 4、 2の画像 1 HP ENVY Rove 20-k014us Fan Replacement: 手順 4、 2の画像 2
    • Use the plastic opening tool along the outer rim of the bottom portion of the back panel.

    • Take off this portion.

    • Removing the cover for the first time requires a bit of force. Use the plastic opening tool to get as much separation as possible before you pull off the cover to help prevent it from cracking.

  5. HP ENVY Rove 20-k014us Fan Replacement: 手順 5、 2の画像 1 HP ENVY Rove 20-k014us Fan Replacement: 手順 5、 2の画像 2
    • Remove three 6.35 mm screw from the back panel using a PH#2 or J1 screw driver.

    • Unscrew the two 6.35 mm PH#2 screws. They aren't able to be completely removed and will just be loosened similar to step 3.

  6. HP ENVY Rove 20-k014us Fan Replacement: 手順 6、 2の画像 1 HP ENVY Rove 20-k014us Fan Replacement: 手順 6、 2の画像 2
    • Release the stand by pressing the large button on the left so that it is easier to take the back case off.

  7. HP ENVY Rove 20-k014us Fan Replacement: 手順 7、 3の画像 1 HP ENVY Rove 20-k014us Fan Replacement: 手順 7、 3の画像 2 HP ENVY Rove 20-k014us Fan Replacement: 手順 7、 3の画像 3
    • Use the plastic opening tool to separate the silver back cover from the screen body.

    • As shown in picture two, use the tool around the stand as well to avoid cracking the cover.

    • As with the bottom cover, removing the top cover requires some force. Using the plastic opening tool to get as much separation as possible will make your job easier in the long run.

  8. HP ENVY Rove 20-k014us Fan Replacement: 手順 8、 1の画像 1
    • Slowly apply pressure to the outsides of the cover until it pops out of place.

    • Carefully lift the cover away from the computer and untangle it from the stand.

    • When putting the back cover back on, make sure you put the bottom of the cover on first so that the plastic cover sits tightly underneath the bottom of the stand case. Then make sure all the plastic tabs are fully pushed in.

    • Make sure that the power button is aligned when you put the back cover on.

  9. HP ENVY Rove 20-k014us Fan Replacement: 手順 9、 2の画像 1 HP ENVY Rove 20-k014us Fan Replacement: 手順 9、 2の画像 2
    • Before working on any of the internal components of the computer, make sure the battery is disconnected so there's no power running through the device.

    • Disconnect the battery by using a plastic opening tool and taking the cable connection out.

  10. HP ENVY Rove 20-k014us Fan Replacement, Hard Drive and Case: 手順 10、 1の画像 1
    • Remove the two black 6.35mm PH #0 screws with a screwdriver from the top of the hard drive.

    • Remove the two silver 6.35mm PH#0 screws from the bottom of the hard drive.

  11. HP ENVY Rove 20-k014us Fan Replacement: 手順 11、 1の画像 1
    • Gently remove the hard drive from the computer.

    • Unplug the hard drive.

  12. HP ENVY Rove 20-k014us Fan Replacement, Stand Recess: 手順 12、 1の画像 1
    • Release the stand by pushing the grey lever in towards the screen.

    • Doing this will allow you to access and remove the plastic casing (stand recess) around the stand itself in the next step.

  13. HP ENVY Rove 20-k014us Fan Replacement: 手順 13、 1の画像 1
    • Remove the fourteen 6.35 mm PH#0 screws around the stand recess and metal cage.

  14. HP ENVY Rove 20-k014us Fan Replacement: 手順 14、 2の画像 1 HP ENVY Rove 20-k014us Fan Replacement: 手順 14、 2の画像 2
    • Gently remove wires from around the stand recess with the plastic opening tool.

  15. HP ENVY Rove 20-k014us Fan Replacement: 手順 15、 1の画像 1
    • Remove the metal cage.

  16. HP ENVY Rove 20-k014us Fan Replacement: 手順 16、 2の画像 1 HP ENVY Rove 20-k014us Fan Replacement: 手順 16、 2の画像 2
    • Remove the stand recess by moving it towards yourself, rotating it about the hinge and then taking it out of the computer.

  17. HP ENVY Rove 20-k014us Fan Replacement, Fan: 手順 17、 3の画像 1 HP ENVY Rove 20-k014us Fan Replacement, Fan: 手順 17、 3の画像 2 HP ENVY Rove 20-k014us Fan Replacement, Fan: 手順 17、 3の画像 3
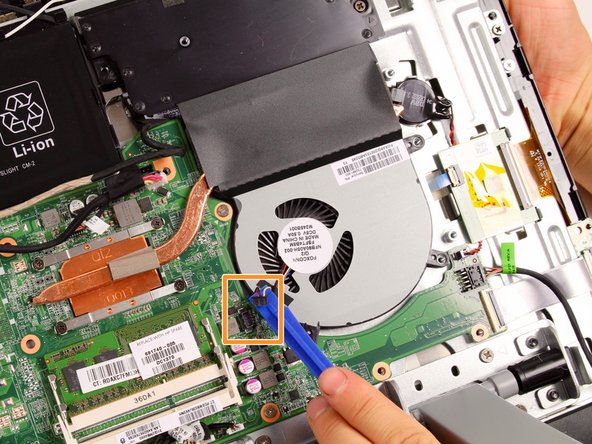
    • Remove four 6.35 mm PH#0 screws around the fan using the J1 screwdriver head.

    • Unplug the fan.

    • Remove the fan from the computer.

    • The black plastic air channel is attached to the fan and will come out as well.

終わりに

To reassemble your device, follow these instructions in reverse order.

14 の人々がこのガイドを完成させました。

作成者

3人の作成者と共同で作成されました。

Berit Bingham

メンバー登録日: 10/06/15

1,464 ポイント

8のガイドは作成済み

チーム

Cal Poly, Team 4-4, Maness Fall 2015 Cal Poly, Team 4-4, Maness Fall 2015人のメンバー

CPSU-MANESS-F15S4G4

4 メンバー

15のガイドは作成済み

2 件のコメント

These instructions serve as a guide to battery replacement as well! I forgot to write down the battery replacement part number - anyone have that handy? Thanks!!

Woodstock Libertarian - 返信

I have a problem, my screen doesn't work and it only makes colors and static. I followed the instructions and after assembling it the screen was no longer working

Lean Cabrera - 返信

コメントを追加

統計データ:

過去 24時間: 0

過去 7 日: 4

過去 30 日: 33

今までの合計 4,876