メインコンテンツにスキップ

HP Deskjet 3000 j310a Repair Carriage Driver Belt Replacement

必要な工具と部品

  1. HP Deskjet 3000 j310a Repair Carriage Driver Belt Replacement, Disconnect Printer: 手順 1、 1の画像 1
    • Begin to disassemble the printer by disconnecting from all power sources and computers. Keep cords separate and allow the printer to cool for 5 minutes.

  2. HP Deskjet 3000 j310a Repair Carriage Driver Belt Replacement, Remove Bottom Cover: 手順 2、 1の画像 1
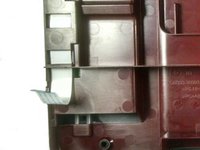
    • Flip the printer upside down and locate the cover on the left hand side. It is rectangular shape and is held in place by two screws. Unscrew these screws and take off cover.

  3. HP Deskjet 3000 j310a Repair Carriage Driver Belt Replacement, Release Paper Output Tray: 手順 3、 1の画像 1
    • To release the tray from the printer, you must manually pull it out. Hold the tray and push towards one side of the printer. Then pull away from the printer towards the other side. Keep output tray separate.

  4. HP Deskjet 3000 j310a Repair Carriage Driver Belt Replacement, Unscrew Cover: 手順 4、 1の画像 1
    • Turn the printer upside down. Locate the four screws holding the cover in place. These will be on the edges of the cover.

  5. HP Deskjet 3000 j310a Repair Carriage Driver Belt Replacement: 手順 5、 1の画像 1
    • Unscrew the four screws, keeping them separate. Turn the printer back right side up

  6. HP Deskjet 3000 j310a Repair Carriage Driver Belt Replacement, Pull Off Top: 手順 6、 1の画像 1
    • Place fingers on the edge of the red cover. Begin to pull upwards to release the top portion, working your way around the printer. Make sure that it does not fall back into place.

  7. HP Deskjet 3000 j310a Repair Carriage Driver Belt Replacement, Disconnect Cover: 手順 7、 2の画像 1 HP Deskjet 3000 j310a Repair Carriage Driver Belt Replacement, Disconnect Cover: 手順 7、 2の画像 2
    • Once the top is loose, there will still be a connection wire between the printer and the cover. This wire will be about one inch wide and white, located under the buttons.

  8. HP Deskjet 3000 j310a Repair Carriage Driver Belt Replacement: 手順 8、 2の画像 1 HP Deskjet 3000 j310a Repair Carriage Driver Belt Replacement: 手順 8、 2の画像 2
    • Detach the wire from the printer by pulling the blue-sealed end from the white holder.

  9. HP Deskjet 3000 j310a Repair Carriage Driver Belt Replacement, Remove Large Hard Drive: 手順 9、 1の画像 1
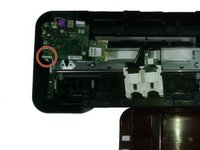
    • The hard drive is in the upper left hand corner of the printer. Locate, then unscrew, the three screws that are holding it in place. Take not of the size of the screws and where they were located.

  10. HP Deskjet 3000 j310a Repair Carriage Driver Belt Replacement, Detach the White Cords: 手順 10、 1の画像 1
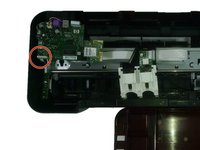
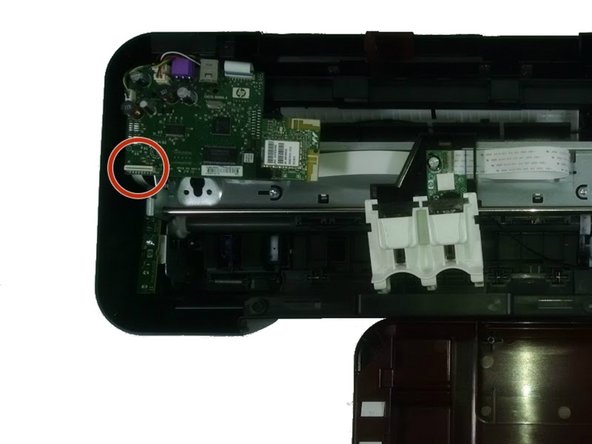
    • Pull the narrower cord out of its connection, holding the blue-sealed end.

  11. HP Deskjet 3000 j310a Repair Carriage Driver Belt Replacement: 手順 11、 1の画像 1
    • Move the hard drive forward and angle downwards so that the larger cord is easier to hold. Pull out of connection holding the cord from the blue-sealed end.

  12. HP Deskjet 3000 j310a Repair Carriage Driver Belt Replacement: 手順 12、 1の画像 1
    • The hard drive will remain loosely attached because of the wires. Do not disconnect these, but lift out of the printer.

  13. HP Deskjet 3000 j310a Repair Carriage Driver Belt Replacement, Disconnect the Carriage Driver Belt: 手順 13、 1の画像 1
    • Locate the belt, and the wheel it is around. The wheel will be on top of the metal piece on the far right side.

  14. HP Deskjet 3000 j310a Repair Carriage Driver Belt Replacement: 手順 14、 1の画像 1
    • Pull the belt tightly to this side, creating enough slack to lift the belt from the wheel.

  15. HP Deskjet 3000 j310a Repair Carriage Driver Belt Replacement: 手順 15、 1の画像 1
    • Push the ink cartridge to the center of the printer so that the wheel on the opposite side is visible. Then lift the belt from that wheel.

  16. HP Deskjet 3000 j310a Repair Carriage Driver Belt Replacement, Remove Narrow Hard Drive: 手順 16、 1の画像 1
    • Locate the narrow hard drive on the left side of the printer. Unscrew the screw holding it in place, then disconnect the cord.

  17. HP Deskjet 3000 j310a Repair Carriage Driver Belt Replacement: 手順 17、 1の画像 1
    • Remove the hard drive, keeping separate from printer.

  18. HP Deskjet 3000 j310a Repair Carriage Driver Belt Replacement, Unscrew Metal Structure: 手順 18、 1の画像 1
    • Unscrew the screws that are holding the metal structure in place. This includes the screw that is on the right side near the wheel the carriage driver belt was around. Be sure to note the size of the screws and where they go.

  19. HP Deskjet 3000 j310a Repair Carriage Driver Belt Replacement, Disconnect Springs: 手順 19、 1の画像 1
    • On the left side, between the wall of the printer and the metal piece, there will be a spring connecting the two. Use the tweezers to detach the spring and keep separate.

  20. HP Deskjet 3000 j310a Repair Carriage Driver Belt Replacement: 手順 20、 1の画像 1
    • On the right side of the printer there will also be a spring. Again, disconnect this spring using the tweezers.

  21. HP Deskjet 3000 j310a Repair Carriage Driver Belt Replacement, Remove Metal Structure: 手順 21、 1の画像 1
    • Now releasing the metal structure will be possible. On the left side of the structure, locate the wheel that the Carriage Driver Belt was around. Push this wheel through the larger opening it sits in.

  22. HP Deskjet 3000 j310a Repair Carriage Driver Belt Replacement: 手順 22、 1の画像 1
    • Lift the metal structure from the printer, which will include the ink cartridge holders.

  23. HP Deskjet 3000 j310a Repair Carriage Driver Belt Replacement, Remove Metal Bar: 手順 23、 1の画像 1
    • Locate the metal bar that will be running parallel to the metal structure that was just removed. Locate the washer at one end.

  24. HP Deskjet 3000 j310a Repair Carriage Driver Belt Replacement: 手順 24、 1の画像 1
    • Use the tweezers to pry off the washer, then slide the belt out. Lift the ink cartridge holder from the metal piece, separating the two.

  25. HP Deskjet 3000 j310a Repair Carriage Driver Belt Replacement, Detach Ink Cartridge Holder: 手順 25、 1の画像 1
    • Locate the white, ink cartridge holder. Find the three connections to the black part, this will be towards the base where the white paper is.

  26. HP Deskjet 3000 j310a Repair Carriage Driver Belt Replacement: 手順 26、 1の画像 1
    • Push the white connections out of where they are held in the black part. This will detach the cartridge holder.

  27. HP Deskjet 3000 j310a Repair Carriage Driver Belt Replacement, Detach Cartridge Holder: 手順 27、 1の画像 1
    • On the cartridge holder, locate the screws holding the green hard drive in place. Unscrew these screws.

  28. HP Deskjet 3000 j310a Repair Carriage Driver Belt Replacement: 手順 28、 1の画像 1
    • On the front portion, detach the white paper from the holder. There will be six tabs that can be pushed though the paper to do this.

  29. HP Deskjet 3000 j310a Repair Carriage Driver Belt Replacement: 手順 29、 1の画像 1
    • Thread the white paper through the whole so that the latch holding the cartridge belt is visible.

  30. HP Deskjet 3000 j310a Repair Carriage Driver Belt Replacement, Remove Cartridge Driver Belt Holder: 手順 30、 1の画像 1
    • Locating where the belt is held in place, there will be a metal cover protecting it. To remove this piece, use the tweezers to push the tabs holding it in place off.

    • This will release the belt. Discard the old belt and place the new one on.

終わりに

To reassemble your device, follow these instructions in reverse order.

作成者

2人の作成者と共同で作成されました。

tdambruoso

メンバー登録日: 10/20/14

491 ポイント

4のガイドは作成済み

チーム

UMass Dartmouth, Team 1-5, Duarte Fall 2014 UMass Dartmouth, Team 1-5, Duarte Fall 2014人のメンバー

UMASSD-DUARTE-F14S1G5

3 メンバー

14のガイドは作成済み

コメント 1 件

コメントを追加

統計データ:

過去 24時間: 0

過去 7 日: 0

過去 30 日: 6

今までの合計 1,309