メインコンテンツにスキップ

HP Deskjet 1000 J110a Power Button Replacement

必要な工具と部品

  1. HP Deskjet 1000 J110a Power Button Replacement, Cover Removal: 手順 1、 3の画像 1 HP Deskjet 1000 J110a Power Button Replacement, Cover Removal: 手順 1、 3の画像 2 HP Deskjet 1000 J110a Power Button Replacement, Cover Removal: 手順 1、 3の画像 3
    • Remove the two 13 mm screws located on the back of the printer using a screwdriver with the T10 torx bit (star-shaped).

  2. HP Deskjet 1000 J110a Power Button Replacement: 手順 2、 3の画像 1 HP Deskjet 1000 J110a Power Button Replacement: 手順 2、 3の画像 2 HP Deskjet 1000 J110a Power Button Replacement: 手順 2、 3の画像 3
    • In the front of the printer, open the tray where the paper comes out and remove the two 13 mm screws located under the top of the printer.

  3. HP Deskjet 1000 J110a Power Button Replacement: 手順 3、 1の画像 1
    • With the front of the printer facing you, lift and raise the left side of the panel (like opening a book in reverse) until it disconnects from the clip on the right side of the panel.

  4. HP Deskjet 1000 J110a Power Button Replacement, Power Button: 手順 4、 3の画像 1 HP Deskjet 1000 J110a Power Button Replacement, Power Button: 手順 4、 3の画像 2 HP Deskjet 1000 J110a Power Button Replacement, Power Button: 手順 4、 3の画像 3
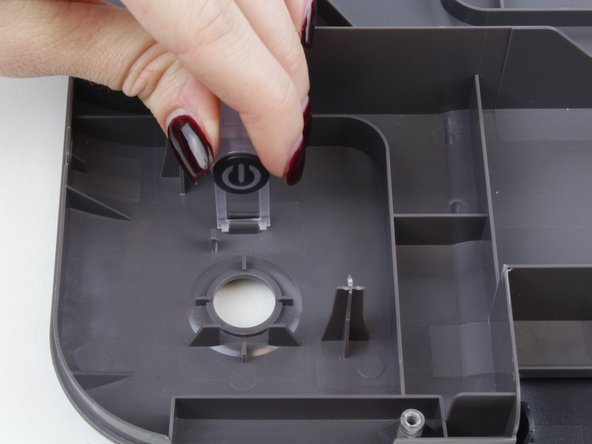
    • Carefully hold the small clip back to release the button arm.

    • Once the arm is unclipped, gently lift and pull the button until it disconnects at the hinge slot.

    • Replace the old power button with a new one.

終わりに

To reassemble your device, follow these instructions in reverse order.

作成者

2人の作成者と共同で作成されました。

Colin Tourjee

メンバー登録日: 01/29/18

632 ポイント

4のガイドは作成済み

チーム

USF Tampa, Team S5-G3, Passmore Spring 2018 USF Tampa, Team S5-G3, Passmore Spring 2018人のメンバー

USFT-PASSMORE-S18S5G3

4 メンバー

12のガイドは作成済み

0 件のコメント

コメントを追加

統計データ:

過去 24時間: 0

過去 7 日: 0

過去 30 日: 1

今までの合計 365