メインコンテンツにスキップ

HP Compaq Presario V5303NR Keyboard Replacement

必要な工具と部品

  1. HP Compaq Presario V5303NR Keyboard Replacement, Keyboard: 手順 1、 3の画像 1 HP Compaq Presario V5303NR Keyboard Replacement, Keyboard: 手順 1、 3の画像 2 HP Compaq Presario V5303NR Keyboard Replacement, Keyboard: 手順 1、 3の画像 3
    • Turn laptop bottom-side up.

    • Push the battery latch to the left position to unlock the battery.

    • Lift the battery out of its socket.

    • Failure to unplug the computer and remove the battery can result in electrical discharges on contact with the computer's components. This can damage the computer or even hurt the user.

  2. HP Compaq Presario V5303NR Keyboard Replacement: 手順 2、 2の画像 1 HP Compaq Presario V5303NR Keyboard Replacement: 手順 2、 2の画像 2
    • Remove the 5 mm and 4 mm screws shown, represented in red and orange, respectively, using a Phillips #0 Screwdriver.

    • Keep all different types of screw separate from one another; they are different sizes, and cannot fit into the other's spaces upon reassembly.

  3. HP Compaq Presario V5303NR Keyboard Replacement: 手順 3、 1の画像 1
    • Turn the laptop right-side up.

    • Carefully open the laptop as far as it can.

  4. HP Compaq Presario V5303NR Keyboard Replacement: 手順 4、 2の画像 1 HP Compaq Presario V5303NR Keyboard Replacement: 手順 4、 2の画像 2
    • Insert the metal spudger in the space between the switch cover and the F1, F5, F11 and Insert keys.

    • Use the spudger to carefully pry the cover plate away from the keyboard and laptop at the aforementioned locations. Remove the cover plate.

    • If it is possible to do so, it is advised to use a plastic spudger instead of a metal one. The metal spudger can damage the computer's internal components, but the plastic one may be too thick to fit in the gap.

  5. HP Compaq Presario V5303NR Keyboard Replacement: 手順 5、 3の画像 1 HP Compaq Presario V5303NR Keyboard Replacement: 手順 5、 3の画像 2 HP Compaq Presario V5303NR Keyboard Replacement: 手順 5、 3の画像 3
    • Use a Phillips #0 Screwdriver to remove the 4 4mm screws shown in the second picture. As per before, keep them separated from the screws removed in step 2.

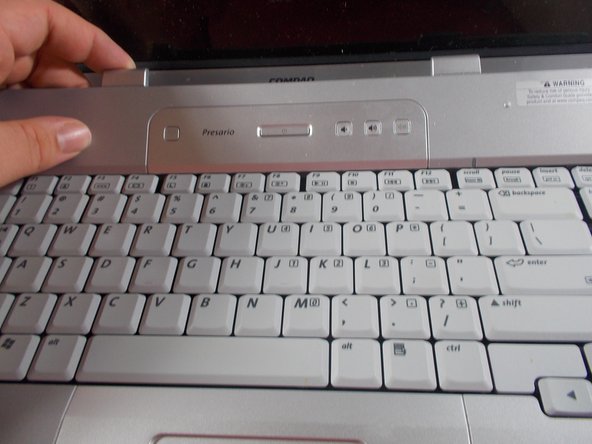
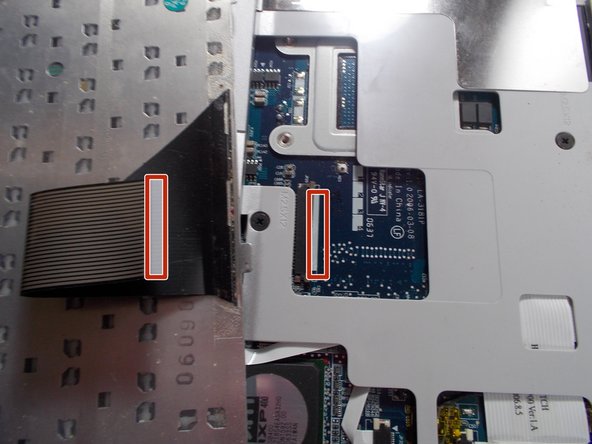
    • Carefully lift up the section of the keyboard closest to the screen. Slowly rotate it downwards until it is resting on top of the touch pad.

  6. HP Compaq Presario V5303NR Keyboard Replacement: 手順 6、 2の画像 1 HP Compaq Presario V5303NR Keyboard Replacement: 手順 6、 2の画像 2
    • Using your fingers, carefully pull the ribbon cable connecting the keyboard and laptop toward the hinge. Continue until connecting cable is unplugged.

    • Remove keyboard from laptop.

終わりに

To reassemble your device, follow these instructions in reverse order.

ある他の人がこのガイドを完成しました。

作成者

1人の作成者と共同作成されました。

Chris Obesky

メンバー登録日: 03/16/18

617 ポイント

3のガイドは作成済み

チーム

UMass Dartmouth, Team S4-G3, Covino Spring 2018 UMass Dartmouth, Team S4-G3, Covino Spring 2018人のメンバー

UMASSD-COVINO-S18S4G3

3 メンバー

5のガイドは作成済み

0 件のコメント

コメントを追加

統計データ:

過去 24時間: 0

過去 7 日: 0

過去 30 日: 0

今までの合計 157