メインコンテンツにスキップ

HP Chromebook x360 14-da0011dx I/O Board Replacement

必要な工具と部品

  1. HP Chromebook x360 14-da0011dx I/O Board Replacement, Lower Case: 手順 1、 1の画像 1
    • Flip the device over with the hinge facing away from you.

    • On the back of the device, remove the two rubber strips on the top and the bottom of the device using a spudger.

  2. HP Chromebook x360 14-da0011dx I/O Board Replacement: 手順 2、 2の画像 1 HP Chromebook x360 14-da0011dx I/O Board Replacement: 手順 2、 2の画像 2
    • Remove the seven 8.0 mm screws located under the two rubber pads and the screws along the back of the device using a Phillips #1 screwdriver.

  3. HP Chromebook x360 14-da0011dx I/O Board Replacement: 手順 3、 3の画像 1 HP Chromebook x360 14-da0011dx I/O Board Replacement: 手順 3、 3の画像 2 HP Chromebook x360 14-da0011dx I/O Board Replacement: 手順 3、 3の画像 3
    • Use a spudger to gently pry the edges of the back cover off the device. Slowly work all the way around the device until the panel comes loose.

  4. HP Chromebook x360 14-da0011dx I/O Board Replacement, Battery: 手順 4、 2の画像 1 HP Chromebook x360 14-da0011dx I/O Board Replacement, Battery: 手順 4、 2の画像 2
    • Remove the cable attached to the battery.

  5. HP Chromebook x360 14-da0011dx I/O Board Replacement: 手順 5、 2の画像 1 HP Chromebook x360 14-da0011dx I/O Board Replacement: 手順 5、 2の画像 2
    • Remove the five 3.0 mm screws holding the battery in place using the Phillips #1 screwdriver.

  6. HP Chromebook x360 14-da0011dx I/O Board Replacement: 手順 6、 1の画像 1
    • Lift the battery out of the chassis.

  7. HP Chromebook x360 14-da0011dx I/O Board Replacement, I/O Board: 手順 7、 3の画像 1 HP Chromebook x360 14-da0011dx I/O Board Replacement, I/O Board: 手順 7、 3の画像 2 HP Chromebook x360 14-da0011dx I/O Board Replacement, I/O Board: 手順 7、 3の画像 3
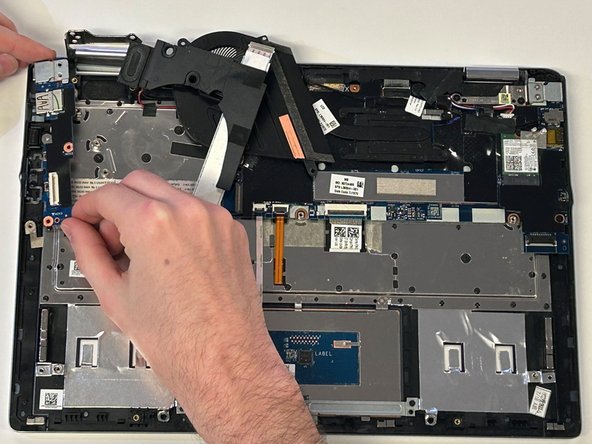
    • Locate the I/O Board on the top left of the laptop.

    • Remove the four 3.0 mm screws with the Phillips #1 screwdriver.

  8. HP Chromebook x360 14-da0011dx I/O Board Replacement: 手順 8、 2の画像 1 HP Chromebook x360 14-da0011dx I/O Board Replacement: 手順 8、 2の画像 2
    • Flip up the ZIF connector locking flaps connected to the I/O board.

    • Remove the ribbon cables.

  9. HP Chromebook x360 14-da0011dx I/O Board Replacement: 手順 9、 1の画像 1
    • Lift the I/O board up and out.

終わりに

To reassemble your device, follow these instructions in reverse order.

作成者

2人の作成者と共同で作成されました。

Jared Tallent

メンバー登録日: 02/14/23

196 ポイント

2のガイドは作成済み

チーム

Western Carolina University, Team 1-2, Virtue Spring 2023 Western Carolina University, Team 1-2, Virtue Spring 2023人のメンバー

WCU-VIRTUE-S23S1G2

4 メンバー

6のガイドは作成済み

0 件のコメント

コメントを追加

統計データ:

過去 24時間: 1

過去 7 日: 1

過去 30 日: 13

今までの合計 178