メインコンテンツにスキップ

HP Chromebook 14-x010wm Touchpad Replacement

必要な工具と部品

  1. HP Chromebook 14-x010wm Touchpad Replacement, Touchpad: 手順 1、 3の画像 1 HP Chromebook 14-x010wm Touchpad Replacement, Touchpad: 手順 1、 3の画像 2 HP Chromebook 14-x010wm Touchpad Replacement, Touchpad: 手順 1、 3の画像 3
    • Before starting the fix, make sure the computer is turned off, the power is disconnected, and all external devices are disconnected as well.

    • Close the laptop lid.

    • Turn the laptop upside-down.

  2. HP Chromebook 14-x010wm Touchpad Replacement: 手順 2、 2の画像 1 HP Chromebook 14-x010wm Touchpad Replacement: 手順 2、 2の画像 2
    • Remove the two larger rubber screw covers.

    • Remove the two smaller rubber screw covers.

    • Remove the middle rubber screw cover.

  3. HP Chromebook 14-x010wm Touchpad Replacement: 手順 3、 1の画像 1
    • Using a Phillips #1 screwdriver, remove the thirteen 5.7 mm screws located on the back of the device as shown.

  4. HP Chromebook 14-x010wm Touchpad Replacement: 手順 4、 3の画像 1 HP Chromebook 14-x010wm Touchpad Replacement: 手順 4、 3の画像 2 HP Chromebook 14-x010wm Touchpad Replacement: 手順 4、 3の画像 3
    • Turn the computer right side up with the front facing towards you.

  5. HP Chromebook 14-x010wm Touchpad Replacement: 手順 5、 2の画像 1 HP Chromebook 14-x010wm Touchpad Replacement: 手順 5、 2の画像 2
    • Carefully open the computer’s lid as far as it will go until the back edge of the keyboard cover separates from the base.

    • Opening the lid too far may cause damage to some of the internal pieces of the laptop.

  6. HP Chromebook 14-x010wm Touchpad Replacement: 手順 6、 3の画像 1 HP Chromebook 14-x010wm Touchpad Replacement: 手順 6、 3の画像 2 HP Chromebook 14-x010wm Touchpad Replacement: 手順 6、 3の画像 3
    • Using a plastic opening tool, pry open along the front edge and the sides of the keyboard cover to separate it from the computer’s base.

    • Carefully lift the keyboard cover from the computer’s base.

    • Lifting the keyboard cover too much may damage the internal cables of the laptop.

  7. HP Chromebook 14-x010wm Touchpad Replacement: 手順 7、 2の画像 1 HP Chromebook 14-x010wm Touchpad Replacement: 手順 7、 2の画像 2
    • Using a spudger, remove the battery cable by slowly pulling the plastic connector towards you.

  8. HP Chromebook 14-x010wm Touchpad Replacement: 手順 8、 3の画像 1 HP Chromebook 14-x010wm Touchpad Replacement: 手順 8、 3の画像 2 HP Chromebook 14-x010wm Touchpad Replacement: 手順 8、 3の画像 3
    • Using a spudger, lift the black plastic flap of the zero insertion force (ZIF) connector that holds the keyboard cable in place.

    • Disconnect the keyboard cable by pulling it from the system board.

  9. HP Chromebook 14-x010wm Touchpad Replacement: 手順 9、 3の画像 1 HP Chromebook 14-x010wm Touchpad Replacement: 手順 9、 3の画像 2 HP Chromebook 14-x010wm Touchpad Replacement: 手順 9、 3の画像 3
    • Using a spudger, lift the black plastic flap of the zero insertion force (ZIF) connector that holds the TouchPad cable in place.

    • Disconnect the TouchPad cable by pulling it from the system board.

    • At this point, the keyboard cover should be completely detached from the computer’s base.

  10. HP Chromebook 14-x010wm Touchpad Replacement: 手順 10、 3の画像 1 HP Chromebook 14-x010wm Touchpad Replacement: 手順 10、 3の画像 2 HP Chromebook 14-x010wm Touchpad Replacement: 手順 10、 3の画像 3
    • Remove the keyboard cover by sliding it towards you.

    • Turn the keyboard cover upside down.

  11. HP Chromebook 14-x010wm Touchpad Replacement: 手順 11、 3の画像 1 HP Chromebook 14-x010wm Touchpad Replacement: 手順 11、 3の画像 2 HP Chromebook 14-x010wm Touchpad Replacement: 手順 11、 3の画像 3
    • Using a spudger, lift the black plastic flap to release the TouchPad cable from the connector.

    • Disconnect the TouchPad cable by pulling it away from the connector.

  12. HP Chromebook 14-x010wm Touchpad Replacement: 手順 12、 2の画像 1 HP Chromebook 14-x010wm Touchpad Replacement: 手順 12、 2の画像 2
    • Using a Phillips #000 screwdriver, remove the two 2.4 mm screws that secure the TouchPad to the keyboard cover.

  13. HP Chromebook 14-x010wm Touchpad Replacement: 手順 13、 2の画像 1 HP Chromebook 14-x010wm Touchpad Replacement: 手順 13、 2の画像 2
    • Lift the keyboard cover. The TouchPad will be detached.

終わりに

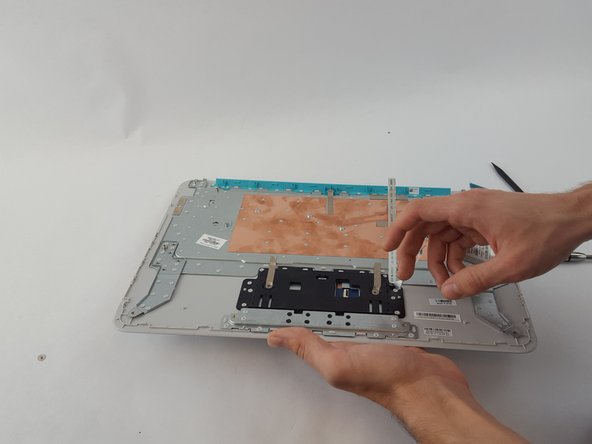
To reassemble your device, follow these instructions in reverse order.

ある他の人がこのガイドを完成しました。

作成者

6人の作成者と共同で作成されました。

Thiago Leal Figueira

メンバー登録日: 02/15/17

113 ポイント

1ガイドが承認済み

チーム

USF Tampa, Team 15-2, Remmell Spring 2017 USF Tampa, Team 15-2, Remmell Spring 2017人のメンバー

USFT-REMMELL-S17S15G2

4 メンバー

1のガイドは作成済み

0 件のコメント

コメントを追加

統計データ:

過去 24時間: 0

過去 7 日: 0

過去 30 日: 2

今までの合計 1,982