メインコンテンツにスキップ

HP Chromebook 14-q010nr Motherboard Replacement

必要な工具と部品

  1. HP Chromebook 14-q010nr Motherboard Replacement, Battery: 手順 1、 1の画像 1
    • Begin by turning the Chromebook onto its back.

    • Remove the 15 screws with a Phillips #0 screwdriver.

    • Four screws will be located underneath the device's rubber foot pads.

  2. HP Chromebook 14-q010nr Motherboard Replacement: 手順 2、 3の画像 1 HP Chromebook 14-q010nr Motherboard Replacement: 手順 2、 3の画像 2 HP Chromebook 14-q010nr Motherboard Replacement: 手順 2、 3の画像 3
    • Remove the keyboard from the base plate with an opening pick to pry it open from both sides of the keyboard.

    • Beginning from the corners closest to the computer screen may result in easier disconnection.

  3. HP Chromebook 14-q010nr Motherboard Replacement: 手順 3、 1の画像 1
    • Use a Phillips #0 screwdriver to remove the seven screws securing the battery.

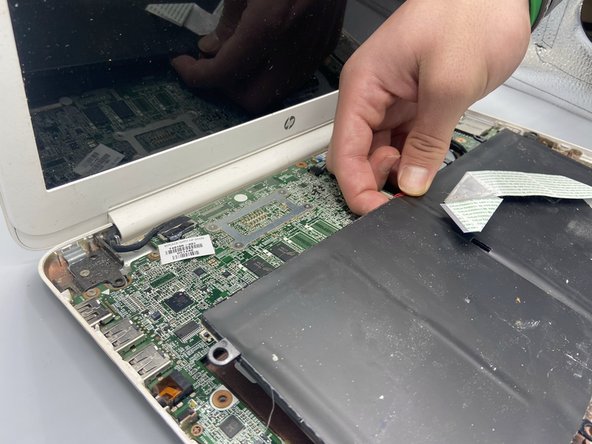
  4. HP Chromebook 14-q010nr Motherboard Replacement: 手順 4、 1の画像 1
    • Gently disconnect the battery's motherboard connection by pinching the white attachment and pulling the plug directly out of the port.

  5. HP Chromebook 14-q010nr Motherboard Replacement: 手順 5、 2の画像 1 HP Chromebook 14-q010nr Motherboard Replacement: 手順 5、 2の画像 2
    • Before removing the battery, gently lift the white ribbon cable taped to the battery.

    • Gently pull up from the back of the battery to remove it.

  6. HP Chromebook 14-q010nr Motherboard Replacement, Motherboard: 手順 6、 1の画像 1
    • Remove the eleven motherboard screws with a 2mm Phillips screwdriver.

  7. HP Chromebook 14-q010nr Motherboard Replacement: 手順 7、 1の画像 1
    • Remove the white ribbon cable from the motherboard by lifting the black ZIF connector.

  8. HP Chromebook 14-q010nr Motherboard Replacement: 手順 8、 1の画像 1
    • Remove the five screws attached to the connector plate.

    • Remove the monitor connector by lifting it gently upward.

  9. HP Chromebook 14-q010nr Motherboard Replacement: 手順 9、 1の画像 1
    • Remove the antenna cables on the right side of the motherboard.

    • Carefully lift the motherboard up to remove it. Use a spudger for ease.

終わりに

To reassemble your device, follow these instructions in reverse order.

作成者

5人の作成者と共同で作成されました。

Julian Knight

メンバー登録日: 09/22/22

159 ポイント

1ガイドが承認済み

チーム

University of North Texas, Team 3-4, Saru Jimmy Fall 2022 University of North Texas, Team 3-4, Saru Jimmy Fall 2022人のメンバー

UNT-SARU JIMMY-F22S3G4

5 メンバー

6のガイドは作成済み

0 件のコメント

コメントを追加

統計データ:

過去 24時間: 0

過去 7 日: 0

過去 30 日: 4

今までの合計 152