メインコンテンツにスキップ

HP Chromebook 14-ca061dx Speaker Replacement

必要な工具と部品

  1. HP Chromebook 14-ca061dx Speaker Replacement, Keyboard: 手順 1、 3の画像 1 HP Chromebook 14-ca061dx Speaker Replacement, Keyboard: 手順 1、 3の画像 2 HP Chromebook 14-ca061dx Speaker Replacement, Keyboard: 手順 1、 3の画像 3
    • Flip the Chromebook to the underside with the hinge at the top.

    • Remove the seven, small rubber stoppers using angled tweezers.

  2. HP Chromebook 14-ca061dx Speaker Replacement: 手順 2、 3の画像 1 HP Chromebook 14-ca061dx Speaker Replacement: 手順 2、 3の画像 2 HP Chromebook 14-ca061dx Speaker Replacement: 手順 2、 3の画像 3
    • Remove the two bigger rubber stoppers using a metal spudger.

  3. HP Chromebook 14-ca061dx Speaker Replacement: 手順 3、 2の画像 1 HP Chromebook 14-ca061dx Speaker Replacement: 手順 3、 2の画像 2
    • Remove the seven 6mm Phillips #00 screws found underneath the stoppers.

  4. HP Chromebook 14-ca061dx Speaker Replacement: 手順 4、 2の画像 1 HP Chromebook 14-ca061dx Speaker Replacement: 手順 4、 2の画像 2
    • Remove the two 9mm Phillips #1 screws.

  5. HP Chromebook 14-ca061dx Speaker Replacement: 手順 5、 3の画像 1 HP Chromebook 14-ca061dx Speaker Replacement: 手順 5、 3の画像 2 HP Chromebook 14-ca061dx Speaker Replacement: 手順 5、 3の画像 3
    • Flip the Chromebook over and open the cover.

    • Insert the iFixit opening tool into the edge of the keyboard, near the mouse pad.

    • By lifting the tool at an angle, work the tool around the entire perimeter of the keyboard.

    • You will hear a popping noise when you disconnect the keyboard.

  6. HP Chromebook 14-ca061dx Speaker Replacement: 手順 6、 3の画像 1 HP Chromebook 14-ca061dx Speaker Replacement: 手順 6、 3の画像 2 HP Chromebook 14-ca061dx Speaker Replacement: 手順 6、 3の画像 3
    • Lift the keyboard from the mouse pad.

    • Lift the keyboard carefully, because there are cables connecting the keyboard to the base and they may break.

    • Use your finger or the spudger tool to flip up the black locking flap.

    • Grab the black cable and pull away from the motherboard.

    • Carefully lift the black piece up, because it is fragile and can break easily.

  7. HP Chromebook 14-ca061dx Speaker Replacement: 手順 7、 3の画像 1 HP Chromebook 14-ca061dx Speaker Replacement: 手順 7、 3の画像 2 HP Chromebook 14-ca061dx Speaker Replacement: 手順 7、 3の画像 3
    • Flip up the white locking flap with your finger or spudger tool.

    • Remove the white cable from the motherboard.

    • Carefully lift the white piece up, because it is fragile and can break easily.

  8. HP Chromebook 14-ca061dx Speaker Replacement: 手順 8、 1の画像 1
    • Lift the rest of the keyboard up from the base of the Chromebook.

  9. HP Chromebook 14-ca061dx Speaker Replacement, Speaker: 手順 9、 2の画像 1 HP Chromebook 14-ca061dx Speaker Replacement, Speaker: 手順 9、 2の画像 2
    • Remove the JIS #000 screws that connect the speaker piece to the base of the laptop.

    • When all screws are unfastened, be cautious when moving the speaker piece. There are a couple cables attached from the speaker to the motherboard. We will detach these wires in the next steps.

  10. HP Chromebook 14-ca061dx Speaker Replacement: 手順 10、 2の画像 1 HP Chromebook 14-ca061dx Speaker Replacement: 手順 10、 2の画像 2
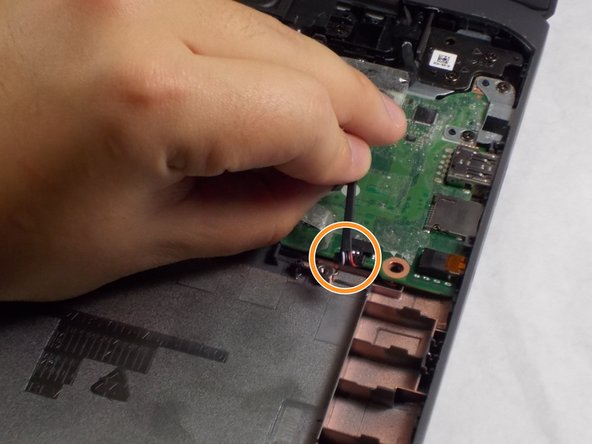
    • You will see the speaker cables (red, black, and white cables) connected to the motherboard.

    • Carefully, peel off the tape covering the red, white, and black cables connecting the speaker to the motherboard.

    • Remove cables from the motherboard.

    • Pull cables from the tip, and not from the wires. These wires could easily snap and break.

  11. HP Chromebook 14-ca061dx Speaker Replacement: 手順 11、 1の画像 1
    • Remove speaker piece from the base of the laptop.

終わりに

To reassemble your device, follow these instructions in reverse order.

作成者

3人の作成者と共同で作成されました。

Jean Arevalo

メンバー登録日: 10/31/19

778 ポイント

6のガイドは作成済み

チーム

UMass Dartmouth, Team S2-G5, Barthe Fall 2019 UMass Dartmouth, Team S2-G5, Barthe Fall 2019人のメンバー

UMASSD-BARTHE-F19S2G5

3 メンバー

6のガイドは作成済み

0 件のコメント

コメントを追加

統計データ:

過去 24時間: 0

過去 7 日: 0

過去 30 日: 2

今までの合計 193