メインコンテンツにスキップ

HP Chromebook 14-Q070NR Solid State Drive Replacement

必要な工具と部品

  1. HP Chromebook 14-Q070NR Solid State Drive Replacement, Keyboard: 手順 1、 1の画像 1
    • At this point, the white caps that hide the top-most screws marked with red circles have been removed.

    • Using the Phillips #1 screwdriver, remove the (10) ten screws from the bottom of the device.

    • After removing the white caps covering the screws, use the Phillips #1 screwdriver to remove the (3) three screws indicated with red circles.

  2. HP Chromebook 14-Q070NR Solid State Drive Replacement: 手順 2、 3の画像 1 HP Chromebook 14-Q070NR Solid State Drive Replacement: 手順 2、 3の画像 2 HP Chromebook 14-Q070NR Solid State Drive Replacement: 手順 2、 3の画像 3
    • Open the laptop and place it upright. Remove the keyboard from the device using a plastic spudger or opening tool.

    • Carefully remove as there are ribbons attached to the keyboard that is connected to the components inside.

    • Gently lift the keyboard just enough to expose the ribbons.

  3. HP Chromebook 14-Q070NR Solid State Drive Replacement: 手順 3、 3の画像 1 HP Chromebook 14-Q070NR Solid State Drive Replacement: 手順 3、 3の画像 2 HP Chromebook 14-Q070NR Solid State Drive Replacement: 手順 3、 3の画像 3
    • Hold the keyboard up to remove the ribbons from the circuit board.

    • To remove each individual ribbon, grab the blue portion of each ribbon and pull it towards your direction until it is fully detached.

  4. HP Chromebook 14-Q070NR Solid State Drive Replacement: 手順 4、 3の画像 1 HP Chromebook 14-Q070NR Solid State Drive Replacement: 手順 4、 3の画像 2 HP Chromebook 14-Q070NR Solid State Drive Replacement: 手順 4、 3の画像 3
    • Once the ribbons are detached, remove the keyboard from the device.

  5. HP Chromebook 14-Q070NR Solid State Drive Replacement, Battery: 手順 5、 1の画像 1
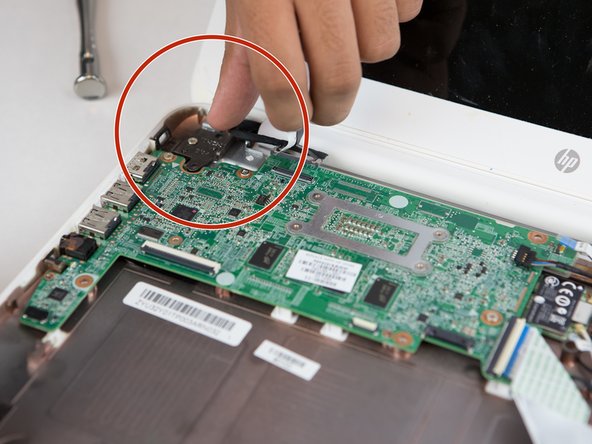
    • Using the Phillips #0 screwdriver, remove the (2) two screws at the bottom of the device.

    • Once removed, separate the screws from previous ones. They are different!

  6. HP Chromebook 14-Q070NR Solid State Drive Replacement: 手順 6、 2の画像 1 HP Chromebook 14-Q070NR Solid State Drive Replacement: 手順 6、 2の画像 2
    • Remove the taped flat wire from the top of the battery.

    • Carefully pull away the connector from the top of the battery to the motherboard.

  7. HP Chromebook 14-Q070NR Solid State Drive Replacement: 手順 7、 1の画像 1
    • Carefully lift the battery and remove it from the device.

  8. HP Chromebook 14-Q070NR Solid State Drive Replacement, Motherboard: 手順 8、 3の画像 1 HP Chromebook 14-Q070NR Solid State Drive Replacement, Motherboard: 手順 8、 3の画像 2 HP Chromebook 14-Q070NR Solid State Drive Replacement, Motherboard: 手順 8、 3の画像 3
    • Carefully remove the (3) three plastic strips attached to the motherboard.

  9. HP Chromebook 14-Q070NR Solid State Drive Replacement: 手順 9、 2の画像 1 HP Chromebook 14-Q070NR Solid State Drive Replacement: 手順 9、 2の画像 2
    • Use the Phillips #1 screwdriver to remove the (5) five screws.

  10. HP Chromebook 14-Q070NR Solid State Drive Replacement: 手順 10、 2の画像 1 HP Chromebook 14-Q070NR Solid State Drive Replacement: 手順 10、 2の画像 2
    • Use the blue plastic opening tool to disconnect the connectors. Remove the fan from the motherboard.

  11. HP Chromebook 14-Q070NR Solid State Drive Replacement: 手順 11、 2の画像 1 HP Chromebook 14-Q070NR Solid State Drive Replacement: 手順 11、 2の画像 2
    • Gently lift while using the plastic opening tool to unhinge the motherboard from the computer in an upward pattern.

    • Be very careful not to detach the motherboard to quickly or forcefully since you could damage or break it.

  12. HP Chromebook 14-Q070NR Solid State Drive Replacement, Solid State Drive: 手順 12、 1の画像 1
    • Locate the retaining screw for the SSD.

  13. HP Chromebook 14-Q070NR Solid State Drive Replacement: 手順 13、 1の画像 1
    • Remove screw using a phillips head screw driver.

  14. HP Chromebook 14-Q070NR Solid State Drive Replacement: 手順 14、 1の画像 1
    • Gently pull outwards to remove the solid state drive.

    • Do not apply any upward force to avoid breaking any other components.

終わりに

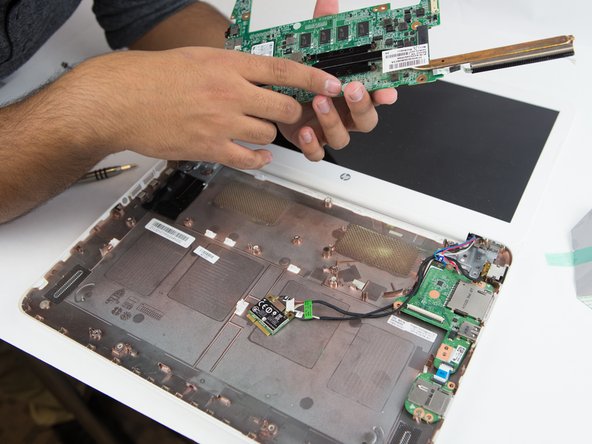
To reassemble your device, follow these instructions in reverse order.

3 の人々がこのガイドを完成させました。

作成者

3人の作成者と共同で作成されました。

Kevin Wong

メンバー登録日: 10/02/17

158 ポイント

1ガイドが承認済み

チーム

USF Tampa, Team S9-G5, Remmell Fall 2017 USF Tampa, Team S9-G5, Remmell Fall 2017人のメンバー

USFT-REMMELL-F17S9G5

5 メンバー

5のガイドは作成済み

0 件のコメント

コメントを追加

統計データ:

過去 24時間: 0

過去 7 日: 4

過去 30 日: 22

今までの合計 657