メインコンテンツにスキップ

HP 7 1800 Front Facing Camera Replacement

必要な工具と部品

  1. HP 7 1800 Front Facing Camera Replacement, Remove the back panel: 手順 1、 2の画像 1 HP 7 1800 Front Facing Camera Replacement, Remove the back panel: 手順 1、 2の画像 2
    • Carefully insert a Spudger into one of the corners of the tablet.

    • Slide the Spudger along the edge popping the tabs out along the way.

    • Be careful not to break the tabs.

  2. HP 7 1800 Front Facing Camera Replacement, Remove the battery: 手順 2、 3の画像 1 HP 7 1800 Front Facing Camera Replacement, Remove the battery: 手順 2、 3の画像 2 HP 7 1800 Front Facing Camera Replacement, Remove the battery: 手順 2、 3の画像 3
    • Slide the Spudger under the battery to lift it off the adhesive.

    • Gently pull the cable connection from the motherboard using tweezers.

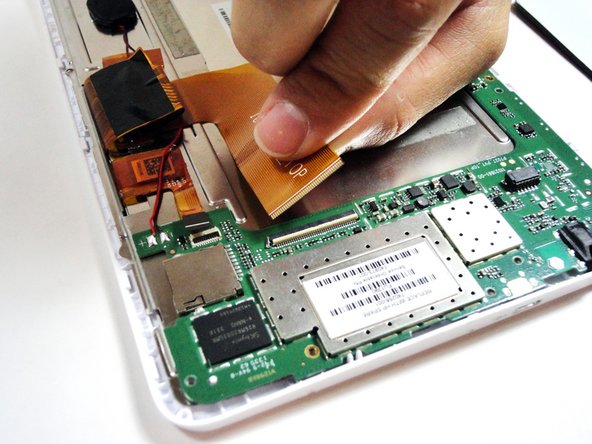
  3. HP 7 1800 Front Facing Camera Replacement, Remove the large ribbon cable: 手順 3、 2の画像 1 HP 7 1800 Front Facing Camera Replacement, Remove the large ribbon cable: 手順 3、 2の画像 2
    • Remove the larger ribbon cable by gently flipping the beige latch and pulling it out with tweezers.

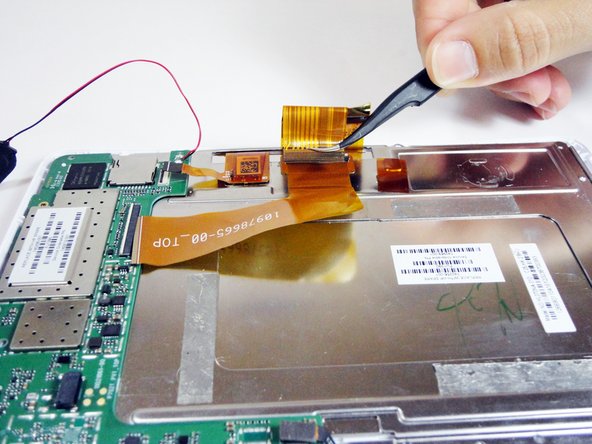
  4. HP 7 1800 Front Facing Camera Replacement, Remove the smaller ribbon cable: 手順 4、 2の画像 1 HP 7 1800 Front Facing Camera Replacement, Remove the smaller ribbon cable: 手順 4、 2の画像 2
    • Remove the smaller ribbon cable by gently flipping the black latch and pulling it out with tweezers.

  5. HP 7 1800 Front Facing Camera Replacement, Unscrew the 7 silver screws from the logic board: 手順 5、 1の画像 1
    • Remove the following 7 screws:

    • Six 4.17mm Phillips #00 around the motherboard.

    • One 2.67mm Phillips #00 next to the front facing camera.

    • The 2.67mm screw circled in yellow is notably shorter than the other 6 screws circled in red.

  6. HP 7 1800 Front Facing Camera Replacement, Unplug the front facing camera from the logic board: 手順 6、 1の画像 1
    • Gently pry the front facing camera plug up and off of the motherboard.

  7. HP 7 1800 Front Facing Camera Replacement, Remove the logic board: 手順 7、 1の画像 1
    • Carefully lift the motherboard directly up.

  8. HP 7 1800 Front Facing Camera Replacement, Remove the ribbon cable attached to the metal plate: 手順 8、 2の画像 1 HP 7 1800 Front Facing Camera Replacement, Remove the ribbon cable attached to the metal plate: 手順 8、 2の画像 2
    • On the metal plate inside of the device, there is a ribbon cable in a loop. Flip the white tab and pull the cable out.

  9. HP 7 1800 Front Facing Camera Replacement, Unscrew the 7 black screws on the metal plate: 手順 9、 1の画像 1
    • Unscrew the following black screws:

    • Seven 2.82mm Phillips #00 around the metal casing.

  10. HP 7 1800 Front Facing Camera Replacement, Remove the metal plate: 手順 10、 1の画像 1
    • Gently lift the metal plate directly up.

  11. HP 7 1800 Front Facing Camera Replacement, Remove the camera: 手順 11、 1の画像 1
    • Gently remove the camera from the device with tweezers by lifting it up and out of its square hole.

終わりに

To reassemble your device, follow these instructions in reverse order.

作成者

5人の作成者と共同で作成されました。

Trevor Shumate

メンバー登録日: 01/21/15

225 ポイント

2のガイドは作成済み

チーム

USF Tampa, Team 4-1, Brown Winter 2015 USF Tampa, Team 4-1, Brown Winter 2015人のメンバー

USFT-BROWN-W15S4G1

4 メンバー

14のガイドは作成済み

0 件のコメント

コメントを追加

統計データ:

過去 24時間: 0

過去 7 日: 0

過去 30 日: 0

今までの合計 229