メインコンテンツにスキップ

HP 225 G7 Memory (RAM) Replacement / Upgrade

必要な工具と部品

  1. HP 225 G7 Memory (RAM) Replacement / Upgrade, Remove Rubber Legs: 手順 1、 2の画像 1 HP 225 G7 Memory (RAM) Replacement / Upgrade, Remove Rubber Legs: 手順 1、 2の画像 2
    • Use the spatula to remove the long rubber leg from the bottom of the laptop.

    • Repeat the same for the second rubber on the bottom.

  2. HP 225 G7 Memory (RAM) Replacement / Upgrade, Unscrew Bottom Cover: 手順 2、 2の画像 1 HP 225 G7 Memory (RAM) Replacement / Upgrade, Unscrew Bottom Cover: 手順 2、 2の画像 2
    • Unscrew all the screws on the bottom of the laptop including the ones that were under the rubber legs.

  3. HP 225 G7 Memory (RAM) Replacement / Upgrade, Remove CD/DVD Drive: 手順 3、 3の画像 1 HP 225 G7 Memory (RAM) Replacement / Upgrade, Remove CD/DVD Drive: 手順 3、 3の画像 2 HP 225 G7 Memory (RAM) Replacement / Upgrade, Remove CD/DVD Drive: 手順 3、 3の画像 3
    • Push the CD drive outwards.

    • Then pull the CD drive out.

  4. HP 225 G7 Memory (RAM) Replacement / Upgrade, Open The Laptop: 手順 4、 1の画像 1
    • Then, open the laptop like you normally would if you were working.

  5. HP 225 G7 Memory (RAM) Replacement / Upgrade, Insert A Pick: 手順 5、 1の画像 1
    • Carefully insert a guitar pick under the touchpad, and leave it on there.

  6. HP 225 G7 Memory (RAM) Replacement / Upgrade, Insert All Picks Around The Laptop: 手順 6、 1の画像 1
    • Then, slowly insert all 6 picks all around the laptop.

    • It is best to leave the picks on while you are inserting other picks so you prevent accidentally pushing on the laptop and putting the cover back on.

  7. HP 225 G7 Memory (RAM) Replacement / Upgrade, Pry Open The Cover: 手順 7、 1の画像 1
    • Remove the picks.

    • Pull the cover and the main body of the laptop apart.

    • If you find a lot of resistance while trying to pull the bottom cover off, close the screen because the hinges often "hold" the bottom cover. If you still find a lot resistance, check for any forgotten screws. Don't apply too much force if you are having difficulty.

  8. HP 225 G7 Memory (RAM) Replacement / Upgrade, How The Laptop Should Look Like: 手順 8、 1の画像 1
    • After prying the bottom cover off, the bottom of the laptop should look like that.

  9. HP 225 G7 Memory (RAM) Replacement / Upgrade, Locate The RAM: 手順 9、 1の画像 1
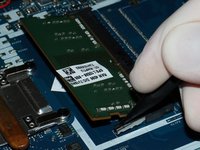
    • Locate the RAM dim on the upper right corner of the laptop. ("upper" when the screen hinge is facing upwards)

  10. HP 225 G7 Memory (RAM) Replacement / Upgrade, "Unlock" The RAM Dim: 手順 10、 2の画像 1 HP 225 G7 Memory (RAM) Replacement / Upgrade, "Unlock" The RAM Dim: 手順 10、 2の画像 2
    • Use a spudger to push both of the clips outwards. Then the dim should pop upwards.

  11. HP 225 G7 Memory (RAM) Replacement / Upgrade, Remove The RAM Dim: 手順 11、 1の画像 1
    • Then, you can simply pull the RAM dim outwards, and remove it.

    • Insert the new dim in the slot.

    • Then, push downwards on the dim to lock it in place.

終わりに

To reassemble your device, follow these instructions in reverse order.

作成者

1人の作成者と共同作成されました。

Stratos Thivaios

メンバー登録日: 02/27/23

1,227 ポイント

5のガイドは作成済み

0 件のコメント

コメントを追加

統計データ:

過去 24時間: 1

過去 7 日: 6

過去 30 日: 33

今までの合計 346