メインコンテンツにスキップ

HP 17-bs049dx Back Panel Replacement

必要な工具と部品

  1. HP 17-bs049dx Back Panel Replacement, Battery: 手順 1、 1の画像 1
    • To remove the battery, simply push the tabs towards each other.

    • The battery will come out with force, be sure to keep anything fragile away from the laptop during this process.

  2. HP 17-bs049dx Back Panel Replacement, Back Panel: 手順 2、 1の画像 1
    • Remove the four screws (13.7mm) with a Phillips #0 screwdriver.

    • Be sure to lift all four rubber tabs to access screws (7.51mm) underneath.

    • Rubber tabs will require force to access screws.

  3. HP 17-bs049dx Back Panel Replacement: 手順 3、 1の画像 1
    • Use the Philips 0 screwdriver to unscrew the screws (7.51mm) that were underneath the battery.

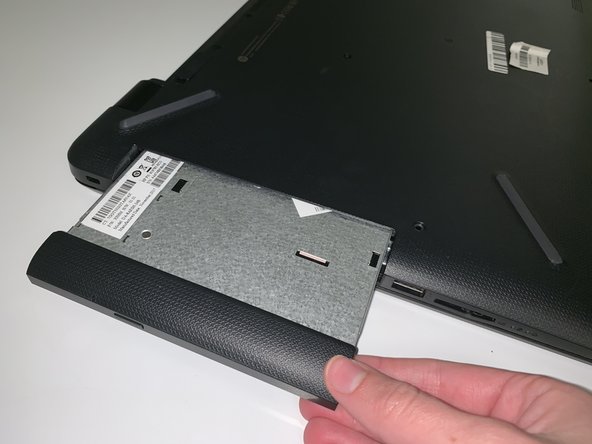
  4. HP 17-bs049dx Back Panel Replacement: 手順 4、 2の画像 1 HP 17-bs049dx Back Panel Replacement: 手順 4、 2の画像 2
    • Pull outwards on the disk reader to remove from main frame.

    • This removal will require force.

    • All screws must be removed before removing disk reader.

  5. HP 17-bs049dx Back Panel Replacement: 手順 5、 1の画像 1
    • Lift back panel to access internal components.

    • You will need to use force to pry it open.

終わりに

To reassemble your device, follow these instructions in reverse order.

5 の人々がこのガイドを完成させました。

作成者

4人の作成者と共同で作成されました。

Megan Paige

メンバー登録日: 09/26/18

457 ポイント

2のガイドは作成済み

チーム

University of North Texas, Team S7-G2, Thompson Fall 2018 University of North Texas, Team S7-G2, Thompson Fall 2018人のメンバー

UNT-THOMPSON-F18S7G2

6 メンバー

7のガイドは作成済み

0 件のコメント

コメントを追加

統計データ:

過去 24時間: 0

過去 7 日: 1

過去 30 日: 9

今までの合計 1,488