メインコンテンツにスキップ

HP 15-AF131DX Wireless Network Card Replacement

必要な工具と部品

  1. HP 15-AF131DX Wireless Network Card Replacement, Battery: 手順 1、 2の画像 1 HP 15-AF131DX Wireless Network Card Replacement, Battery: 手順 1、 2の画像 2
    • Turn the computer upside down on a level surface.

    • Slide the battery lock to unlock the battery.

    • Slide the battery release latch. The latch will click when the battery is released.

    • Lift the battery from the middle to remove it from the computer.

    • The latch will click again when a battery is reinstalled. Switch the battery lock back to locked after reinstalling a battery to keep it secure.

  2. HP 15-AF131DX Wireless Network Card Replacement, Optical Drive: 手順 2、 2の画像 1 HP 15-AF131DX Wireless Network Card Replacement, Optical Drive: 手順 2、 2の画像 2
    • Using a small Phillips screwdriver, remove the Phillips screw in the middle of the bottom of the computer.

    • Pull the CD/DVD drive outward to slide it away from the computer.

  3. HP 15-AF131DX Wireless Network Card Replacement: 手順 3、 1の画像 1
    • To open the drive use an unbent paperclip and press it into the small hole until the disc tray releases.

    • Pull the disc tray out from the front until it is as far as it will go out of the optical drive.

  4. HP 15-AF131DX Wireless Network Card Replacement: 手順 4、 3の画像 1 HP 15-AF131DX Wireless Network Card Replacement: 手順 4、 3の画像 2 HP 15-AF131DX Wireless Network Card Replacement: 手順 4、 3の画像 3
    • To remove excess parts from the optical drive press down on the plastic tab behind the tray's bezel.

    • Gently pry the bezel from the face of the optical drive.

    • With a smaller phillips head screwdriver, remove the screws on the back of the drive, then remove the small metal bracket.

  5. HP 15-AF131DX Wireless Network Card Replacement, Wireless Network Card: 手順 5、 2の画像 1 HP 15-AF131DX Wireless Network Card Replacement, Wireless Network Card: 手順 5、 2の画像 2
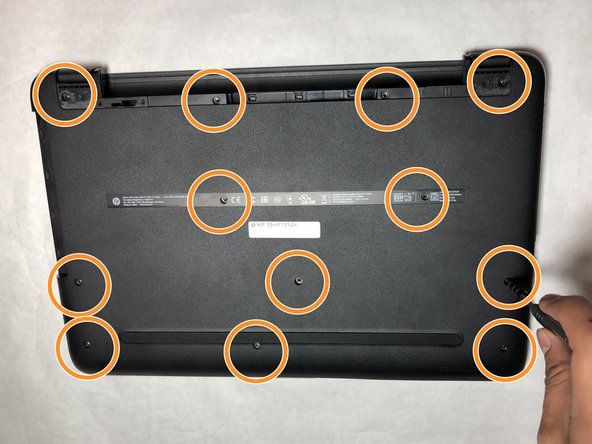
    • The first step of this process is to peel off two rubber feet from the bottom of the laptop.

    • Then remove twelve 8.8 mm screws using the Phillips #0 Screwdriver.

  6. HP 15-AF131DX Wireless Network Card Replacement: 手順 6、 3の画像 1 HP 15-AF131DX Wireless Network Card Replacement: 手順 6、 3の画像 2 HP 15-AF131DX Wireless Network Card Replacement: 手順 6、 3の画像 3
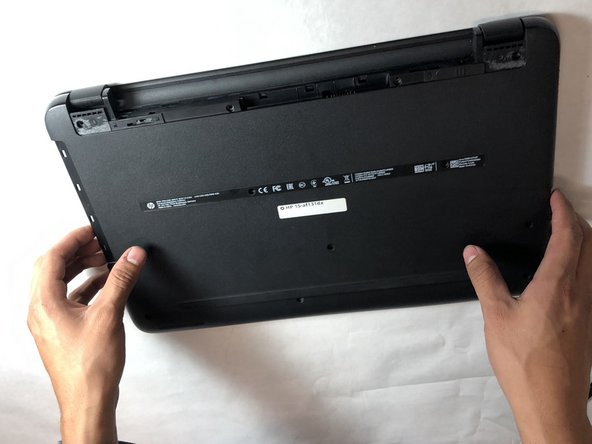
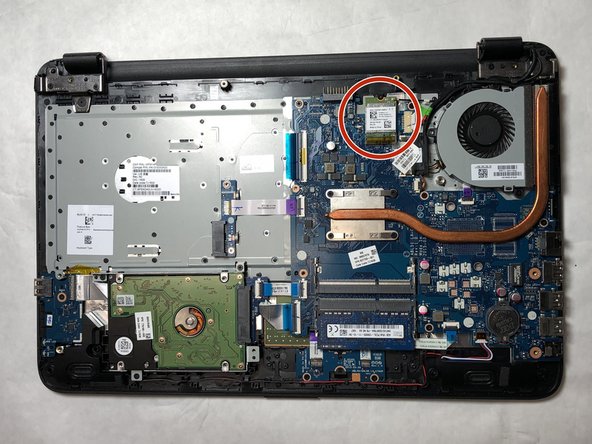
    • Remove the bottom of the plastic case using a blue plastic opening tool.

    • The HP Wireless Network Card is found in Picture 3, circled in red.

  7. HP 15-AF131DX Wireless Network Card Replacement: 手順 7、 3の画像 1 HP 15-AF131DX Wireless Network Card Replacement: 手順 7、 3の画像 2 HP 15-AF131DX Wireless Network Card Replacement: 手順 7、 3の画像 3
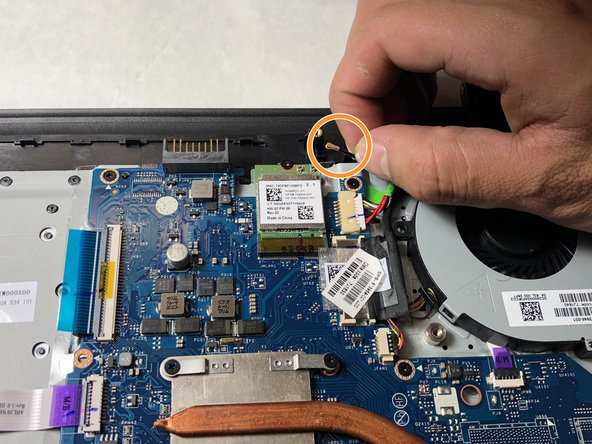
    • Remove one 3.3 mm screw using Phillips #0 screwdriver.

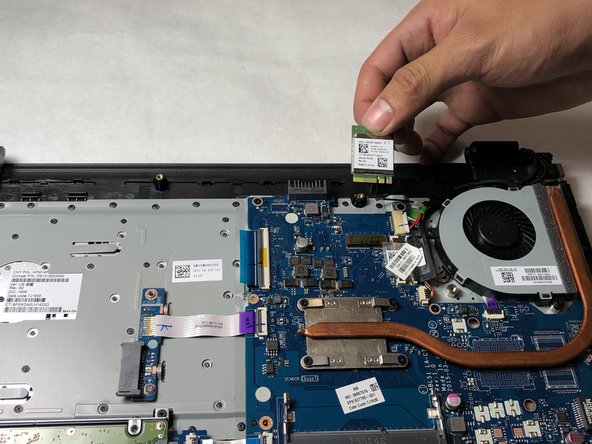
    • Pop off the connection wire by pulling the wire upwards off the stud on the HP Wireless Network Card.

    • Pull out the HP Wireless Network Card.

終わりに

To reassemble your device, follow these instructions in reverse order.

ある他の人がこのガイドを完成しました。

作成者

1人の作成者と共同作成されました。

Clayton Mettert

メンバー登録日: 11/01/18

121 ポイント

1ガイドが承認済み

チーム

IUPUI, Team S2-G2, Harley Fall 2018 IUPUI, Team S2-G2, Harley Fall 2018人のメンバー

IUPUI-HARLEY-F18S2G2

3 メンバー

2のガイドは作成済み

0 件のコメント

コメントを追加

統計データ:

過去 24時間: 0

過去 7 日: 0

過去 30 日: 1

今までの合計 599