メインコンテンツにスキップ

HP 14-fq1025nr SSD Replacement

必要な工具と部品

  1. HP 14-fq1025nr SSD Replacement, Back Cover: 手順 1、 1の画像 1
    • Flip the laptop upside down so the bottom cover is facing up.

  2. HP 14-fq1025nr SSD Replacement: 手順 2、 1の画像 1
    この手順で使用する道具:
    Tweezers
    $4.99
    購入する
    • Use a pair of tweezers to grab and pull the feet off of the cover.

  3. HP 14-fq1025nr SSD Replacement: 手順 3、 1の画像 1
    • Remove the two 4 mm screws using a Phillips #0 screwdriver.

    • Remove the six remaining 6 mm screws located around the edges and underneath the feet using a Phillips #0 screwdriver.

  4. HP 14-fq1025nr SSD Replacement: 手順 4、 1の画像 1
    • Flip the laptop right-side up and slide an iFixit opening tool and/or Jimmy inside of the bottom cover seam to pry it open.

  5. HP 14-fq1025nr SSD Replacement: 手順 5、 1の画像 1
    • Remove the bottom cover.

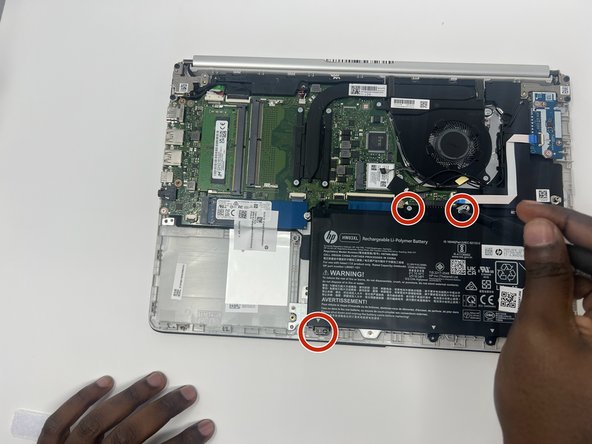
  6. HP 14-fq1025nr SSD Replacement, Battery: 手順 6、 2の画像 1 HP 14-fq1025nr SSD Replacement, Battery: 手順 6、 2の画像 2
    • Remove the four gray 3 mm screws holding down the battery using a Phillips #0 screwdriver.

  7. HP 14-fq1025nr SSD Replacement: 手順 7、 1の画像 1
    • Remove the battery.

  8. HP 14-fq1025nr SSD Replacement, SSD: 手順 8、 1の画像 1
    • Remove the single 6 mm screw holding down the SSD using a Phillips #0 screwdriver.

  9. HP 14-fq1025nr SSD Replacement: 手順 9、 1の画像 1
    • Slide the SSD out of the slot.

終わりに

To reassemble your device, follow these instructions in reverse order.

Kristen Gismondi

メンバー登録日: 11/12/14

82,275 ポイント

200のガイドは作成済み

チーム

iFixit iFixit人のメンバー

Staff

136 メンバー

17,292のガイドは作成済み

0 件のコメント

コメントを追加

統計データ:

過去 24時間: 0

過去 7 日: 4

過去 30 日: 15

今までの合計 379