メインコンテンツにスキップ

HP 14-dq0055dx Charging port Replacement

必要な工具と部品

  1. HP 14-dq0055dx Charging port Replacement, Charging port: 手順 1、 3の画像 1 HP 14-dq0055dx Charging port Replacement, Charging port: 手順 1、 3の画像 2 HP 14-dq0055dx Charging port Replacement, Charging port: 手順 1、 3の画像 3
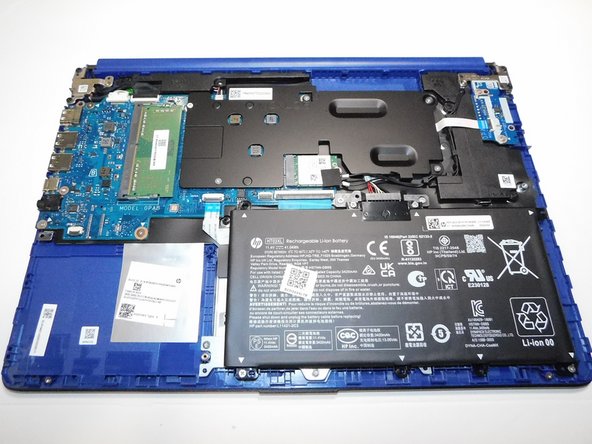
    • Turn laptop upside down exposing the screws.

    • Gently remove the rubber grips to reveal the remaining screws.

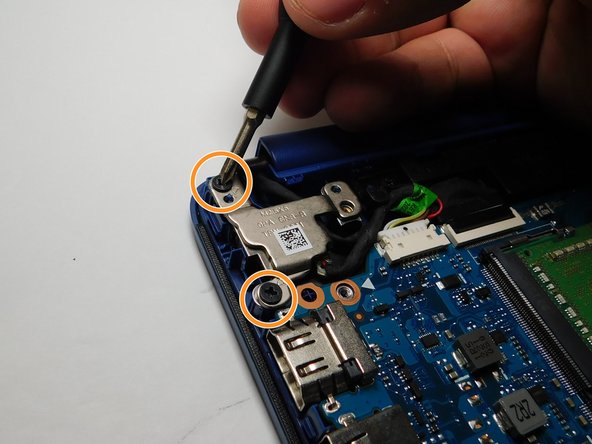
    • Using a Phillips head #1 screwdriver, remove all eight 2.5 mm screws.

  2. HP 14-dq0055dx Charging port Replacement: 手順 2、 1の画像 1
    • Turn the laptop back over and open the screen.

    • Insert an opening tool into the seam between the keyboard and the bottom panel.

    • Run the opening tool along the seam to separate the back panel from the keyboard.

    • You may hear clicking as clips release the bottom panel from the keyboard.

  3. HP 14-dq0055dx Charging port Replacement: 手順 3、 2の画像 1 HP 14-dq0055dx Charging port Replacement: 手順 3、 2の画像 2
    • After the bottom panel has been separated from the laptop, close the laptop.

    • Flip the laptop back over.

    • Carefully place hands on either side of the laptop's back panel.

    • Lift up to remove the panel.

  4. HP 14-dq0055dx Charging port Replacement: 手順 4、 3の画像 1 HP 14-dq0055dx Charging port Replacement: 手順 4、 3の画像 2 HP 14-dq0055dx Charging port Replacement: 手順 4、 3の画像 3
    • Using a Phillips #1 screwdriver remove the four 2.5 mm screws securing the battery in place.

    • To remove the battery, lift the battery slightly toward the bottom.

    • Pull the battery toward you.

    • Do not pull the battery straight up after the removal of the screws.

  5. HP 14-dq0055dx Charging port Replacement: 手順 5、 3の画像 1 HP 14-dq0055dx Charging port Replacement: 手順 5、 3の画像 2 HP 14-dq0055dx Charging port Replacement: 手順 5、 3の画像 3
    • Locate the charging port bracket at the top left of the laptop.

    • Remove the two 2.5 mm screws that secure the charging port bracket.

    • Flip the bracket up and away from you.

  6. HP 14-dq0055dx Charging port Replacement: 手順 6、 1の画像 1
    • Locate the wires connected to the charging port.

    • Carefully pull the white tab out of its socket.

終わりに

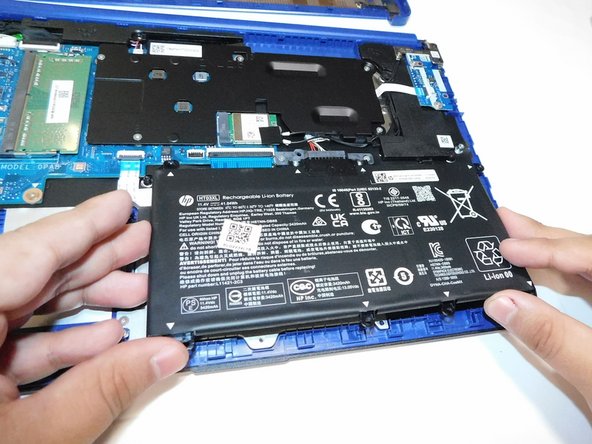
To reassemble your device, follow these instructions in reverse order.

作成者

3人の作成者と共同で作成されました。

Guy Medina

メンバー登録日: 02/01/24

461 ポイント

3のガイドは作成済み

チーム

Gateway, Team 8-88, Gonzalez Spring 2024 Gateway, Team 8-88, Gonzalez Spring 2024人のメンバー

GCC-GONZALEZ-S24S8G88

4 メンバー

4のガイドは作成済み

0 件のコメント

コメントを追加

統計データ:

過去 24時間: 1

過去 7 日: 5

過去 30 日: 24

今までの合計 88