はじめに
The Google Pixel Buds A-Series are essentially a cheaper version of the Google Pixel Buds 2. One notable difference is that the sound chamber cover is no longer a robust metal grid, but a glued-on very thin and extremely fine mesh.
This mesh can become damaged or clogged with oils and other substances, which can greatly reduce the maximum volume of the buds or create noise and inconsistent audio output due to becoming loose.
Note that Google advises you to not get liquids (other than small amounts of water) on the ear buds, but in my case, ear drops containing alcohol got on the ear buds and caused damage to the mesh.
If the mesh is clogged by oils, there's no way to clean it, as oils won't dissolve in water and using other solvents like alcohol will dissolve the glue holding the mesh. So the only practical approach is to completely remove the mesh.
This guide shows how to remove this protective mesh and restore sound quality. This isn't a complete repair, as there's no practical way to replace the original mesh, but at least this makes the otherwise pretty much unrepairable device usable again.
必要な工具と部品
-
-
Open the Google Pixel Buds Charging / Carrier case to locate the Buds.
-
Remove the rubber tips.
-
-
-
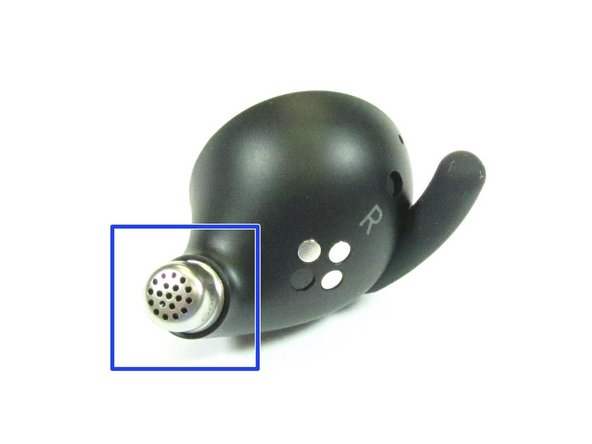
Components of the ear buds:
-
Microphone
-
Vent
-
Charging contacts
-
IR sensor for detecting when the bud is in the ear
-
Touch sensor
-
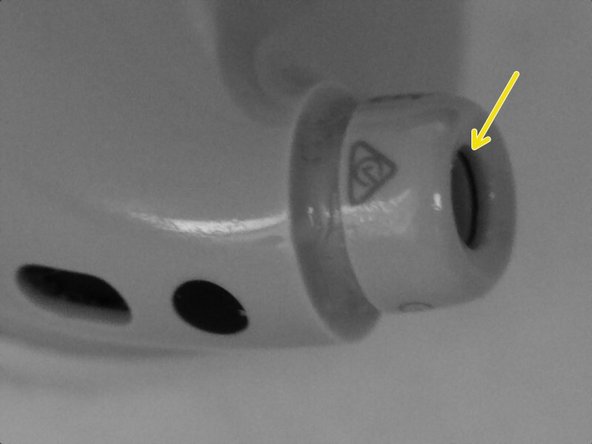
Sound chamber opening with mesh, our point of interest
-
-
-
-
Carefully use fine tweezers to grab the loose mesh and pull it outside.
-
The mesh is likely still stuck to one side of the ridge (assuming you pushed carefully), so it should be easy to retrieve. If not, locate it in the sound chamber and carefully remove it.
-
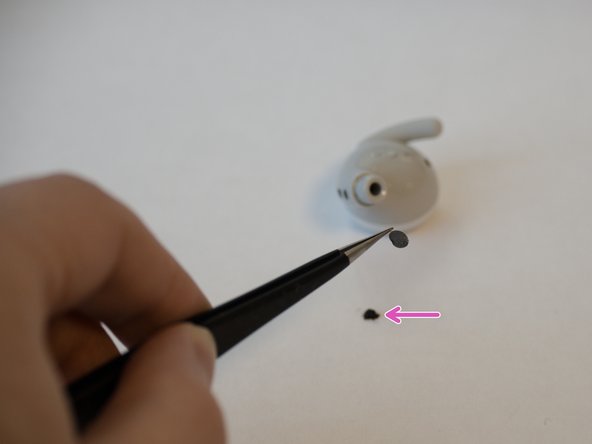
Most of the glue should have come out together with the mesh. If necessary, carefully remove any remaining residue with the tweezers or a soft brush.
-
Here's some of the sticky black glue.
-


Reassemble the rubber tips and test the ear buds. Hopefully, the problem should be gone.
The removed mesh could cause increased ingress of dirt and liquids in the future. You could try to create a new cover made out of fine brass mesh for example, but the removed cover mesh also allows you to carefully clean the inside, so this isn't a big deal.
4 の人々がこのガイドを完成させました。
8 件のコメント
I was having problems with the loudness of the pixel buds 2a. I thought my hearing was deteriorating. I had to have them set to around 80-90% volume on my pixel 6. I was thinking of getting new headphones anyways so I'm okay ruining the buds. I took the mesh out, now they sound like the same volume but the volume phone is set to only 20%. Feels like I have new head phones. Thanks for the guide!
Happy to help. Also had a low volume problem at first and it took some trial and error to figure out what was wrong.
Wow! If weren't completely inappropriate to hug a complete stranger...! I didn't think I could do this and it did require glasses, focused light, a magnifying glass, and a ton of patience, but it worked!! I did shred the screen a bit but I eventually got it all out. God bless you.
I was playing around with mine and it looks like that cup that has the CE mark and forms the groove that holds in the soft ear piece comes off at the seam that the mesh sits inside of. If you were to take it off you might be able to reinstall the mesh if you so desired.
That's good. I suspected that the "cups" could be removed but in my buds these were quite stuck. If you have them removed, could you explain how? Just brute force?