はじめに
この修理ガイドはiFixitのテックライティングスタッフによって執筆されたもので、Googleによって承認されたものではありません。iFixitの修理ガイドのクオリティーについては、 こちらを参照してしてください。
Google Pixel 4a 5Gのスクリーンを外したり、交換するための修理ガイドです。
必要な工具と部品
-
-
デバイスの側面にある2つのシーム(継ぎ目)にご注意ください。
-
スクリーン側のシーム: このシームはデバイス全体とスクリーンを乖離するものです。この部分をこじ開けてください。
-
フレーム側のシーム: これはバックカバーがプラスチックと合わさる箇所です。ネジで固定されています。このシームをこじ開けないでください。
-
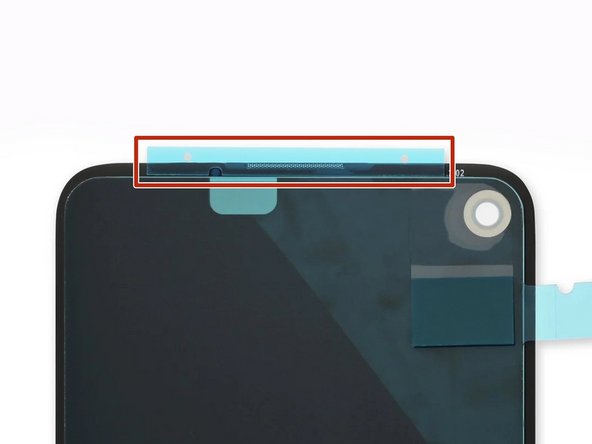
作業を始める前に、スクリーンの次のエリアにご注目ください。
-
スクリーンのフレックスケーブル: 表記された以上深くまで、開口ピックを押し込まないでください。このケーブルを破損するリスクがあります。
-
周囲の接着剤: ピックを斜めに挿入しない状態で、この細い接着剤エリアを越えて、こじ開けないでください。OLEDパネルを破損してしまいます。
-
-
-
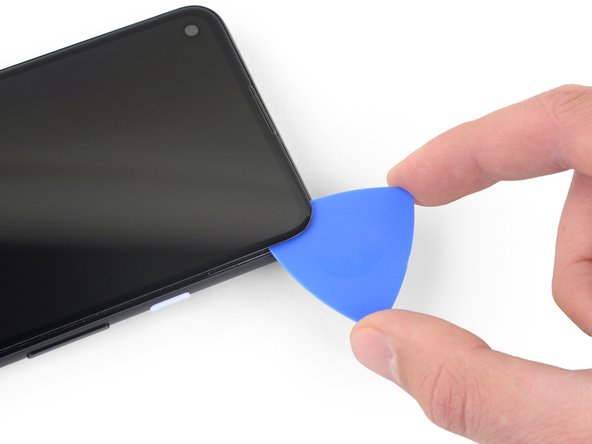
吸盤カップをスクリーンの右端に近い位置に装着します。
-
吸盤カップを一定の強い力で引き上げます。
-
開口ピックの先端を、スクリーンのシームから1mm以上差し込まないでください。
For a very cracked screen, I placed clear packing tape on top of the screen to use the suction cup at all. Also had to suction cup and pry/pick at multiple sides of the screen. Small fragments of broken glass won't pry up, so had to use tweezers to pull at glass fragments to release them from the adhesive underneath.
-
-
-
隙間にピックの先端を1mm差し込んだら、鋭利な角度で上向きに開口ピックを、てこのようにして持ち手を上向きにします。
-
鋭利な角度で、ピックの先端をゆっくりと6mm程度隙間に差し込みます。ピックはOLEDパネルの下側にスライドします。
If only the battery needs to be replaced, be sure to pay attention to the angle at which the pick is moved. Even the slightest deviation and the display is crap. I followed the instructions, but obviously I got to the display somewhere. Unfortunately the display now remains black and I have a flashing green bar at the top. So be careful.
-
-
-
ピックをスクリーンの右端に沿ってスライドして、接着剤を切開します。
-
接着剤の再装着を防ぐため、デバイス右上コーナーに、開口ピックを差し込んだまま、次の作業に移ります。
-
-
-
-
2枚目の開口ピックを、デバイス右端に沿ってピックを隙間ができている箇所に差し込みます。OLEDパネルを破損しないようにご注意ください。
-
開口ピックをデバイス下部周辺にスライドして、接着剤を切開します。
-
接着剤の再装着を防ぐために、デバイス下部端に開口ピックを残します。
The corners seems particularly tricky with the adhesive. Make sure to reapply heat in the corners. I cracked my screen while detaching the corners.
-
-
-
開口ピックをディスプレイの左下コーナー周辺とデバイス下部をスライドして、接着剤を切開します。
-
スクリーンのフレックスケーブルとデジタイザ付近の接着剤を切開していることを念頭に置いてください。
-
-
-
ピンセットもしくは爪先を使って、スクリーンコネクタを覆っている黒いテープカバーを慎重に剥がします。
-
-
There are four adhesives provided in the current kit provided by ifixit. They have a blue and clear backing with a thin black strip, as shown on here. The adhesives instructions provided in this general guide are not very clear and I messed up my first one, which made the other three useless leading me to just buy a b-7000 adhesive instead. However, for anyone wanting to correctly use the ifixit adhesives, first line up the black strip on the edge of your phone where the screen will rest and peel off the first clear portion. Then peel off the blue portion and you will be left with a thin black adhesive strip. Do this for all four pieces in the configuration shown on the page linked above and then place your screen on, press down gently, then turn the phone screen down and place some books on to provide stronger contact between the adhesive and the new screen. Good luck!
thanks a lot!
Zurdits -


オリジナルのパーツと交換用パーツをよく見比べてください。交換用パーツに付いていない残りのコンポーネントや接着シールなどは、インストールする前に新パーツに移植する必要があります。
このデバイスを再組み立てするには、インストラクションを逆の順番に従って作業を進めてください。
e-wasteを処理する場合は、認可済みリサイクルセンターR2を通じて廃棄してください。
修理が上手く進みませんか?ベーシックなトラブルシューティングのページを参照するか、このモデルのアンサーコミュニティに尋ねてみましょう。
オリジナルのパーツと交換用パーツをよく見比べてください。交換用パーツに付いていない残りのコンポーネントや接着シールなどは、インストールする前に新パーツに移植する必要があります。
このデバイスを再組み立てするには、インストラクションを逆の順番に従って作業を進めてください。
e-wasteを処理する場合は、認可済みリサイクルセンターR2を通じて廃棄してください。
修理が上手く進みませんか?ベーシックなトラブルシューティングのページを参照するか、このモデルのアンサーコミュニティに尋ねてみましょう。
52 の人々がこのガイドを完成させました。
以下の翻訳者の皆さんにお礼を申し上げます:
100%

これらの翻訳者の方々は世界を修理する私たちのサポートをしてくれています。 あなたも貢献してみませんか?
翻訳を始める ›

28 件のコメント
Where is the best place to purchase a replacement screen?
I was just wondering the same thing and it seems everywhere is sold out, only place I can find it is on eBay…
This was an excellent tutorial. One thing I would add here that caught me in reassembly: the proximity sensor is built into the inner lip on the top of the screen about 3mm to the right of the speaker grill (if you shine a bright light in that location, you will see a little blue dot where this is locate through the screen). If you are putting new adhesive on make sure not to block this proximity sensor with the adhesive.
Great tutorial. I just used the new original google pixel parts and this guide worked great! Only thing i wish was that there was a bit more clarity on how to apply the adhesives
Same! I needed to order another set of adhesive because at first time I ruined. Specifically that part where speaker goes. We need to attach it on screen. and all other on Phone case itself.
Also noticed that after some time, screen bends and we see gaps. I need to press time to time so it stick again. Not sure why this is so.
Took me some time to realize the adhesives should be applied to the screen, not the body -- the shape of the earphone side didn't line up on the body.
To Justas' comment, I also noticed that the adhesives tutorial says to hold firmly for 20-30 seconds. (Tip: turn phone over onto flat surface and press on the back for more even pressure than trying to do that from the front.)
I've seen other tutorials that require long holds and 24 hour set time for this type of adhesive. I have also used a silicone pipe sealer tape that adheres to itself, not the pipe, and after a month (when I did the real repair) I could not unwrap the adhesive, and it adhered well to the uneven pipe surface anyway. So I think these types of silicone based adhesives have a certain flow rate to them, and they require pressure and time for them to adhere properly. This is different from regular old tape and other more antiquated adhesives.
Kiki -
This guide is let down by next to no steps on applying the adhesive. Expected better, you give everything and then go missing on the last steps!?
Very sad to see what appears to be 2/3rds of a guide on how to replace a screen
al in all 8/10 guide- the process was pretty simple and along with a few youtube videos to clarify a few points, I found the repair to be pretty smooth. The only thing I would have liked to see was instyructions on the double sided tape provided with the kit but I understand how varied these might be depending on the vendor. THANK YOU IFIXIT! You've allowed me a few more years with a device that is otherwise perfect and have prevented unecessary waste and purchase of a new device. I will definitely recommend and use your service again
Update: The adhesive strips do not cut it and the screen keeps lifting. Also the multitouch does not work on the screen- still unsure if this is a hardware or software issue. Anyone getting the full kit from ifixit would do well to also get some B-7000 to re-glue the screen as the provided adhesive strips are not enough. I would recommend supplying a small tube of this stuff instead of these custom adhesive strips.
Great guide and really helped me to install the genuine replacement part I bought from iFixit!
My recommendation would be to line the holes on the adhesive strips up with screws and indents on the device.
Also when you're reconnecting the screen flex cable, you need to use some force - don't be too scared like I was for a while :)
Got my replacement screen and tools today. Getting the screen off was the easy part since it was already broken. Getting it attached was a bit of a struggle but the trick is to connect the ribbon cable then insert the plastic part. Make sure to reboot when you do.
Jesse Earl - 返信
This guide told me the tidbits I needed to know to do this successfully. I purchased the replacement screen and tool kit for this (mostly for the "iOpener" heat tool) and it worked like a champ. I did have one small issue with the pre-cut adhesive that came with the screen: the piece for the top of the screen was "mirrored" so I had to do a bit of fiddling to cut it into a couple smaller pieces and apply it that way to avoid blocking the proximity sensor. But if you're doing a repair like this odds are this isn't going to be a big deal for you if yours comes this way too.
I noticed this too, until I suddenly realized that it works perfectly if applied to the screen and not the body of the phone -- then it is aligned perfectly. The adhesive was quite confusing as the blue template was meaningless.
Kiki -
This guide was written for removing an intact screen. If your screen is shattered there are extra steps to take. A piece of packing tape on the screen will help the suction cup work over cracks as well as help to contain the many tiny glass fragments. If it's the right side that has the most cracks then start on the left side. If your screen was badly shattered you will have to spend some time removing all the tiny pieces that remain around the edge of the phone. Avoid getting the shards into the body of the phone. I temporarily covered the larger openings with small pieces of packing tape. The packing tape is also useful for collecting all the tiny shards from the surface of your work area.
Even if your screen is in one piece, you'll still need to remove the glue remnants from the rim of the phone so that the new screen has a perfectly flat surface to be installed onto. A bit of isopropyl alcohol will aid in loosening the glue and preparing a clean surface for the new adhesive. A piece of tape over the rear cameras housing will help protect it from being scratched by any glass fragments on your work surface as you move the phone around cleaning up the old glue.
If your screen shattered from a drop, there will inevitably be some damage to the plastic frame. Ensure that any deformation is addressed, perhaps with a razor blade, so the new screen can sit flat.
Chris -
I didn't understand how the pre-cut adhesive strips worked until I used them. It's only the black goo that is the adhesive. Once you peel off the clear side, place the strip and then peel off the coloured side, all that's left is the black goo, hopefully exactly where it needs to be. Mine could be carefully re-aligned with tweezers as necessary before setting the screen into place.
I bought a tube of glue as a previous commenter recommended, so I can repair again if the screen lifts but I have faith in the adhesive supplied on the pre-cut strips, since the surfaces were clean and flat.
Chris -
Thank you for the explanations on the adhesive strips, they helped more than the actual guide above. One thing to mention would be order of operations: it's easier to clean the sides and apply the adhesive strips BEFORE plugging in the screen and having to fiddle around with the ribbon cable. The adhesive has cutouts and you see how they match with the screws in the board. Top adhesive is already applied to the screen so you have a backup piece in case something goes wrong. Also, when lowering the screen in place over the adhesive make sure to align the bottom first otherwise you'll get an uneven set with the top part having like a small gap and forcing you to lift it again and screwing the adhesive bands. Overall I would recommend getting the B-7000 or T-7000 glue that another poster mentioned, seems like a more easy installation. The corners are also better covered with liquid glue, since the strips don't actually go there.
Adrian -
Used this guide to replace a shattered screen using the iFixit kit. Heating the adhesive thoroughly was important, especially when having to reinsert the picks because the pick wasn't able to slide smoothly across the cracks. As others have said, the instructions about where to apply the adhesives wasn't super clear, but the success of the assembly doesn't seem to have been too dependent on precise placement as long as they were in the rails.
Brian Erly - 返信
I agree with the adhesives comments! However, it seems like the two long strips are interchangeable.
My new screen actually came with the top adhesive already in place. The blue protective plastic peeled away with the bubble wrap when I opened it. Apart from the strip coming off sooner than I wanted, it was actually very helpful to have the adhesive in place already. Especially since the bottom adhesive strip had rubbed against the package for the alcohol swab during shipping and was stuck firmly to the paper packaging. I was able to salvage some of it and then apply the extra strip from the top onto the bottom.
The ribbon cable was really tricky to re-attach. That took longer than any other step.
Prying the old screen off was made easier by inserting the pick underneath where the glass had already broken. If you are replacing the screen (and not just opening the phone for other repairs) there's not much point in worrying about damaging the edge of the OLED since you are replacing that too!
Lead Sheep - 返信
"To reassemble your device, follow the above steps in reverse order."
So you want me to remove the screen, disconnect the display, flip the screen over, slice through the display adhesive, insert an opening pick, and then heat the edges. Got it. Should go perfectly.
Please update with specific instructions on reassembly.
After changing the screen, the touch screen is not working. The display works properly but no touch is detected. with a USB mouse I made a factory reset and still no luck. I cant test with the older screen since its torn to pieces and the phone wont boot with the old screen connected. Any suggestions?