はじめに
この修理ガイドはiFixitのテックライティングスタッフによって執筆されたもので、Googleによって承認されたものではありません。iFixitの修理ガイドのクオリティーについては、 こちらを参照してしてください。
このガイドを使用して、Google Pixel 4 XL の消耗したバッテリーを取り外したり交換したりします。バッテリーが膨張している場合は、適切な予防措置をとるを参照してください。
安全のため、携帯電話を分解する前にバッテリーを25%以下に放電してください。これにより、修理中に誤ってバッテリーを損傷した場合に、危険な熱現象が発生するリスクを低減できます。
注:このガイドの一部の写真では、携帯電話からSIMカードトレイが取り出されています。この手順では、SIMカードトレイを取り出す必要はありません''。
注意: Googleは、フロントレーザーアセンブリの分解により、目に見えない赤外線レーザー放射にさらされる危険性があることを警告しています。Googleの安全に関する警告 こちら をお読みください。
必要な工具と部品
-
-
差し込んだ開口ピックを、左側コーナーに向けて下部をスライドして、接着剤を切開します。
-
ピックを差し込んだままで、左下コーナーから右下コーナーに向けて下部端をスライドして、接着剤を切開します。
-
接着剤の再装着を防ぐため、ピックを右下コーナーに残したままにします。
-
-
-
-
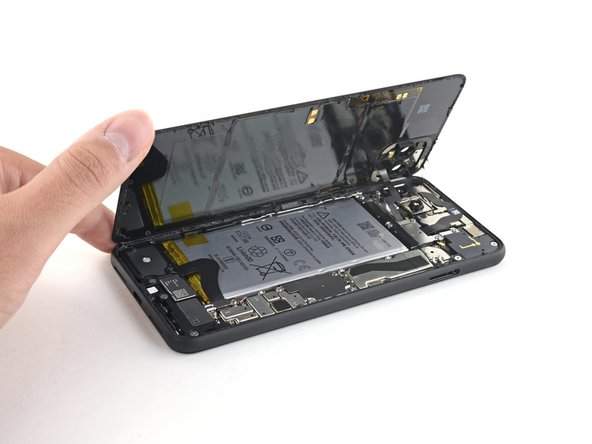
デバイス周辺の接着剤のスライスが終わったら、本を開くように、バックカバーの右端を慎重に持ち上げます。
-
パネルを完全に外さないでください。デバイスにケーブルが繋がっています。
-
-
-
付属のリボンケーブルにストレスを加えないように注意しながら、バックパネルをデバイス左端に載せれるまで開きます。
Geoff B: These are good instructions. Any technician worth his or her salt will test the device for functionality before sealing it up. That’s why it reads, “During reassembly…and test all functions before sealing it up.” Not confusing if you read and comprehend the full pin.
No instructions on how to fit new sticky gasket before assembly. Removing old adhesive was a messy business, I used IPA on a cotton bud and removed as much as possible with flat end of spudger and kitchen paper.
-
-
-
バッテリーコネクタシールドを固定しているT3トルクスネジを4本外します。
-
1.8 mmネジー1本
-
4.1 mmネジー1本
-
4.4 mm肩ツキネジー1本
-
4.0 mm肩ツキネジー1本
Anyone know the thread size of the 1.8mm screw mentioned here? Mine went missing, and I need to get a replacement. I've got a bunch of tiny screw kits, but none of them have fit!
-
-
-
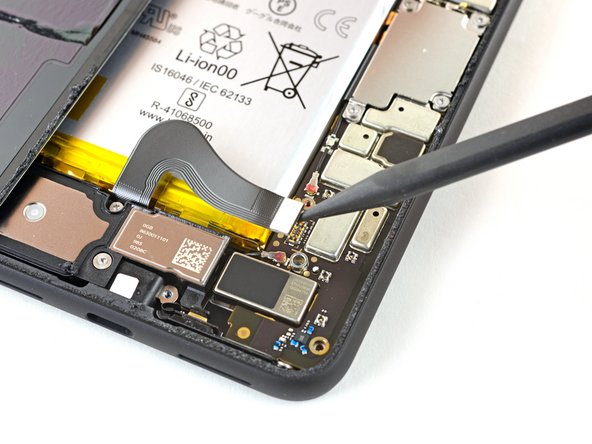
スパッジャーの先端を使用して、バッテリーコネクタをマザーボードからまっすぐ上にこじ開けてバッテリーを外します。
What are the 5 copper dots under the battery connector for.
When you reattach the connector to the motherboard this is a good time to power up and check basic functionality temporarily. Even though it had appeared it was correctly lined, my camera was not functional, in particular the switch button from the rear to the front camera, I was stuck in selfie mode. Then I was getting a message on the screen, possible hardware or software issues. Once I reattached the connecter (several times) until it was correctly inlined, the error went away and I was able to switch from the rear and front cameras.
That was a good call! Thanks!
Esther -
-
-
-
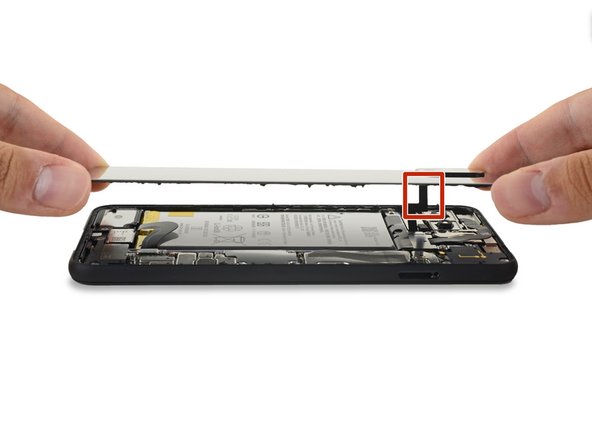
T3トルクスドライバーを使って、バックパネルのコネクタカバーを固定している4.1mmネジを2本外します。
Wouldn’t it make more sense to use the same (orange) color circles as the other 4.1mm screw?
Maybe Google did it to avoid exchange in the models where they differ
-
-
-
バックパネルを取り出します。
REASSEMBLY ADHESIVE: This is the step during reassembly that you'll want to set the back glass adhesive strip on (before you reattach ribbons). Set the adhesive strip into the body of the phone with the red tabs down (toward the body of the phone, it will simply rest inside the lip of the phone body). Press the back glass onto the adhesive strip to set the strip onto the back glass, lift the back glass back out of the body of the phone. Next reattach the ribbons, test functions, reattach connector covers, peel red adhesive cover off of the adhesive (on the back glass) then set the back glass into the phone lip. This could have been explained far better but was skipped over and the generic adhesive instructions posted in the comments are useless for this.
There are also detailed instructions at answer 742532, "How do I apply new back panel adhesive on a Pixel 4xl?" (sorry it doesn't let me link directly). But it advises adhering the adhesive to the main frame first before the glass. I do notice a slight lip on the main frame on both sides, which seems less forgiving to align with than the glass, so I would imagine doing the frame first would be easier? I haven't done this yet myself, so would be interested in opinions.
Update: it appears the discrepancy is due to a difference between the third-party adhesives and the iFixit "genuine" one. The iFixit one is not mirror symmetric and must be adhered to the glass back first, though it has cutouts that avoid protrusions and facilitate this. The third-party one (I believe) has no such cutouts and thus must go on the frame first.
However, in trying to follow Michael's instructions, I could not get the adhesive and red tabs off the blue plastic without distorting the adhesive, and had to take the clear side off first. I ended up directly placing the adhesive onto the glass back, without the frame to help align (I posted my method in the above-mentioned answer 742532). The cutouts in the blue plastic seem to have been made with this in mind.
-
-
-
先の鋭利でないピンセットを使って、バッテリーの接着用プルタブを取り出します。指でプルタブをしっかりと摘みます。
-
-
-
バッテリーのプルタブが作業中、切断してしまった場合、開口ピックをバッテリーの右上端に挿入して、接着剤を切開します。
Strip of glue is only on the top part, only 3 stripes. Becareful passing the gold strip
I wouldn't risk going across the topside of the battery either. the thin cable connecting the side buttons to the board is exposed and is easy to break. Learned from experience.
Also broke this grip sensor cable but now what where to get one?
I carefully pulled up the battery from the bottom using the opening pick because my adhesive pull tabs snapped. The battery was so strongly glued to the bottom. I needed to use the other tools in the box to really push the battery out. Could not do it that gently. But anyway succeeded! v
All three tabs broke immediately for me. Take your time with the pick, using a sawing and poking motion as described and never cross the threshold of the grip sensor cable. If you're struggling in removing the adhesive, I had great success with using the IPA dropper with high concentrate isopropyl alcohol, applying a few drops, waiting a minute, trying the pick, and repeating. Good luck, you got this.
-
-
-
バッテリーを持ち上げて、デバイスから引き離し、取り出します。
-
バッテリーの溝から接着剤の残りを除去します。
-
ストレッチリリースタイプの接着ストリップを使用されている場合、 バッテリー 上にこれらを装着してください。 もしくは両面テープ、プレカットされた接着ストリップをデバイスのバッテリー用スペースに位置合わせします。充電ポートフレックスケーブル上に貼らないようにご注意ください。テープのライナーを剥がして、接着面を露出します。
-
一時的に、バッテリーをマザーボードのソケットにつなげてください。バッテリーが正しく装着できているか確認します。
-
バッテリー を設置して、しっかりと押し込みます。
-
バッテリーコネクタの接続をマザーボードソケットから外して、再組み立てを再開します。
The kit comes with a replacement glue strip for the back cover. I would like to have seen some guidance on putting that on. I’m not exactly a beginner at repairing things in general, but this is the first time I’ve worked on a phone. Figuring it out wasn’t too bad, but getting the old glue off enough to make it work added 15-30 minutes to the process.
This is what I’m sitting at now. probably 90% of the original glue off. did you put the replacement strip on the cover first or the body of the phone?
For this, I peeled off the white strip and placed the new adhesive (with blue template still on) onto the inside of the back cover, making sure it aligned. I then peeled off the blue sheet and applied pressure and a mostly-cooled iOpener to help it adhere. Worked very well for me.
You can follow this adhesive guide for installing new battery adhesive!
-


オリジナルのパーツと交換用パーツをよく見比べてください。交換用パーツに付いていない残りのコンポーネントや接着シールなどは、インストールする前に新パーツに移植する必要があります。
このデバイスを再組み立てするには、インストラクションを逆の順番に従って作業を進めてください。
e-wasteを処理する場合は、認可済みリサイクルセンターR2を通じて廃棄してください。
修理が上手く進みませんか?ベーシックなトラブルシューティングのページを参照するか、このモデルのアンサーコミュニティに尋ねてみましょう。
オリジナルのパーツと交換用パーツをよく見比べてください。交換用パーツに付いていない残りのコンポーネントや接着シールなどは、インストールする前に新パーツに移植する必要があります。
このデバイスを再組み立てするには、インストラクションを逆の順番に従って作業を進めてください。
e-wasteを処理する場合は、認可済みリサイクルセンターR2を通じて廃棄してください。
修理が上手く進みませんか?ベーシックなトラブルシューティングのページを参照するか、このモデルのアンサーコミュニティに尋ねてみましょう。
92 の人々がこのガイドを完成させました。
以下の翻訳者の皆さんにお礼を申し上げます:
100%


これらの翻訳者の方々は世界を修理する私たちのサポートをしてくれています。 あなたも貢献してみませんか?
翻訳を始める ›


37 件のコメント
Worked great, was tough pulling up the battery but other than that went super smoothly. thanks!!
Really comprehensive, helpful and well-written guide. I prefer to learn to fix things on my own, so this was immensely helpful and just what I needed. Thank you so much!
Zaeda June - 返信
the adhesive pull tabs? there was no way to get them out as the hardware prevents you from pulling at the right angle. i went with softening the glue with a couple drops of alcohol and prying the battery up enough to get a guitar pick in and cut the rest.
Just finished changing the battery to my Pixel 4XL. Battery was slightly bloated (about 1mm) but still running great, at 104% after one year and a half. However, it suddenly stopped charging wirelessly, even from the original Pixel charger.
The kit was great, everything happened according to the instructions. Carefully cleaning the old adhesive took most of the time. I used lint-free wipes and a small syringe filled with Isopropyl alcohol 99.9% to drop the liquid over the adhesive strips in small sections, with the phone positioned vertically, so the alcohol didn’t get inside. Same for the rear cover [Regular rubbing alcohol does not work at all for this purpose] The alcohol really helped removing the old stretch release strips really fast. The connector of the new battery was slightly out of alignment, so I had to plug it first, with the battery leaning at a small angle, then seat the battery on the glue strips. Thank you, that was fun! :)
Great tutorial. I followed all the steps. And, even with the new battery, it's still stuck in 50%.
My phone took a dive in the pool. I love in Brazil, do I don't have Google technical support available, and due to battery mailing restrictions it took 6 months until I managed to receive a spare one.
Do you guys know what could I do?
Thanks
it is stuck both while turned on and while off? does the battery life is decreased? or is it only a broken report of battery %age? while you tore down the phone, did you see any corrosion aroud?
Same problem here, but the Pixel turns on and work.. just don't recognize the level of battery.. it shows a "?" icon in the battery's icon...
Some times turns off or on without any sense.. so i don't know if its a problem of battery (the original one, i didn't change it yet) or the weird"Battery FPC Connector"... Just because i can change a battery, nut i can't do a "Damaged Battery FPC Connector Replacement". So if someone knows please tell me if i need a battery replacement or a FPC Connector replacement :c
Wow. I’ve fixed about 10 phones now and I’ve always had issues getting new adhesive tape delivered without being mangled into an unusable crumpled ball. They packaged it between two thin pieces of plastic and it arrived in perfect condition. They also don’t use plastic bubble wrap as their insulating material which is a refreshing change.
Thanks for the informative guide, competitive price and quality service!
Hi, I'm having issues with my Pixel's battery and I wanted to buy the kit for battery replacement, but I'm from Mexico.
Do you know if there's a place with international shipping? I would like to buy that kit.
Sorry to hear about the trouble! Please contact iFixit Customer Support and they would be happy to assist you.
Great guide. I only wish there was a bit more details in the application of the adhesive in the re-assembly.
That said, my 17-year old son was able to follow the instructions and resurrect his Pixel 4XL that had been destined for the trash bin.
Thank you!
Byron Todd - 返信
I ordered a new battery kit from iFixIt for my Pixel 4 XL ([リンクされた製品が存在しない、もしくは無効: IF356-158]) with the intent to use this guide.
From what I've seen elsewhere on the internet, I expected the battery to say either "Huizhou Desay Battery Co., Ltd" or "Sunwoda Electronic Co., Ltd". However, that portion of the label is blank -- there is no company name listed.
It also has 3700 mAh on the front label but the rear has a QR code and some text printed including "3740 mAh".
I'm concerned about the legitimacy of this battery.
Changed the battery to the second Pixel 4XL. Obviously, it went faster. Having some highly concentrated isopropyl alcohol (>99% by volume) makes your life a lot easier when clearing the gunk and dislodging the battery.
What I want to mention is: please DO NOT RUSH. Take your time, do it elegantly. For the first time changing a battery, 30 minutes estimated time is a little too optimistic. Scrapping off the old gunk from the phone and the back cover took more than I thought, but it’s a cheap price to pay for a job done well. It was fun!
IFixit rocks!
Overall this is a really well made guide, instructions for disassembly are clear and the pictures are definitely helpful. I do wish the guide actually showed the best ways to apply new adhesive though. It’s not hard to figure out but just taking out the battery and doing the steps backwards again isn’t really a complete reflection of the job.
Tom Vieira - 返信
I was getting this warning from my Pixel 4XL “problem reading your battery meter”. Ordered the battery and repair kit. Works great now, error message is gone. The glue ring around the back plate is definitely the most annoying thing. I doubt the phone is water resistant now, but I’m still very happy with this repair.
This is totally my fault that this happened, because I didn’t read both guides thoroughly before starting, but there needs to be a big red “STOP” symbol at the top of this guide that says “Stop! If you intend to replace your screen, start there first. Do not replace the battery and replace the rear cover prior to replacing the screen.” I am out 2 hours of my life and have to wait for another back adhesive piece. But the bright side is the battery works great and combined with a fresh factory reset the phone is running like new.
Cabel Gray - 返信
Just did it. It was tough to get passed the glue thing on both the back cover and the battery, but I did it successfully. Now I have the phone as new, apart from the fact that the phone is not water resistent. I would add new steps to describe how to reseal with new glue and where to buy it. However, I just used the iOpener to reheat the glue so that it attaches again. Taking into account that I use the pixel cover, that shouldnt be a problem.
Help me battery
Thank you for this very GREAT GUIDE. My Pixel 4XL stopped wireless charging due to the internal battery being "bloated". It was of great help also because you have mentioned the tools needed; i.e. T3 driver, removing the battery adhesive was a pain though as all three of them broke at the very moment it was pulled. Nonetheless the entire replacement process took about 40 minutes following this guide, now it is sleek and thin and wireless charging is back.
I followed the guide exactly and somehow my display has been damaged. The haptics still work so I know its on and the touch screen works but the display doesn't power on. Please help.
The lack of explanation for the back glass adhesive is pretty bad. It's a major reassembly step that is just completely skipped over with completely no mention and kind of complicated in comparison to the rest of the process IMO. It really needed to be in here so I've added a comment with regards to it. The generic adhesive instructions that have been posted in the comments aren't helpful for this at all either. Outside of this major instruction flaw the rest was solid and spot on. The phone has been fixed and Is working properly once again for way less than having someone else fix it.
I have assembled the battery but it is not charging: connected but not charging. Can anyone help me solve this problem?
mine didnt charge at first aswell mb try reconnecting the battery
took me 5 tries of reconnecting
corni -
my phone battery started getting worse and worse and didnt display % so i decided to try my luck on replacing it. some small tips from me:
-things u need(from ifixit store): the battery replacement, adhesive strips for battery and back, the iOpener kit and a torx t3 4mm precision bit which is sold separately...
-hardest things when repairing: battery was very hard to get out... i had a friend help me and gently nudged some plectrums under it to make it easier... other hard thing was reconnecting the battery for me... i reconnected it 5 times and on the last try i finally got it right and the phone worked again. that little connector can be tough but still try to be gentle.
Honestly I would not recommend, as the pins on the battery connector broke off after a month of installation. I opened my phone back up to see why my phone would no longer charge and I see that the battery pins got stuck on the phone and that the battery connector on the battery itself was missing. I wish I could post pictures, but bottomline is that this product's build quality is inferior.
Great tutorial and excellent kit! My 3-year old Pixel 4XL could not read the battery meter with a '?' on the battery icon. The adhesive part was pretty fiddly. Apart from that, instructions worked like a charm and my phone has a new lease of life!!!
Thanks!
Hey! For the safest repair possible, we like to disconnect the battery as soon as we're able. In this case, it's accessible right after the back cover lifts away.
Hi Carsten, thanks for the reply. I made the repair today using this guide. Because my battery was replaced under warranty some time ago, things looked a bit different inside. The battery was installed with kapton tape, which made it very easy to remove. I found the hardest part of the process was to create a gap to begin removal of the glass back. The trickiest part was putting the battery and sensor connectors back in place. The battery is definitely charging. Fingers crossed, I haven't ruined the top sensor.
I spent about 2 hours and 40 minutes to replace the battery and reassemble the back panel.
Taking out the battery and removing the adhesive took the longest. Also, keeping the back panel connector secured while putting the screws was hard. I had to hold the cover from closing while putting the screws on with the other hand.
Overall, this guide helped a lot and I couldn't have done without it.
It was fun and nerve-racking at the same time. I'm glad I tried to change my own battery and it's working great! I added a few of my comments in the guide and hope it helps.
Good tutorial, fiddly to reassemble connectors and no instruction for fitting new back gasket. Apart from that it went well. I do have experience in mechanical and electronic assembly however.
I found 2 minutes works best per side. Great Guide btw, thank you for being a strong leader in the fight for right to repair.
Dennis - 返信