メインコンテンツにスキップ

Google Pixel 3a Plastic Midframe Replacement

必要条件のみ
この修理ガイドは、他のガイドの前提条件として使用されます。それ自体は不完全で、単独で使用されることはありません。

必要な工具と部品

  1. Google Pixel 3a Plastic Midframe Replacement, Plastic Midframe: 手順 1、 1の画像 1
    • Remove the fourteen T3 screws of the following lengths securing the plastic midframe:

    • Twelve 4.3 mm silver T3 screws

    • Two 4.3 mm black T3 screws

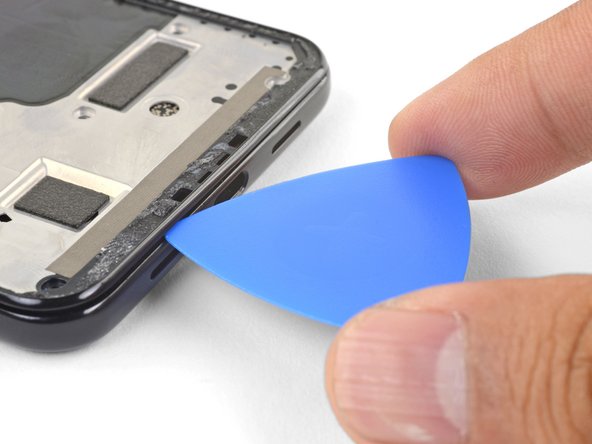
  2. Google Pixel 3a Plastic Midframe Replacement: 手順 2、 3の画像 1 Google Pixel 3a Plastic Midframe Replacement: 手順 2、 3の画像 2 Google Pixel 3a Plastic Midframe Replacement: 手順 2、 3の画像 3
    • The midframe is still held in place by plastic clips.

    • Insert an opening pick into frame seam at the bottom of the phone. This seam sits between the plastic midframe and the back cover.

    • Slide the pick along the seam to release the clips holding the plastic midframe.

  3. Google Pixel 3a Plastic Midframe Replacement: 手順 3、 3の画像 1 Google Pixel 3a Plastic Midframe Replacement: 手順 3、 3の画像 2 Google Pixel 3a Plastic Midframe Replacement: 手順 3、 3の画像 3
    • Slide the opening pick along the left and right edges of the phone to release the midframe clips.

    • Lift the bottom edge of the plastic midframe up but do not remove the midframe. The midframe is still tethered to the phone by the fragile proximity sensor cable at the top edge.

    • To reinstall the plastic midframe, align the midframe to the back cover, and squeeze the perimeter of the phone with your fingers to snap the clips back into position.

  4. Google Pixel 3a Plastic Midframe Replacement: 手順 4、 3の画像 1 Google Pixel 3a Plastic Midframe Replacement: 手順 4、 3の画像 2 Google Pixel 3a Plastic Midframe Replacement: 手順 4、 3の画像 3
    • Use the point of a spudger to carefully pry up and disconnect the proximity sensor connector from the motherboard.

    • Your proximity sensor connector may have automatically disconnected itself when you lifted the midframe.

    • Remove the plastic midframe.

  5. Google Pixel 3a Plastic Midframe Replacement: 手順 5、 3の画像 1 Google Pixel 3a Plastic Midframe Replacement: 手順 5、 3の画像 2 Google Pixel 3a Plastic Midframe Replacement: 手順 5、 3の画像 3
    • This step shows how to reconnect the proximity sensor during re-assembly.

    • Align the top edge of the plastic midframe with the phone.

    • Use the point of a spudger to carefully align and push the proximity sensor connector onto the motherboard socket.

    • This takes a bit of patience and finesse. Once you have the connector in place, you can also use a finger to gently press the connector onto the socket.

    • Alternatively, you can remove the proximity sensor from the midframe to reattach it to the motherboard first.

    • Use the point of a spudger to carefully pry the proximity sensor out of its recess on the midframe. The sensor is lightly adhered to the midframe.

    • Remove the sensor from the midframe. Attach the sensor connector onto its motherboard socket.

    • Thread the sensor cable through the midframe and reposition the sensor in the recess. Press down with your finger to adhere the sensor back onto the midframe.

終わりに

To reassemble your device, follow these instructions in reverse order.

作成者

4人の作成者と共同で作成されました。

Arthur Shi

メンバー登録日: 01/03/18

249,673 ポイント

503のガイドは作成済み

チーム

iFixit iFixit人のメンバー

Staff

135 メンバー

16,718のガイドは作成済み

0 件のコメント

コメントを追加

統計データ:

過去 24時間: 0

過去 7 日: 0

過去 30 日: 0

今までの合計 100