はじめに
この修理ガイドはiFixitのテックライティングスタッフによって執筆されたもので、Googleによって承認されたものではありません。iFixitの修理ガイドのクオリティーについては、 こちらを参照してしてください。
Pixel 3aのリチウムイオンバッテリーを取り出すには、このガイドを使用してください。
バッテリーが膨張している場合は、 適切な方法で処理してください。
デバイスを再組み立てする前に、バッテリーの残量を25%以下まで放電してください。充電されたリチウムイオンバッテリー は引火の原因となったり、アクシデントで穴を開けてしまうと爆発の恐れがあります。
The Pixel 3a XLのディスプレイは壊れやすいです。この修理後、スクリーンを再利用する場合は、開口作業で特別に注意を払ってください。
必要な工具と部品
-
-
デバイス上の2つのシーム(継ぎ目)にご注目ください。
-
スクリーン上のシーム:このシームはスクリーンとデバイスの残り部分が繋がっています。ここをこじ開けます。
-
フレーム上のシーム:ここはプラスチックフレームが、バックカバーと繋がっている部分です。ネジで固定されています。このシームはこじ開けないでください。
-
シームをこじ開ける前に、スクリーン上の次のエリアにご注意ください。
-
スクリーンのフレックスケーブル:指示された以上に深くこじ開けないでください。このケーブルのダメージに繋がります。
-
接着剤周辺: 開口ピックの角度を調節せずに狭い周囲以上をこじ開けてしまうと、ディスプレイパネルが損傷します。
-
-
-
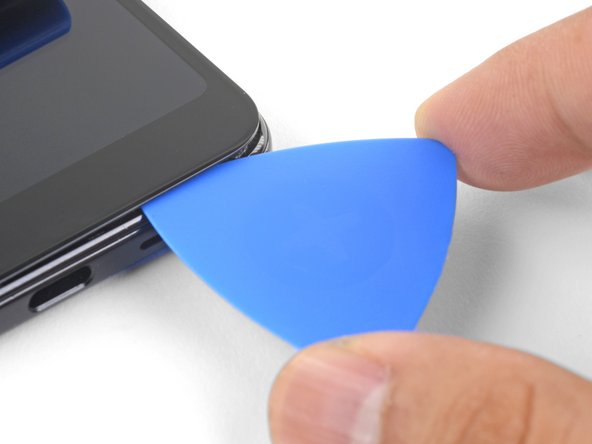
iOpenerを準備して、ディスプレイの右側端に載せて約1分間温めます。
My screen was cracked diagonally. Heating with iOpener helped at the top and bottom edges to weaken the adhesive.
-
-
-
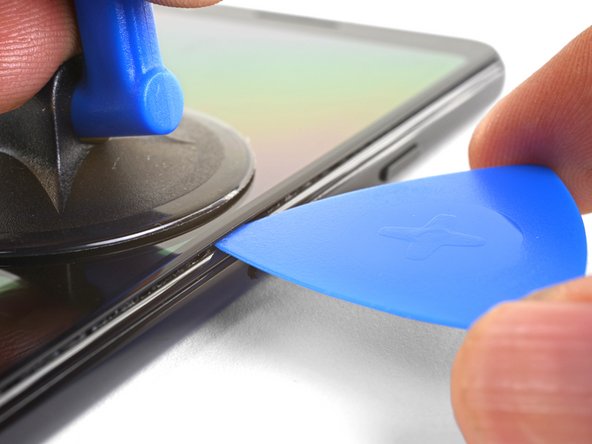
ピックを右側端に沿ってスライドし、接着剤を切開します。
-
接着剤が再装着するのを防ぐため、開口ピックをその場に残します。
Don’t make my mistake and read ahead. 6mm may be too close for comfort! 8mm is definitely too far and caused me to damage. Also be sure to read the right manual! I have an XL and it notes 5mm.
Fortunately my old screen was beyond repair, But be super careful around the bottom I managed to sever the ribbon cable to the digitizer.
I broke my screen here. The adhesive in my case was quite strong on the top and bottom.
This is by far the hardest part of the entire replacement. I ruined my screen doing this, you might as well buy a new screen at the same time as you buy your battery. I just barely rubbed the edges of my screen and it turned the edge of my screen purple. This eventually migrated to the entire screen causing the whole thing to be purple/black.
I've repaired many iPhones, and never had any issues. The screens always remained intact. But with the Pixel, I completely destroyed the screen. The only thing it showed after booting up was a purple line... The adhesive is very strong and it's nearly impossible to separate the screen without damaging it. You should order a new screen before you attempt to change the battery, just in case.
-
-
-
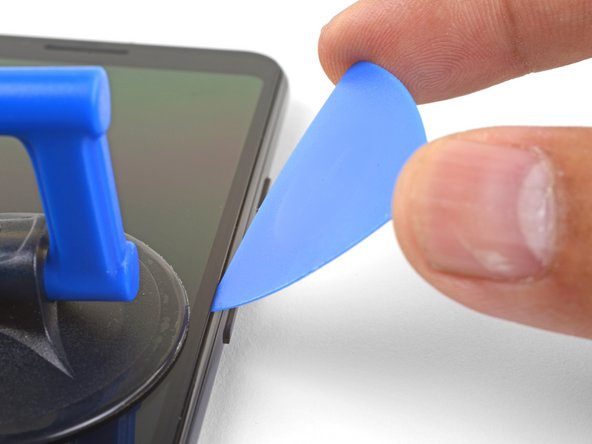
開口ピックで下側右の角周辺をスライドし、接着剤を切開します。
-
続けて、デバイスの下側端と左側角に沿ってスライドします。
My screen was already cracked diagonally, so going around the corners was especially hard. Starting from each side was not so risky as I first thought because side adhesive is really thin. However top and bottom needed some more lifting force from the pick. More heating helped at the top and bottom edges.
-
-
-
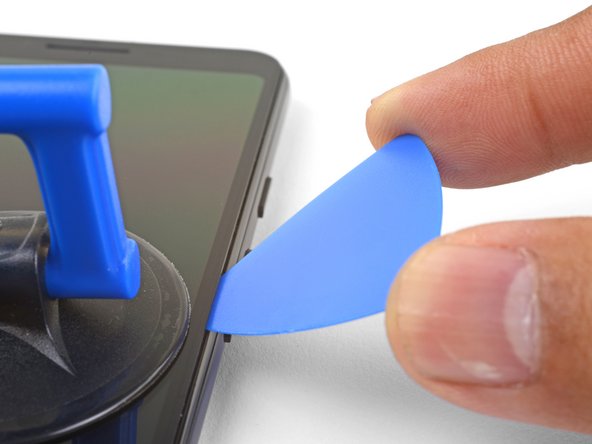
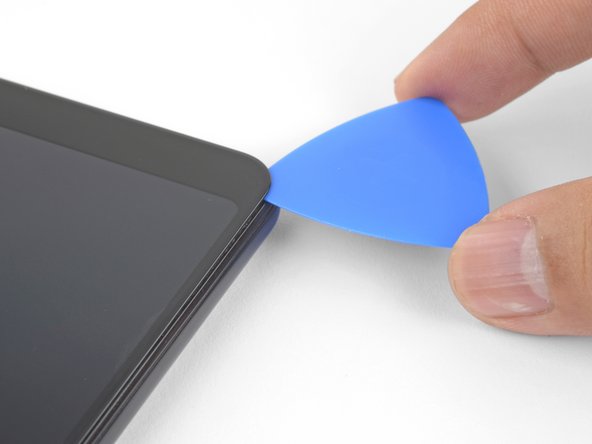
上部端に沿って接着剤を切開します。開口ピックを8mm以上差し込まないでください。
There is a LOT more adhesive at the top than anywhere else on the phone! It’s like there’s 2 lines of adhesive, one along the edge of the case and one along the edge of the screen, and it’s filled in between them wherever the speaker camera aren’t. I needed to heat and pry several times to get the top loose. Fortunately, there’s little risk of hitting a cable near the top (look ahead to the step where you lift the screen off to see where all the cables go!)
I found that applying the iOpener across the top edge of the glass for about 30 seconds at this step helped soften the adhesive significantly. My front camera was replaced only a few months ago by uBreakiFix and the display adhesive subsequently let go on the entire right edge, bottom, and part of the left side shortly after the new front camera failed. Only the top was still securely stuck.
-
-
-
-
全ての接着剤が切開できたらスクリーンガラスを裏返しにして、デバイス上部に載せます。スクリーン用フレックスケーブルが大きな円を描いて繋がっています。
Hi, could you help me with one clarification?
What does the small “metal patch” in the middle of the display ribbon do?
Does it prevent the phone from starting while disconnected?
Thank you for your time!
Hi Oliver,
I think the patch you’re referring to helps with either EM shielding or heat dissipation. It should not prevent the phone from starting.
-
-
-
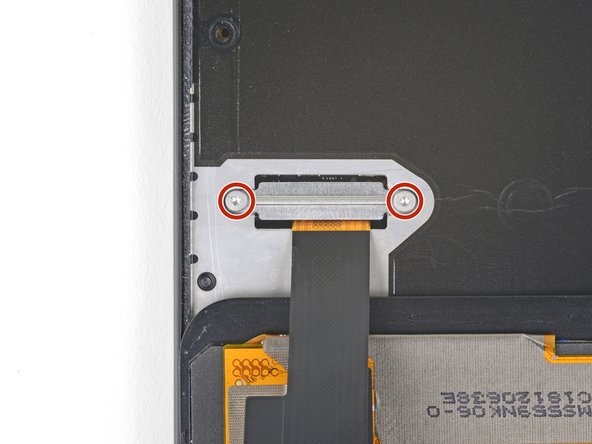
慎重に、スクリーンコネクタのブラケットを覆っている黒いテープを剥がします。
-
スクリーンコネクタのブラケットを固定している4.4 mm T3 長ネジを2本外します。
-
スクリーンコネクタブラケットを外します。
This may be a silly question but how are you able to tell whether the tape is in good condition? Is it based off of how sticky it is after you remove it?
That is a fair question! If the tape is in one piece and is relatively sticky, it can probably be used again.
Oops! I forgot to put any tape back. Does this tape have a critical purpose, in other words should I go to the trouble to pry the screen back off and tape it?
The tape does not serve a critical purpose. If you have already re-sealed your phone, I wouldn’t worry about it.
Les vis sont des T4 et non des T3
Bonjour Gaëtan ! Merci pour la remarque. En fait, il y a toujours une certaine tolérance entre le tournevis et la tête de vis. Donc il se peut que la taille supérieure ou inférieure soit plus “confortable” au cas par cas. Bonne réparation !
Bonjour,
Pouvez-vous me conseiller un bon kit de réparation pour mon Google Pixel 3A?
J'ai peur de me faire arnaquer en achetant un mauvais écran de basse qualité .
Do you sell the 2 4.4mm t3 screws and the screen connector bracket. Or know where I can get it thanks
-
-
-
スパッジャーの先端を使って、スクリーンのフレックスケーブルをこじ開けて接続を外します。
I had accidentally pressed the power button and the phone was on when connecting the new screen and that broke the board! So make sure the phone is off.
hey man think I've just done the same thing :(
how did you fix it? did it need a new motherboard?
is it okay if I forgot to add the black tape on the connector area???
When reassembling, before reattaching the connector for the screen flex cable is the time to align the screen cover adhesive sheet onto the perimeter of the plastic mid-frame. Even if one is using the Tesa tape, I suspect aligning it along the edge of the mid-frame would be simpler without the screen and its flex cable obstructing your efforts.
-
-
There is a blue plastic tape covering the digitizer and when I try to take it off it rips out something more than just the tape I think it’s pulling the magnet too
i had a little plastic piece around the camera (seems to just be a spacer) that i moved to the new screen. had to pry it up with a pick cuz it was stuck down good.
actually to clarify- i didn’t move the little camera spacer to the new screen- i placed it around the camera on the phone, where there was a little indent for it, and stuck it down with a bit of tesa strip, then applied more tesa strips around the edge of the phone before finally reconnecting and replacing the screen. the little plastic bit i encountered needs to be precisely placed around the camera so would not be a good idea to just stick it to the screen when reinstalling!
elyze -
Thanks team! I was able to replace my broken screen with no issues!
Instead of cutout adhesives or tesa tape, I used B-7000. Painless.
Appreciate the screen and instructions!
Bonjour,
Pouvez-vous me conseiller un bon kit de réparation pour mon Google Pixel 3A?
J'ai peur de me faire arnaquer en achetant un mauvais écran de basse qualité .
Hello . Can you advice me a site where i Can buy a quality screen replacement pack for my Google Pixel 3A?
There's a lot of rip off on internet and id like to get a good pack and a quality screen .
Hello! We currently sell a replacement screen. However, I’m not sure if it is available yet internationally.
I have a quick question, so I haven’t done anything yet because I only just ordered my repair kit, but is it possible to replace the battery without having to replace the display ?
Hi Braeden!
Yes, it is definitely possible to replace the battery without replacing the display. With that said, the initial entry steps can be pretty tricky. Before you begin, look very closely over the display to see if you can see any micro-fractures. If you see any, you will most likely crack the screen when you try to remove it. Take your time and apply a heated iOpener often. Good luck!
I forgot to order the tape when getting my replacement USB port, so I ended up putting the screen back on without any tape and using regular clear tape on the outside of the phone to keep the screen from falling off. It’s less waterproof, but it’ll do the job until the right part arrives.
Speaker mesh appeared to already be in place on my replacement screen, so I did not transfer this over from my old screen. That was a huge mistake, sounds were garbled above about 30% volume. Make sure you do this part!
I tried the replacement after watching this and many other videos. I purchased a working Pixel 3a and removed it to put onto my old Pixel 3a. The screen is not turning on on either devices now, old or new. The device is turning on because I can feel vibrations. What do you think the problem is?
-
-
プラスチック製ミッドフレームを固定している次の長さのT3ネジを14本外します。
-
4.3 mm シルバーT3ネジー12本
-
4.3 mm ブラック T3ネジー2本
-
この作業では外したねじを安全に保管してください。そして再組立の際は、正しい位置に装着するしてください。
I found that a T3 bit didn’t get purchase on the screws in my Pixel 3a, but the T4 bit worked great. Not sure what’s up with that.
This is definitely possible, depending on which kit’s T3 bit you use, along with potential screw quality variances.
My Pixel 3a has been apart three times for a non-functioning front camera. The first time, it was by a Google authorized repair shop, and the camera stopped functioning again after a few months. When I took it apart the second time, I noted that many of the screws weren't seated before I removed them. The camera module had become disconnected and simply reseating the connector fixed it. I was careful to fully drive all screws and apply an appropriate amount of torque to them, thinking the repair shop failed to do so. After 9 or 10 months, my front camera stopped working again. Again, I'm noticing a lot of the screws have worked themselves loose. I'm going to try to find an appropriate thread compound that I can precisely apply to these tiny screws.
Hey Reid,
I would suggest blue Loctite or threadlocker. Dab a small drop on each screw before you install them.
-
-
-
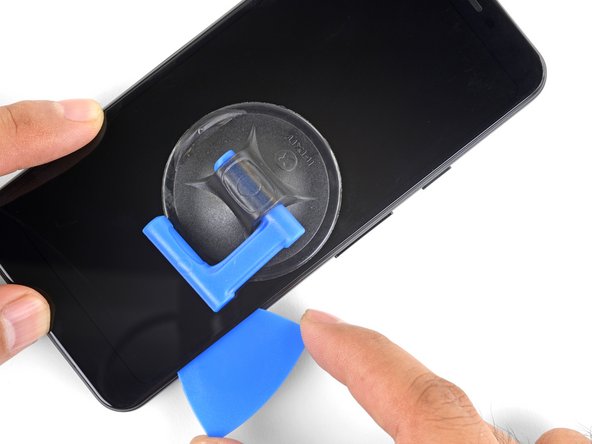
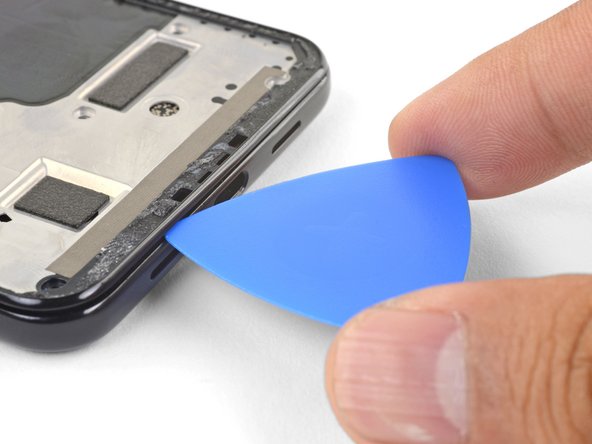
開口ピックをデバイス下側のフレームの継ぎ目に差し込みます。この継ぎ目は、プラスチックのミッドフレームとバックカバーの間です。
-
プラスチック製ミッドフレームを固定しているクリップを外すには、継ぎ目に沿ってピックをスライドします。
To remove the midframe, I was having a lot of trouble until removing the sim card tray. I think this might have to be removed before the midframe
-
-
-
スパッジャーの先端を使って、近接センサーのコネクタをマザーボードからこじ開けて、接続を外します。
-
プラスチックのミッドフレームを取り出します。
This connector is f*ckn impossible to reconnect 😭
Arnau Mora - 返信
This is the hardest part of the job. I gave up on connecting the proximity sensor while in the midframe, and found it much easier to remove the proximity sensor from the midframe, attach the connector, then thread the sensor into its home in the midframe.
-
-
-
プラスチックのミッドフレーム上部端とデバイス本体の位置を揃えます。
-
スパッジャーの先端を使って、近接センサーのコネクタをマザーボードのソケット上に、慎重に揃えて押さえます。
-
この作業には忍耐と正確さが必要です。コネクタの位置が確認できたら、指で慎重にコネクタをソケット上で押さえて装着します。
-
スパッジャーの先端を使用して、近接センサーをミッドフレームの凹部から慎重にこじ開けます。 センサーはミッドフレームに軽く接着されています。
-
ミッドフレームからセンサーを取り外します。 センサーのコネクタをマザーボードソケット上に装着します。
-
センサーケーブルをミッドフレームに通し、センサーを凹部に合わせて再装着します。 指で押し下げて、ミッドフレーム上にセンサーを装着し直します。
I tried to do this for about 15 minutes before I went to the alternative. There is a tiny post to hold the sensor in position on the midframe. I pried the sensor from the midframe from the corner opposite that post and then finished this step in 2 minutes.
Plan B ok for me as well. There is a hole below the sensor in order to push it with a sim card opener.
-
-
-
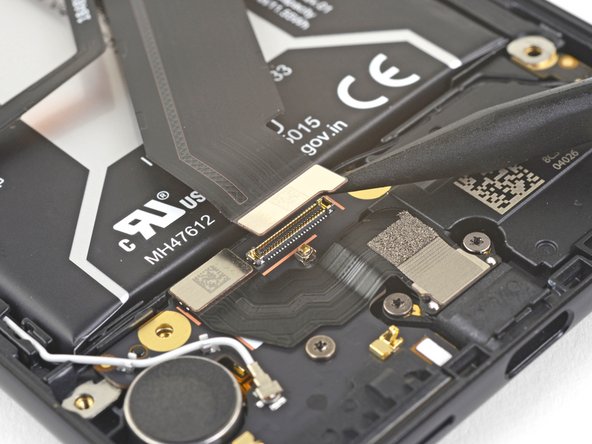
スパッジャーの先端を使って、バッテリーコネクタをマザーボードのソケットから持ち上げて、接続を外します。
-
バッテリーフレックスケーブルを若干折り曲げます。アクシデントでソケットと接触してしまわないよう、予防目的です。
-
-
-
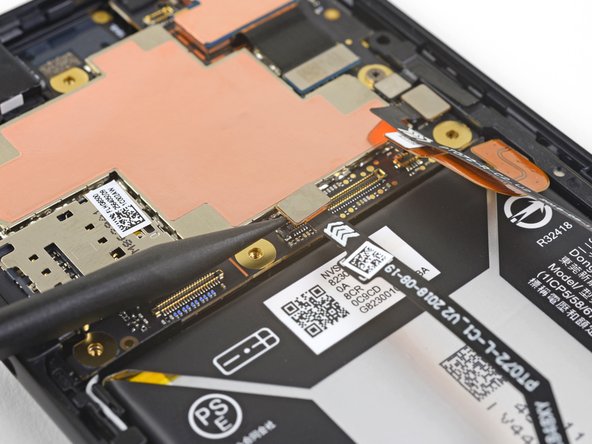
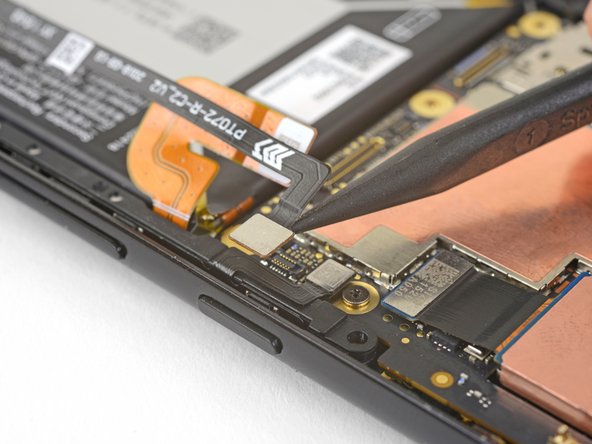
スパッジャーの先端を使って、バッテリー下のドーターボードソケットから相互接続ケーブルの接続をこじ開けて外します。
-
相互接続ケーブルを取り出します。
I would add here as a warning to pay attention to the orientation of the ribbon cable when you are putting it back. I put mine back upside down which caused a lot of headache (no direct damage thankfully) as the phone did not turn on, so furiously checked everything, put it back together again and again which in the end damaged something else (the screen).
Thanks for sharing! I added your tip to the step.
-
-
-
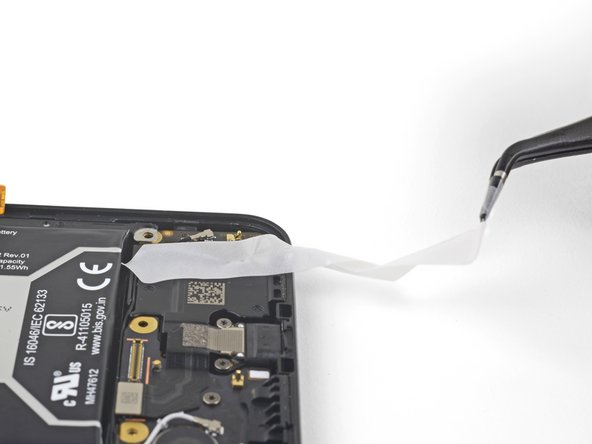
バッテリーを取り出します。
-
デバイスに残っているバッテリーの接着剤を綺麗に除去します。
-
交換用の引っ張ってストレッチする接着剤を準備するか、Tesaテープなどの両面テープを使って、オリジナルの接着剤が付けられていたバッテリー用のスペースに装着します。
-
慎重にバッテリーを取り付けます。一時的に、バッテリーのコネクターをマザーボードに接続して、バッテリーが正しく装着できているか確認してください。
-
バッテリーを指でしっかりと押し込んで固定します。
-
バッテリーの接続をマザーボードから外して、組み立て作業を継続してください。
Der Zusammenbau gestaltet sich sehr einfach, lediglich die Verbindung mit dem Näherungssensor war so ätzend dass ich mir den Teil erspart habe. Den Versuch den Sensor vom Rahmen zu lösen hatte ich leider nicht mehr gemacht ich glaube aber, dass das der bessere Weg ist.
Ansonsten habe ich den neuen Akku mit Teppichklebeband befestigt und das Display habe ich mit dem noch vorhandenen und anhaftenden Klebstoff wieder auf den Rahmen gedrückt....
Nach dem der Akku geladen war und ich das Gerät gestartet habe, fand Ein Neustart statt und danach lief das Handy wieder noch nicht einmal eine Display oder Fingerabdrucksensor Kalibrierung wurde gefordert.
Wenn es jetzt nochmal 2-3 Jahre macht bin ich sehr zufrieden....
Achtung die Schrauben sind so klein ..., Mir ist eine abhanden gekommen warscheinlich zu tief eingeatmet...., Aber zum Glück geht der Drucksensor dennoch!!!!!!
-


デバイスを再組み立てする際は、これらの手順を逆の順番に従って作業を進めてください。
バッテリーの最適化のために、この手順を完了後、新しく搭載したバッテリーの残量を調整してください。 100%まで充電したら、そのままプラグに繋いだまま、さらに2時間充電状態にします。それから自動的にシャットダウンするまで放電させて、中断なく一気に100%まで充電してください。
e-wasteを処理する場合は、認可済みリサイクルセンターR2を通じて廃棄してください。
修理が上手く進みませんか?トラブルシュートのヘルプには、Google Pixel 3aのアンサーコミュニティを参照してください。
デバイスを再組み立てする際は、これらの手順を逆の順番に従って作業を進めてください。
バッテリーの最適化のために、この手順を完了後、新しく搭載したバッテリーの残量を調整してください。 100%まで充電したら、そのままプラグに繋いだまま、さらに2時間充電状態にします。それから自動的にシャットダウンするまで放電させて、中断なく一気に100%まで充電してください。
e-wasteを処理する場合は、認可済みリサイクルセンターR2を通じて廃棄してください。
修理が上手く進みませんか?トラブルシュートのヘルプには、Google Pixel 3aのアンサーコミュニティを参照してください。
45 の人々がこのガイドを完成させました。
以下の翻訳者の皆さんにお礼を申し上げます:
100%

Midori Doiさんは世界中で修理する私たちを助けてくれています! あなたも貢献してみませんか?
翻訳を始める ›


7 件のコメント
There is no link to a battery part to purchase, where can those be found?
Nir Hadjes - 返信
Hi Nir,
We are in the process of getting replacement batteries. Because the phone is so new, supply chains have not gotten to offering replacements yet.
Just completed this took, probably took me an hour and half from start to plugging the phone back in after I was done. Seems to have worked very well! Do be careful pulling the adhesive out from behind the battery. If it breaks, it can be a little trickier to get it out. I had to heat up the adhesive through the back of the phone, but once I did that I was able to very carefully pry the battery out, using a pick as a load distributor on the battery.
Same with me....one strip came out nicely, the other one just broke midway.
If you are reusing the screen, this guide is too dangerous
1. You should heat the disaply evenly, not only at the right edge:
Using simple physics heating the display from all sideas will reduce the adhesive force of the glue overall, heating only one side will reduce the adhesive force on one side, thus you will need to use more force on the suction cup making things worse.
2. Start from bottom edge:
Most glue is present on bottom and top edges, also there is more space to insert the pick too cut the glue. It will give you more room to work on left and right edges where the gap is very less.
3. Don't use iopener
It's very hard to evenly heat the display with iopener. You basically heat one edge, run to the microwave to heat the iopener then place on the next edge, until then the first edge cools. Use hair dryer, or heat gun they heat the display evenly
worked pretty smoothly. I would have appreciated better reassembly instructions, particularly for the screen installation. I connected the screen before putting the adhesive on, which was a mistake. Should have mounted the adhesive to the mid-frame first, then mounted the screen cable then peeled off the upper adhesive backing. The proximity sensor was much easier to do the second method. All good though and charging up.
Agreed. I advise to put on the adhesive on the frame, connect the screen, peel the protective layer (carefully) and put the screen in place.
Power is off, but does the battery need to be disconnect to safely do this replacement?
mplishka - 返信
Da ich keinen iopener ( dachte das wäre alles dabei wie auf der bstellvorschau!!!) habe ich eine Wärmflasche auf das Handy gelegt ..behutsam und nicht zu heiß. Besonders an Kopf und fußende war das Display ziemlich fest...befolgt man die Anweisungen genau ist es eigentlich kein Problem das Display vom Rahmen zu lösen, jedoch bin ich der Meinung, dass hier schon ein gewisses Maß an motorischer Vertrautheit mit der Materie bestehen sollte, da wie gesagt oben und unten doch ein tieferes eingreifen in den Rahmen unter das Display nötig ist...
Ralph S. aus Neumünster
Ralph S - 返信
You definitely want to use the iOpener on all sides as you make your way around the screen. The adhesive on my device was quite strong!
My screen was cracked in the corner and it was a real pain in the neck to get the little bits and pieces out of the corner. I don't know if this step is easier with an intact screen, but it was definitely the most difficult step on the repair for me.
Simon Stone - 返信