はじめに
この修理ガイドはiFixitのテックライティングスタッフによって執筆されたもので、Googleによって承認されたものではありません。iFixitの修理ガイドのクオリティーについては、 こちらを参照してしてください。
このガイドに従って、Pixel 2 XLのカメラを交換します。
必要な工具と部品
-
-
一定の強い力で吸盤を引き上げ、開口ピックをフロントパネルとリアケースの間に挿入します。
Whatever happened to “Do not heat your phone. If needed, you can use a dropper or syringe to inject isopropyl alcohol (90+%) around the edges of the back cover to weaken the adhesive.”?
Mike Trieu - 返信
It is in concern with swollen batteries.
I spent an hour trying to get the glass screen apart from the body. I tried the hairdryer etc but made no progress. However, when I used a sucker to gently pull on the glass it was easy.
I used a heat gun, and the metal spatula in the iFixit kit. I broke the screen. Then, continuing with a blue plastic triangle, the screen continued to break. It seems to be quite brittle.
Rolf Kirby - 返信
Never use metal tools on glass component
p43j77 -
Just broke the screen as well. I’d say heat gun is a must, otherwise it’s really hard to slide pick at the top and bottom without breaking the screen. It’s a very thin line of glass over there.
I thought I did this perfectly. I used the iOpener to heat the glue, and the picks to slide around the screen to release the adhesive. I preformed the rest of the repair (charging assembly and the battery) with little issue. Just reassembled and the volume rocker side of the screen is white. I took less care on this side since the instructions said that you didn’t need to worry about how far the pick went in. NOT TRUE! There is a curvature to that edge that will push your pick up into the back of the unprotected display. It clearly doesn’t take much to damage it. I was so careful! F&CK!! I should have just created the e-waste and bought a new device. So mad!
-
-
-
-
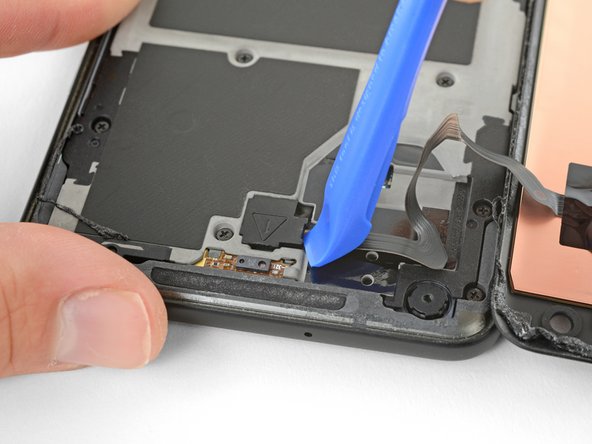
オープニングツールの角で、デジタイザのケーブルコネクタカバーを持ち上げます。
-
コネクタカバーを取り外します。
Lol mine shot off and Ricocheted off the ceiling! Then landed on my shoulder haha
It literally popped me right in the middle of the forehead. My wife is still making fun of me.
Mine flew off while I was laughing you guys, never too be seen again: (
I decided to work outdoors, didn't read any comments first, so when mine flew off I found it five cursing minutes later in a crack on the driveway. Should have read the comments first! Thanks hamiltont. Will now read every comment BEFORE attempting step.
Loose Drag - 返信
Confirmed, this $@$* can fly!
-
-
-
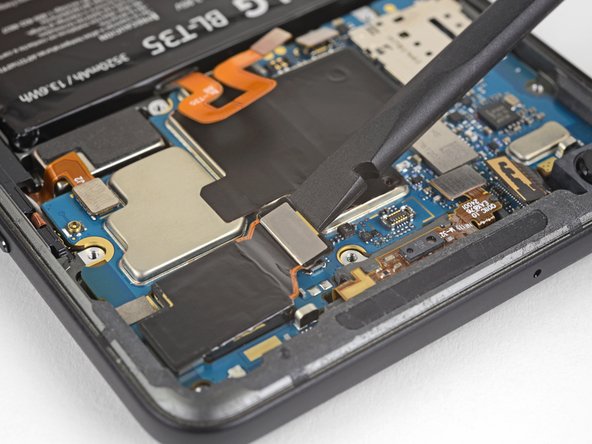
スパッジャーの先端でデジタイザケーブルを持ち上げ、マザーボードのソケットから外します。
This small connector gave me fits getting it located correctly, is there a trick to getting it aligned since it’s difficult to see around edge of the connector?
-
-
-
スパッジャーの平面側先端を使って、ソケットからディスプレイケーブルコネクタを持ち上げます。
-
ディスプレイを取り外します。
BE EXTRA CAREFUL HERE, and during reassembly! There are 2 itty bitty parts directly under this ribbon cable connector that, if damaged, will render your loudspeaker unusable. The only sure way to fix it if you break it is to replace the motherboard. There are some reports of people being able to solder the spots and shorting it to make it work, and that worked for me for a time, but they’re really tiny (about 0.5 mm) and if you don’t get a secure solder, or if you bleed over, it will also mess up your top speaker.
Saw this comment after I’ve done replacing and sure enough, the loud speaker was broken. The resistor was knocked over but still hanging in place so I just stuck it back and it works for now.
They are 2 black resistors at the end of the cable’s connector. So follow the above photo exactly and pry the connector from the side, not from the end of the connector like I did
What wasn't clear to me here (because I didn't put Step 13 together with Step 12, I suppose?) is that if your replacement part came with speaker grills and camera gasket, Step 12 is your final step. You are done, except for replacing the cables and covers, then placing the adhesive strips onto the replacement part and sticking the phone back together.
I ordered my screen from iFixit and it came with new grills and camera gasket already installed. I was able to use the thinnest strips on the supplied Tesa patch to line the entire screen perimeter piecemeal, then stick it back together like new.
Loose Drag - 返信
-
-
-
音量ボタン付近のミッドフレームの溝に開口ツールを差し込み、ミッドフレームを持ち上げて、スマートフォン本体から離します。
-
ミッドフレームを取り外します。
How do I reattach the midframe? it seems like there are a lot of tabs that need to be reinserted carefully
Slide in the bottom part at an angle in first since it has some tabs. Otherwise it will get stuck halfway on top
-


新しい交換パーツを元のパーツと比較します
—残っている部品を移植したり、または新しいパーツを取り付ける前に粘着剤の剥離紙を剥がすことが必要になる場合があります。
デバイスを組み立てる際は、上記の手順を逆に実行してください。
古いパーツは、R2 or e-Stewards certified recyclerに持っていきます。
予定通りに修理できなかった場合は、当サイトのアンサーコミュニティを参照して、トラブルシューティングを確認してください。
新しい交換パーツを元のパーツと比較します
—残っている部品を移植したり、または新しいパーツを取り付ける前に粘着剤の剥離紙を剥がすことが必要になる場合があります。
デバイスを組み立てる際は、上記の手順を逆に実行してください。
古いパーツは、R2 or e-Stewards certified recyclerに持っていきます。
予定通りに修理できなかった場合は、当サイトのアンサーコミュニティを参照して、トラブルシューティングを確認してください。
15 の人々がこのガイドを完成させました。
以下の翻訳者の皆さんにお礼を申し上げます:
100%


これらの翻訳者の方々は世界を修理する私たちのサポートをしてくれています。 あなたも貢献してみませんか?
翻訳を始める ›

5 件のコメント
Is there a guide for replacing the lens cover? I bought the replacement camera and lens cover, but not sure how to replace the cover. I may not even need a new camera, since my camera is just a little blurry. Any help would be appreciated!
Unfortunately we don’t have a guide for the camera lens cover yet. It’s just adhered to the back of the phone, so you should be able to heat it and carefully pry it up, or push it out from the inside of the phone. Before installing the new lens cover make sure you scrape all the old adhesive off of the phone and clean adhesion surface with isopropyl alcohol. Then you should be able to use the provided adhesive to install the new cover. Try not to touch the clear part of the new cover since fingerprints might be tough to clean off.
Also, I’d probably try just replacing the lens cover first and then testing the camera (without sealing the phone closed) and see if that fixes your issue before you replace the whole camera. Hope that helps, and good luck with the repair!
I just recently replaced the camera and lens on a pixel 2 xl, after installing and reassembly every time I opened the camera app it just came up dark screen and closed, I cleared cache, memory and even ended up performing a hard reset on the device and nothing helped; also updated the OS and the camera app and nothing helped out. Any suggestions?
Sorry you're experiencing that. I just did the camera replacement, and didn't need to clear any cache or anything, and it just works
Shouldn’t this be “As close as possible to the volume rocker”?
Mihai Turdean - 返信
Forget about the tiny toy suction cup they provide to battery replacement kits. I used a dent puller from an automotive shop. The smallest they had was just small enough for the Pixel's screen. I still needed to heat the edges with a heat gun.
Tamás Polgár - 返信
I wish someone tell me in advance that if I doing this replacement after using phone for a few years it better to have spare "display adhesive" and be ready to follow Google Pixel 2 XLディスプレイ粘着剤の交換
Original adhesive become dirty with time and fat chances it will be damaged during opening phase. In my case I replaced battery but can't use the phone, as still waiting for adhesive to be delivered
Maxim Vorontsov - 返信