メインコンテンツにスキップ

GoPro Hero5 Black Lens Assembly Replacement

必要な工具と部品

  1. GoPro Hero5 Black Lens Assembly Replacement, Battery: 手順 1、 3の画像 1 GoPro Hero5 Black Lens Assembly Replacement, Battery: 手順 1、 3の画像 2 GoPro Hero5 Black Lens Assembly Replacement, Battery: 手順 1、 3の画像 3
    • While pressing the button on the bottom of the GoPro, slide the battery door to the side to pop it open.

  2. GoPro Hero5 Black Lens Assembly Replacement: 手順 2、 3の画像 1 GoPro Hero5 Black Lens Assembly Replacement: 手順 2、 3の画像 2 GoPro Hero5 Black Lens Assembly Replacement: 手順 2、 3の画像 3
    • Grab the plastic flap on the battery and pull the battery out.

  3. GoPro Hero5 Black Lens Assembly Replacement, Back Housing: 手順 3、 2の画像 1 GoPro Hero5 Black Lens Assembly Replacement, Back Housing: 手順 3、 2の画像 2
    • Pull and twist the lens cover right or left until it pops off.

    • The lens cover is secured tightly and might be difficult to twist off.

    レンズを回すには爪などをレンズカバーと本体との隙間に入れて、手前に引き出してから回転させます。

    Taizo Yamamoto - 返信

    Go around the gap between the lens cover and camera body with a thin spludger to open a small gap and the cover will twist off easily.

    Paul - 返信

  4. GoPro Hero5 Black Lens Assembly Replacement: 手順 4、 1の画像 1
    • This step is not necessary but will make the process of removing the faceplate much easier.

    • Refer to the iOpener instructions for how to heat up and use the iOpener.

    • Apply the heated iOpener to the front of the GoPro for a few minutes to melt the adhesive under the faceplate.

    • The heated iOpener is very hot and can burn your hands. Avoid burns by using towels or gloves to hold the iOpener.

  5. GoPro Hero5 Black Lens Assembly Replacement: 手順 5、 3の画像 1 GoPro Hero5 Black Lens Assembly Replacement: 手順 5、 3の画像 2 GoPro Hero5 Black Lens Assembly Replacement: 手順 5、 3の画像 3
    • Starting with the edges, use the spudger to pry off the faceplate.

    • The faceplate is held down with adhesive and may take a while to get off.

  6. GoPro Hero5 Black Lens Assembly Replacement: 手順 6、 2の画像 1 GoPro Hero5 Black Lens Assembly Replacement: 手順 6、 2の画像 2
    • Remove the six T3 Torx screws.

    Where can I get the screw driver

    subashzeeq - 返信

    Mine are actually T4 screws.

    John Hahn - 返信

  7. GoPro Hero5 Black Lens Assembly Replacement: 手順 7、 3の画像 1 GoPro Hero5 Black Lens Assembly Replacement: 手順 7、 3の画像 2 GoPro Hero5 Black Lens Assembly Replacement: 手順 7、 3の画像 3
    • Be careful when pulling open the motherboard assembly as it is still connected to the back housing by four cables. The cables may break if stretched.

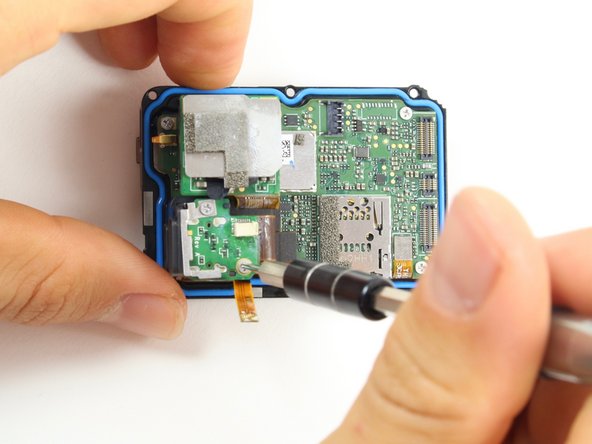
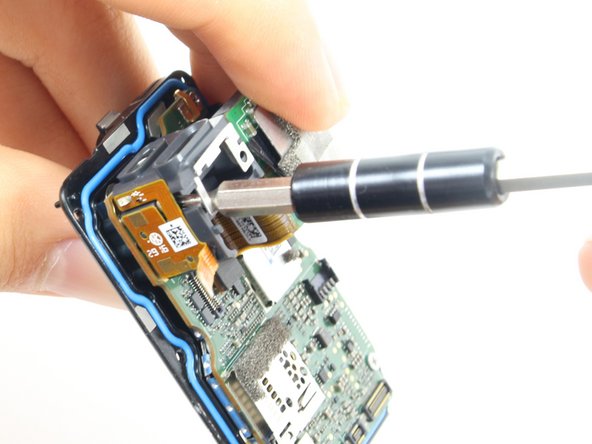
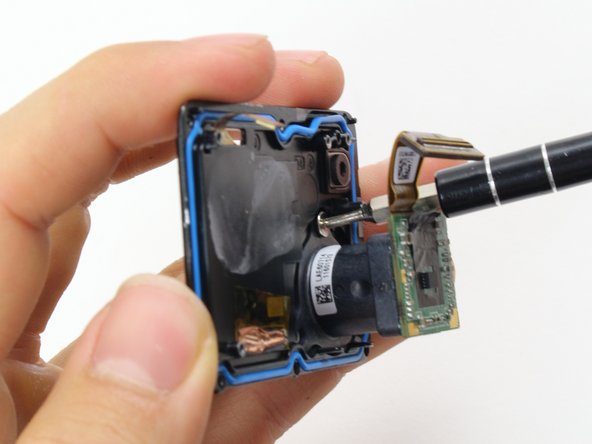
    • Using the spudger, slowly pry open the motherboard assembly from the LCD side of the GoPro.

    Little FYI ; pry slightly on the side with the LCD. Once it pops, work the other slightly. Then pull the board up and out but remember the cables. THE PICTURE ABOVE WHERE THE METAL SHIELD IS IS THE CAMERA LENS! CABLES ARE ON THE SIDE WHERE YOU BEGIN PRYING.

    stevan othon - 返信

  8. GoPro Hero5 Black Lens Assembly Replacement: 手順 8、 3の画像 1 GoPro Hero5 Black Lens Assembly Replacement: 手順 8、 3の画像 2 GoPro Hero5 Black Lens Assembly Replacement: 手順 8、 3の画像 3
    • Use the flat end of a spudger to pry the three ribbon cables connected to the side of the motherboard.

  9. GoPro Hero5 Black Lens Assembly Replacement: 手順 9、 2の画像 1 GoPro Hero5 Black Lens Assembly Replacement: 手順 9、 2の画像 2
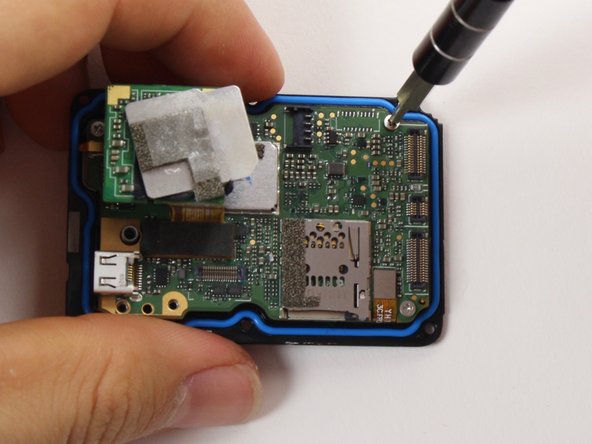
    • Use the flat end of the spudger to pry the battery housing power cable straight up from its socket on the motherboard.

    Does anyone know which are the specs of the connector/socket? Thanks

    Pietro De Caro - 返信

  10. GoPro Hero5 Black Lens Assembly Replacement, Motherboard: 手順 10、 1の画像 1
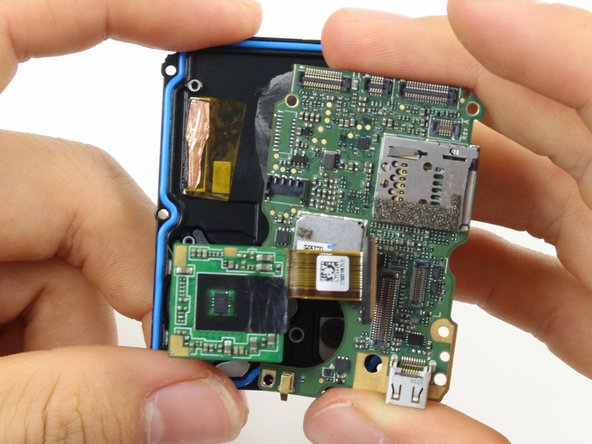
    • Use the flat end of the spudger to pry the black cover plate straight up from its socket on the motherboard.

  11. GoPro Hero5 Black Lens Assembly Replacement: 手順 11、 1の画像 1
    • Use the tweezers to pull the ribbon cable connector out of its white socket on the charging assembly board.

  12. GoPro Hero5 Black Lens Assembly Replacement: 手順 12、 2の画像 1 GoPro Hero5 Black Lens Assembly Replacement: 手順 12、 2の画像 2
    • Remove the two #000 Phillips screw.

  13. GoPro Hero5 Black Lens Assembly Replacement: 手順 13、 2の画像 1 GoPro Hero5 Black Lens Assembly Replacement: 手順 13、 2の画像 2
    • Use the flat end of the spudger to pry the charging port ribbon cable connector straight up from its socket on the motherboard.

    • Once the ribbon cable is disconnected from the motherboard. The charging port assembly should come right off.

  14. GoPro Hero5 Black Lens Assembly Replacement: 手順 14、 2の画像 1 GoPro Hero5 Black Lens Assembly Replacement: 手順 14、 2の画像 2
    • Remove the 10mm #000 Phillips screw.

  15. GoPro Hero5 Black Lens Assembly Replacement: 手順 15、 1の画像 1
    • Remove the charging assembly housing by pulling it straight up off the motherboard.

  16. GoPro Hero5 Black Lens Assembly Replacement: 手順 16、 2の画像 1 GoPro Hero5 Black Lens Assembly Replacement: 手順 16、 2の画像 2
    • Remove the two 6mm #000 Phillips screws.

    • Remove the two 2mm #000 Phillips screws.

  17. GoPro Hero5 Black Lens Assembly Replacement: 手順 17、 1の画像 1
    • Use the flat end of the spudger to pry the lens assembly ribbon cable connector straight up from its socket on the motherboard.

  18. GoPro Hero5 Black Lens Assembly Replacement: 手順 18、 1の画像 1
    • Use the flat end of the spudger to pry the LCD screen ribbon cable connector straight up from its socket on the motherboard.

  19. GoPro Hero5 Black Lens Assembly Replacement: 手順 19、 3の画像 1 GoPro Hero5 Black Lens Assembly Replacement: 手順 19、 3の画像 2 GoPro Hero5 Black Lens Assembly Replacement: 手順 19、 3の画像 3
    • Use the flat end of the spudger to pry the motherboard off the midframe.

    • The motherboard is held onto the midframe with light adhesive and should come right off with a little force.

  20. GoPro Hero5 Black Lens Assembly Replacement, Lens Assembly: 手順 20、 2の画像 1 GoPro Hero5 Black Lens Assembly Replacement, Lens Assembly: 手順 20、 2の画像 2
    • Remove the 2mm #000 Phillips screws using a #000 Phillips head screwdriver or tool bit.

  21. GoPro Hero5 Black Lens Assembly Replacement: 手順 21、 2の画像 1 GoPro Hero5 Black Lens Assembly Replacement: 手順 21、 2の画像 2
    • Pull the lens assembly straight out from the Midframe.

終わりに

To reassemble your device, follow these instructions in reverse order.

16 の人々がこのガイドを完成させました。

作成者

3人の作成者と共同で作成されました。

Christopher Adams

メンバー登録日: 10/03/16

2,112 ポイント

5のガイドは作成済み

チーム

Cal Poly, Team 18-6, Forte Fall 2016 Cal Poly, Team 18-6, Forte Fall 2016人のメンバー

CPSU-FORTE-F16S18G6

4 メンバー

22のガイドは作成済み

7 件のコメント

RageCams has interchangeable lens mod for hero5

http://ragecams.com/shop/modified-gopro-...

dennis - 返信

why can't You show how the lens is mount to that assembly? That's the point of it... can we change lenses that way or not?

Polina Luzenco - 返信

Exactly. Can the actual lens be unscrewed from the mount or it glued / fixed?

contact -

The lens is heavily glued onto the assembly. It would be far easier to replace the entire assembly than trying to remove that glue.

Christopher Adams -

the guy who wrote the guide apparently has never heard of pliers. it comes right out, but no idea what the threading is.

mattatron4 -

Actually the lens is just screwed into that last part. I took a pincer and gave it a slight tug and it unscrewed just fine. So if you bought just the lens replacement you can screw the new lens right in!

kokutouchichi - 返信

Any idea what the threading is?

mattatron4 -

コメントを追加

統計データ:

過去 24時間: 2

過去 7 日: 19

過去 30 日: 55

今までの合計 15,872