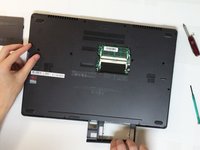
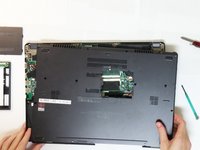
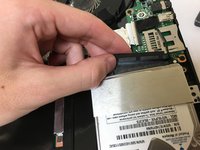
メインコンテンツにスキップ

Gigabyte P35K Laptop Hard Drive Replacement

必要な工具と部品

  1. Gigabyte P35K Laptop Hard Drive Replacement, Hard Drive: 手順 1、 3の画像 1 Gigabyte P35K Laptop Hard Drive Replacement, Hard Drive: 手順 1、 3の画像 2 Gigabyte P35K Laptop Hard Drive Replacement, Hard Drive: 手順 1、 3の画像 3
    • Touch grounded metal objects occasionally with a clear path to the ground, such as a metal radiator, to ensure that static electricity does not build up and discharge, damaging electronic components.

    • Work on a clean hard surface to minimize static buildup.

    • Fully power off the laptop.

    • Close the lid.

    • Flip the laptop over.

  2. Gigabyte P35K Laptop Hard Drive Replacement: 手順 2、 2の画像 1 Gigabyte P35K Laptop Hard Drive Replacement: 手順 2、 2の画像 2
    • Locate the small plastic back plate.

    • Remove the small 4.0mm screw holding the small plastic back plate in place.

  3. Gigabyte P35K Laptop Hard Drive Replacement: 手順 3、 3の画像 1 Gigabyte P35K Laptop Hard Drive Replacement: 手順 3、 3の画像 2 Gigabyte P35K Laptop Hard Drive Replacement: 手順 3、 3の画像 3
    • Remove the small plastic back plate.

    • Use a small flat head tool or knife to lift the plastic back plate and then use your hands to gently remove the plastic plate.

  4. Gigabyte P35K Laptop Hard Drive Replacement: 手順 4、 3の画像 1 Gigabyte P35K Laptop Hard Drive Replacement: 手順 4、 3の画像 2 Gigabyte P35K Laptop Hard Drive Replacement: 手順 4、 3の画像 3
    • Disconnect the small red and black cord connecting motherboard to the case using a small flathead screwdriver.

    • This cord is located under the back panel which was removed in the previous step.

    • Do not pull directly on the wires, instead gently pry the connector apart.

  5. Gigabyte P35K Laptop Hard Drive Replacement: 手順 5、 2の画像 1 Gigabyte P35K Laptop Hard Drive Replacement: 手順 5、 2の画像 2
    • Slide the switch on the base of the laptop from locked to open.

  6. Gigabyte P35K Laptop Hard Drive Replacement: 手順 6、 2の画像 1 Gigabyte P35K Laptop Hard Drive Replacement: 手順 6、 2の画像 2
    • Remove the removable drive bay or CD drive, whichever one is currently present in the laptop.

  7. Gigabyte P35K Laptop Hard Drive Replacement: 手順 7、 2の画像 1 Gigabyte P35K Laptop Hard Drive Replacement: 手順 7、 2の画像 2
    • Remove the 8 longer 7.0mm screws from the top and bottom of the laptop.

    • Remove the 6 shorter 5.0mm screws from the middle of the laptop.

  8. Gigabyte P35K Laptop Hard Drive Replacement: 手順 8、 3の画像 1 Gigabyte P35K Laptop Hard Drive Replacement: 手順 8、 3の画像 2 Gigabyte P35K Laptop Hard Drive Replacement: 手順 8、 3の画像 3
    • Beginning from the hole created by removing the drive bay in step 6 and moving in a counterclockwise direction, begin separating the base by gently prying between the seam separating the base from the mother board, using either your fingernail or a small flathead tool.

    • During this process you may hear small pops which is just the plastic releasing from the motherboard.

  9. Gigabyte P35K Laptop Hard Drive Replacement: 手順 9、 2の画像 1 Gigabyte P35K Laptop Hard Drive Replacement: 手順 9、 2の画像 2
    • Carefully place base plate aside, ensuring not to disconnect the wire which runs from the motherboard to the baseplate.

    • There is no need to disconnect the cable connecting the motherboard to the base of the computer as it is long enough to not interfere with the rest of the guide.

  10. Gigabyte P35K Laptop Hard Drive Replacement: 手順 10、 3の画像 1 Gigabyte P35K Laptop Hard Drive Replacement: 手順 10、 3の画像 2 Gigabyte P35K Laptop Hard Drive Replacement: 手順 10、 3の画像 3
    • Disconnect the battery from the motherboard by gently prying the plastic connector apart

    • Do not pull directly on the battery wires, first disconnect the plastic connector.

    • You do not need to remove the battery from the laptop, just make sure the connector is disconnected.

    • This is done to avoid electric discharge and possible damage to internal component.

  11. Gigabyte P35K Laptop Hard Drive Replacement: 手順 11、 1の画像 1
    • Locate hard drive in the bottom right of the laptop.

  12. Gigabyte P35K Laptop Hard Drive Replacement: 手順 12、 2の画像 1 Gigabyte P35K Laptop Hard Drive Replacement: 手順 12、 2の画像 2
    • Remove the two screws holding the hard drive in the laptop.

    • There is still a SATA cable holding the hard drive in the laptop so be careful after removing the screws.

  13. Gigabyte P35K Laptop Hard Drive Replacement: 手順 13、 3の画像 1 Gigabyte P35K Laptop Hard Drive Replacement: 手順 13、 3の画像 2 Gigabyte P35K Laptop Hard Drive Replacement: 手順 13、 3の画像 3
    • Remove the SATA connector by gently prying the far right, and then the far left of the connector until it slides out of the hard drive.

  14. Gigabyte P35K Laptop Hard Drive Replacement: 手順 14、 3の画像 1 Gigabyte P35K Laptop Hard Drive Replacement: 手順 14、 3の画像 2 Gigabyte P35K Laptop Hard Drive Replacement: 手順 14、 3の画像 3
    • Remove the hard drive from the laptop by picking it up.

    • Un-screw the metal holder by removing two more screws, one on either side of the hard drive.

  15. Gigabyte P35K Laptop Hard Drive Replacement: 手順 15、 1の画像 1
    • If replacing with an identical hard drive, repeat all the steps backwards and if necessary, reinstall windows.

    • If replacing the hard drive with a solid state drive, there may be a small gap between the metal holder and the top of the SSD, but this is normal.

終わりに

To reassemble your device, follow these instructions in reverse order.

6 の人々がこのガイドを完成させました。

作成者

2人の作成者と共同で作成されました。

Wilson Fletcher

メンバー登録日: 09/29/15

281 ポイント

1ガイドが承認済み

チーム

Cal Poly, Team 14-3, Green Fall 2015 Cal Poly, Team 14-3, Green Fall 2015人のメンバー

CPSU-GREEN-F15S14G3

4 メンバー

5のガイドは作成済み

0 件のコメント

コメントを追加

統計データ:

過去 24時間: 0

過去 7 日: 10

過去 30 日: 34

今までの合計 8,501