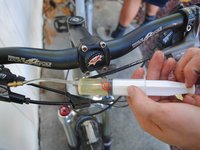
メインコンテンツにスキップ

Giant Reign 2 Hydraulic Brake Fluid Replacement

必要な工具と部品

  1. Giant Reign 2 Hydraulic Brake Fluid Replacement, Hydraulic Brake Fluid: 手順 1、 1の画像 1
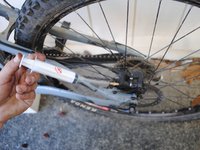
    • Pull out and rotate the quick release lever until the axle is loose.

    • Pull back on the derailleur on the left hand side. This lessens the force required to remove the wheel from its mount greatly.

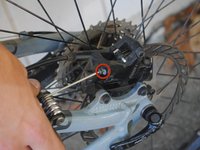
    • Lift the bike, and pull the wheel from its mount.

    • It is possible that your wheel does not have a quick release tab. In this case, use a wrench to loosen the retaining bolt. This wrench size varies between wheels.

  2. Giant Reign 2 Hydraulic Brake Fluid Replacement: 手順 2、 1の画像 1
    • Use a flat head screwdriver to push out on the break pads in order to space the hydraulic pistons.

    • Your hydraulic pistons will be fully extended at the end of travel of the brake pads.

  3. Giant Reign 2 Hydraulic Brake Fluid Replacement: 手順 3、 2の画像 1 Giant Reign 2 Hydraulic Brake Fluid Replacement: 手順 3、 2の画像 2
    • Slide the cover off of the hydraulic port until it is fully exposed.

    • Use a torque head bit to remove the screw on the hydraulic port of the brake handle. Be careful to not lose this screw.

  4. Giant Reign 2 Hydraulic Brake Fluid Replacement: 手順 4、 1の画像 1
    • Use a torque spit to remove the indicated screw on the rear brake caliper.

  5. Giant Reign 2 Hydraulic Brake Fluid Replacement: 手順 5、 2の画像 1 Giant Reign 2 Hydraulic Brake Fluid Replacement: 手順 5、 2の画像 2
    • Fill your syringe with hydraulic fluid.

    • Clear air out of the syringe by holding it upright, flicking on it with your finger, and pushing on the stopper until hydraulic fluid starts to come out.

  6. Giant Reign 2 Hydraulic Brake Fluid Replacement: 手順 6、 2の画像 1 Giant Reign 2 Hydraulic Brake Fluid Replacement: 手順 6、 2の画像 2
    • Screw the full syringe into the port on the caliper at the rear of the bike shown in the first photo.

    • Screw an empty syringe into the port at the front at the brake lever shown on the second photo. Fully depress this syringe before attaching it to the hydraulic system.

  7. Giant Reign 2 Hydraulic Brake Fluid Replacement: 手順 7、 2の画像 1 Giant Reign 2 Hydraulic Brake Fluid Replacement: 手順 7、 2の画像 2
    • Push the stopper down on the loaded syringe until it is almost empty.

    • Do not empty the bottom syringe completely, as this will cause air to be injected into the brake lines, causing malfunctions once you try to use your bike.

    • The empty syringe will fill with the excess hydraulic fluid.

    • Always push the fluid through the system starting from the lowest point. In this case it is the rear brakes.

  8. Giant Reign 2 Hydraulic Brake Fluid Replacement: 手順 8、 2の画像 1 Giant Reign 2 Hydraulic Brake Fluid Replacement: 手順 8、 2の画像 2
    • Remove the back syringe first. Depress the top syringe a little bit so that hydraulic fluid almost starts to flow out of the open hole. Then, replace the screw.

    • Once the first screw is replaced, remove the top syringe and replace that screw shown in the 2nd image.

終わりに

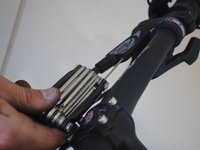
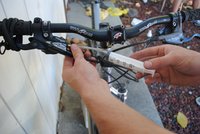
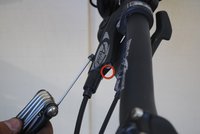
To reassemble your device, Replace the cover on the hydraulic port and reinstall the wheel with the calipers still in their widened position. Make sure that all screws over on the hydraulic ports are very secure. Once the wheel is installed, pump the brakes a few times to seat the brake pads. Confirm function of your brakes before attempting to ride the bike by inverting the bike so that it rests on the handlebars and seat, then spinning the rear and front wheels manually. If this does not work, you may need to add more fluid. Ride safe!

ある他の人がこのガイドを完成しました。

作成者

9人の作成者と共同で作成されました。

Sterling Grande

メンバー登録日: 10/08/12

148 ポイント

4のガイドは作成済み

チーム

Cal Poly, Team 9-14, Amido Fall 2012 Cal Poly, Team 9-14, Amido Fall 2012人のメンバー

CPSU-AMIDO-F12S9G14

4 メンバー

10のガイドは作成済み

0 件のコメント

コメントを追加

統計データ:

過去 24時間: 1

過去 7 日: 2

過去 30 日: 10

今までの合計 6,460