メインコンテンツにスキップ

このバージョンは誤った内容を含んでいる可能性があります。最新の承認済みスナップショットに切り替えてください。

必要な工具と部品

  1. この手順は未翻訳です。 翻訳を手伝う。

    : 手順 1、 1の画像 1
    • Using the 4mm Allen wrench, partially unscrew the 4 (22mm) hex screws on the front of the axle casing to allow the axle to slide freely.

  2. この手順は未翻訳です。 翻訳を手伝う。

    : 手順 2、 2の画像 1 : 手順 2、 2の画像 2
    • Using the 8mm Allen wrench, loosen the axle screw until 1/2 of the axle screw is visible.

    • Push the axle screw to reveal the axle rod on the other side.

  3. この手順は未翻訳です。 翻訳を手伝う。

    : 手順 3、 1の画像 1
    • Using the Allen wrench, finish unscrewing the axle screw and pull it out.

    • Hold the wheel when pulling out the axle rod so that the bike does not fall.

  4. この手順は未翻訳です。 翻訳を手伝う。

    : 手順 4、 1の画像 1
    • Pull the wheel from the fork.

  5. この手順は未翻訳です。 翻訳を手伝う。

    : 手順 5、 2の画像 1 : 手順 5、 2の画像 2
    • Using the 8mm Allen wrench, unscrew 2 (32mm) screws to release the brake calipers from the fork.

    • If necessary use wire cutters to release zip ties attaching cables to the forks.

  6. この手順は未翻訳です。 翻訳を手伝う。

    : 手順 6、 3の画像 1 : 手順 6、 3の画像 2 : 手順 6、 3の画像 3
    • Using the 8mm Allen wrench, unscrew the 30mm head screw located on top of the steam.

    • Using the 4mm Allen wrench, loosen the side screw on both sides.

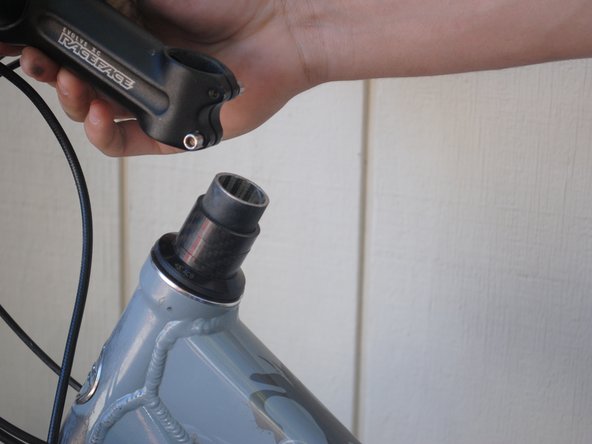
    • Lift off the handlebar.

    • Hang the handlebar gently from the cables. Do not pull the cables as you may damage the brake/derailleur lines.

  7. この手順は未翻訳です。 翻訳を手伝う。

    : 手順 7、 3の画像 1 : 手順 7、 3の画像 2 : 手順 7、 3の画像 3
    • Slide off the spacers.

    • Lift off the seal.

  8. この手順は未翻訳です。 翻訳を手伝う。

    : 手順 8、 1の画像 1
    • Slide the fork out of the casing.

  9. この手順は未翻訳です。 翻訳を手伝う。

    : 手順 9、 1の画像 1
    • Using your fingers, pry the bearings from the top and bottom of the headset.

  10. この手順は未翻訳です。 翻訳を手伝う。

    : 手順 10、 1の画像 1
    • Apply WD-40 to both ends of the headset and bearings.

    • Dry headset and bearings with paper towels.

    • Repeat as necessary until clean.

  11. この手順は未翻訳です。 翻訳を手伝う。

    : 手順 11、 2の画像 1 : 手順 11、 2の画像 2
    • Using your finger, apply all-purpose lube to the bearings and each end of the headset.

    • Insert the bearings into the headset with the beveled side facing into the headset.

ゴール

ある他の人がこのガイドを完成しました。

作成者

10人の作成者と共同で作成されました。

Sterling Grande

メンバー登録日: 10/08/12

148 ポイント

4のガイドは作成済み

チーム

Cal Poly, Team 9-14, Amido Fall 2012 Cal Poly, Team 9-14, Amido Fall 2012人のメンバー

CPSU-AMIDO-F12S9G14

4 メンバー

10のガイドは作成済み

0 件のコメント

コメントを追加

統計データ:

過去 24時間: 0

過去 7 日: 7

過去 30 日: 16

今までの合計 4,093