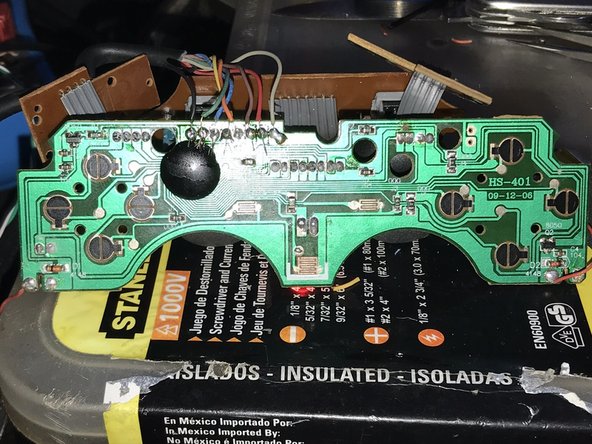
メインコンテンツにスキップ

Generic DualShock 2 Cable Pinout

必要な工具と部品

  1. Generic DualShock 2 Cable Pinout, DualShock 2 Disassembly: 手順 1、 2の画像 1 Generic DualShock 2 Cable Pinout, DualShock 2 Disassembly: 手順 1、 2の画像 2
    • First, check that the connection port of your controller (whether wireless or not) has all the pins.

    • If you have a wired controller (a controller with a cable that connects directly to your console) try bending it in different directions. This may recconect broken connections within the controller cabel and could be a temporary fix.

  2. Generic DualShock 2 Cable Pinout: 手順 2、 2の画像 1 Generic DualShock 2 Cable Pinout: 手順 2、 2の画像 2
    • Flip Over Controller and remove all 6 screws from the bottom of the controller.

  3. Generic DualShock 2 Cable Pinout: 手順 3、 2の画像 1 Generic DualShock 2 Cable Pinout: 手順 3、 2の画像 2
    • Once the screws are removed, carefully pry the controller open with your hands.

    • Remove the screw holding the circuit board in place.

  4. Generic DualShock 2 Cable Pinout: 手順 4、 1の画像 1
    • Carefully remove the circuit board from the front cover of the controller.

  5. Generic DualShock 2 Cable Pinout: 手順 5、 1の画像 1
    • Analyze the rubber pads for any debris that may be getting in the way of the black pads. These make an electrical connection on the pad and may not be contacting properly.

  6. Generic DualShock 2 Cable Pinout: 手順 6、 1の画像 1
    • Examine the flexible trigger board itself for any dirt or debris that could get in the rubber button pad's way.

  7. Generic DualShock 2 Cable Pinout: 手順 7、 1の画像 1
    • Check the connection of the flexible trigger board to the main circuit board of your controller.

  8. Generic DualShock 2 Cable Pinout: 手順 8、 1の画像 1
    • If the previous steps are all covered and you are still facing difficulties in getting your buttons to work, consider replacing the main circuit board or flexible trigger board.

  9. Generic DualShock 2 Cable Pinout: 手順 9、 1の画像 1
    • Reverse the disassembly steps until the controller is back to its original state. Plug the controller into the console and test whether the fix worked.

  10. Generic DualShock 2 Cable Pinout, Cable Color And Order: 手順 10、 2の画像 1 Generic DualShock 2 Cable Pinout, Cable Color And Order: 手順 10、 2の画像 2
    • Here it is how it should be connected.

終わりに

To reassemble your device, follow these instructions in reverse order.

2 の人々がこのガイドを完成させました。

作成者

1人の作成者と共同作成されました。

Bruno Melo

メンバー登録日: 02/07/19

146 ポイント

1ガイドが承認済み

0 件のコメント

コメントを追加

統計データ:

過去 24時間: 11

過去 7 日: 66

過去 30 日: 279

今までの合計 2,661