メインコンテンツにスキップ

Gateway Lt4004u Keyboard Replacement

必要な工具と部品

  1. Gateway Lt4004u Keyboard Replacement, Battery: 手順 1、 3の画像 1 Gateway Lt4004u Keyboard Replacement, Battery: 手順 1、 3の画像 2 Gateway Lt4004u Keyboard Replacement, Battery: 手順 1、 3の画像 3
    • Place the laptop face down in front of you.

    • Locate the battery lock switches on the left and right top corners of the bottom of the device indicated by the red circles.

    • Pinch the switches and slide toward the edges of the computer to unlock.

  2. Gateway Lt4004u Keyboard Replacement: 手順 2、 2の画像 1 Gateway Lt4004u Keyboard Replacement: 手順 2、 2の画像 2
    • Once the switches have both been unlocked, push the battery upwards away from the rest of the laptop.

    • Remove the battery from the laptop.

  3. Gateway Lt4004u Keyboard Replacement, Keyboard: 手順 3、 3の画像 1 Gateway Lt4004u Keyboard Replacement, Keyboard: 手順 3、 3の画像 2 Gateway Lt4004u Keyboard Replacement, Keyboard: 手順 3、 3の画像 3
    • Open the laptop so that the screen and keyboard are facing you.

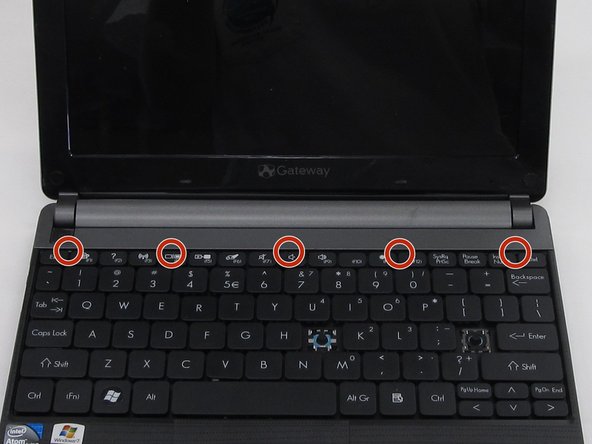
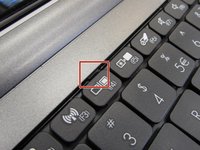
    • Identify the 5 tabs above the function keys in the crevice that attaches the keyboard to the main frame.

  4. Gateway Lt4004u Keyboard Replacement: 手順 4、 3の画像 1 Gateway Lt4004u Keyboard Replacement: 手順 4、 3の画像 2 Gateway Lt4004u Keyboard Replacement: 手順 4、 3の画像 3
    • Use an opening pick to push each tab away from you.

    • Use an opening tool to push the middle tab until you hear a click. Begin to push the tool downward into the computer and slide the card along the length of the keyboard, as you overcome the five tabs.

    • A clicking sound is normal and no cause for alarm.

  5. Gateway Lt4004u Keyboard Replacement: 手順 5、 3の画像 1 Gateway Lt4004u Keyboard Replacement: 手順 5、 3の画像 2 Gateway Lt4004u Keyboard Replacement: 手順 5、 3の画像 3
    この手順で使用する道具:
    Plastic Cards
    $2.99
    購入する
    • Begin to slide the plastic card under the top edge of the keyboard. You will hear popping sounds and the keyboard will eventually be released.

    • Carefully pry the keyboard from the main frame, starting at the top section.

    • Look at the intel sticker in this step and the next to orient your computer with the pictures.

  6. Gateway Lt4004u Keyboard Replacement: 手順 6、 2の画像 1 Gateway Lt4004u Keyboard Replacement: 手順 6、 2の画像 2
    • Look at the intel sticker in this step and the previous step to orient your computer with the pictures.

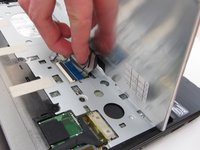
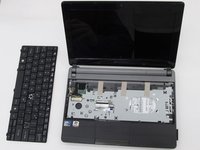
    • Unplug the thin blue connection piece beneath the keyboard. It may pop off on its own while you are prying off the keyboard.

    • The popping noise will not hurt the computer.

    • Once the thin blue plastic has been detached, remove the keyboard from the rest of the laptop.

終わりに

To reassemble your device, follow these instructions in reverse order.

作成者

3人の作成者と共同で作成されました。

Carlisle Hiott

メンバー登録日: 03/21/16

812 ポイント

7のガイドは作成済み

チーム

Clemson, Team 6-5, Benson Spring 2016 Clemson, Team 6-5, Benson Spring 2016人のメンバー

CLEM-BENSON-S16S6G5

4 メンバー

16のガイドは作成済み

0 件のコメント

コメントを追加

統計データ:

過去 24時間: 0

過去 7 日: 1

過去 30 日: 3

今までの合計 450