メインコンテンツにスキップ

Gateway LT2104u RAM Replacement Guide

必要な工具と部品

  1. Gateway LT2104u RAM Replacement Guide, RAM: 手順 1、 1の画像 1
    • Locate the the "L" shaped cover on the back, lower right hand side the device. Using a Philips screwdriver, remove the screw holding it in.

  2. Gateway LT2104u RAM Replacement Guide: 手順 2、 2の画像 1 Gateway LT2104u RAM Replacement Guide: 手順 2、 2の画像 2
    • Gently lift the cover until it detaches from the device.

  3. Gateway LT2104u RAM Replacement Guide: 手順 3、 2の画像 1 Gateway LT2104u RAM Replacement Guide: 手順 3、 2の画像 2
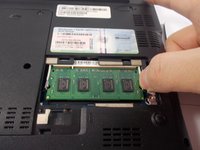
    • Gently push the levers on each side of the stick of RAM away from each other until the RAM springs into a 45° angle.

  4. Gateway LT2104u RAM Replacement Guide: 手順 4、 1の画像 1
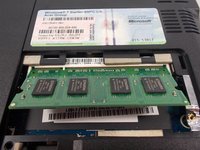
    • Carefully remove the stick of RAM by pulling at the same 45° angle the RAM is currently at until it detaches from the device.

  5. Gateway LT2104u RAM Replacement Guide: 手順 5、 1の画像 1
    • When inserting the new stick of ram, be sure to insert it at the same 45° angle that the old stick of ram was taken out at. Press the stick of RAM down until it clicks into place.

終わりに

To reassemble your device, follow these instructions in reverse order.

ある他の人がこのガイドを完成しました。

作成者

6人の作成者と共同で作成されました。

Chris Sullivan

メンバー登録日: 03/29/16

234 ポイント

2のガイドは作成済み

チーム

UMass Dartmouth, Team 7-5, Catania Spring 2016 UMass Dartmouth, Team 7-5, Catania Spring 2016人のメンバー

UMASSD-CATANIA-S16S7G5

3 メンバー

10のガイドは作成済み

0 件のコメント

コメントを追加

統計データ:

過去 24時間: 0

過去 7 日: 1

過去 30 日: 4

今までの合計 324