メインコンテンツにスキップ

Gateway 600YG2 CPU Replacement

必要な工具と部品

  1. Gateway 600YG2 CPU Replacement, Battery: 手順 1、 1の画像 1
    • Flip the laptop over.

    • Slide the battery release tab to the right to open the battery cover.

  2. Gateway 600YG2 CPU Replacement: 手順 2、 1の画像 1
    • Remove the battery cover using the tab on the right side.

    • Lift and remove the battery.

  3. Gateway 600YG2 CPU Replacement, Power Button Panel: 手順 3、 1の画像 1
    • Insert the spudger between the "sysrq" and "ins" keys.

    • Gently pry free the power button panel above the keyboard, from the right and moving to the left.

  4. Gateway 600YG2 CPU Replacement, Keyboard: 手順 4、 1の画像 1
    • Remove the five screws holding the keyboard in place.

  5. Gateway 600YG2 CPU Replacement: 手順 5、 2の画像 1 Gateway 600YG2 CPU Replacement: 手順 5、 2の画像 2
    • Possible device damage: When lifting the keyboard out, do not lift the keyboard up. Only fold back along the space bar edge.

    • Possible device damage: Do not pull the black cable by the ribbon section. Only pull it from the connector itself.

    • Follow the black ribbon cable and gently pull straight up.

  6. Gateway 600YG2 CPU Replacement, System Fan: 手順 6、 2の画像 1 Gateway 600YG2 CPU Replacement, System Fan: 手順 6、 2の画像 2
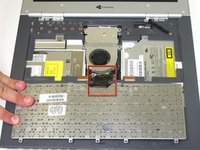
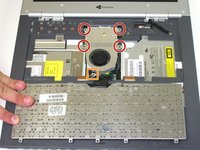
    • Unscrew the four captive screws.

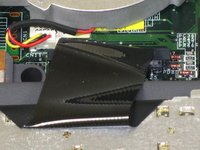
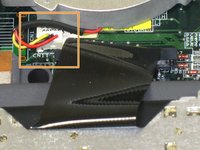
    • Unplug the fan from the system and pull it out. This should slide forward before coming free.

  7. Gateway 600YG2 CPU Replacement, CPU: 手順 7、 1の画像 1
    • Turn screw 1/4 turn to the right.

    • When reinstalling ensure proper orientation the yellow arrow on CPU should be in upper left corner

終わりに

To reassemble your device, follow these instructions in reverse order.

ある他の人がこのガイドを完成しました。

作成者

3人の作成者と共同で作成されました。

Elizabeth Mazer

メンバー登録日: 10/14/10

78 ポイント

10のガイドは作成済み

チーム

Cal Poly, Team 20-10, Maness Fall 2010 Cal Poly, Team 20-10, Maness Fall 2010人のメンバー

CPSU-MANESS-F10S20G10

3 メンバー

22のガイドは作成済み

0件のガイドコメント

コメントを追加

統計データ:

過去 24時間: 1

過去 7 日: 1

過去 30 日: 11

今までの合計 2,088