メインコンテンツにスキップ

Garmin Nuvi 2597LMT Motherboard Replacement

必要な工具と部品

  1. Garmin Nuvi 2597LMT Motherboard Replacement, Battery: 手順 1、 2の画像 1 Garmin Nuvi 2597LMT Motherboard Replacement, Battery: 手順 1、 2の画像 2
    • Turn your device over so the back is revealed and you can see the screws in the four corners.

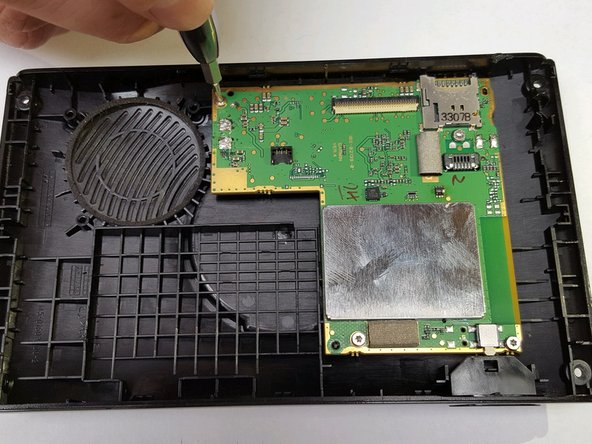
    • Remove the four 3mm width by 6mm length T5 Torx screws using your screwdriver.

    I needed to know what size Torx driver I needed. Thank you! This is very easy to follow. I’m sure I’ll have no problems now replacing my battery.

    myfblogin - 返信

  2. Garmin Nuvi 2597LMT Motherboard Replacement: 手順 2、 3の画像 1 Garmin Nuvi 2597LMT Motherboard Replacement: 手順 2、 3の画像 2 Garmin Nuvi 2597LMT Motherboard Replacement: 手順 2、 3の画像 3
    • Use the plastic opening tool to pry open the device at the seam where the two halves meet, prying all along the sides and the top seams if need be.

    • Do it slowly so you don't accidently rip the ribbon cable that connects the digitizer to the motherboard, as well as don't completely separate the halves as this can tear the ribbon cable.

  3. Garmin Nuvi 2597LMT Motherboard Replacement: 手順 3、 2の画像 1 Garmin Nuvi 2597LMT Motherboard Replacement: 手順 3、 2の画像 2
    • Locate the battery and then use your spudger to gently lift the battery, which is held to the case using a sticky pad, and free it from its position.

    • When you remove the battery, do so slowly so that the wires connecting it to the motherboard aren't torn. The wires will be disconnected in the next step.

  4. Garmin Nuvi 2597LMT Motherboard Replacement: 手順 4、 2の画像 1 Garmin Nuvi 2597LMT Motherboard Replacement: 手順 4、 2の画像 2
    • Use your hands or a spudger to gently lift the wires from underneath to disconnect the connector from the motherboard.

    • Once you have disconnected the battery from the motherboard, you can safely set it aside.

  5. Garmin Nuvi 2597LMT Motherboard Replacement, Motherboard: 手順 5、 3の画像 1 Garmin Nuvi 2597LMT Motherboard Replacement, Motherboard: 手順 5、 3の画像 2 Garmin Nuvi 2597LMT Motherboard Replacement, Motherboard: 手順 5、 3の画像 3
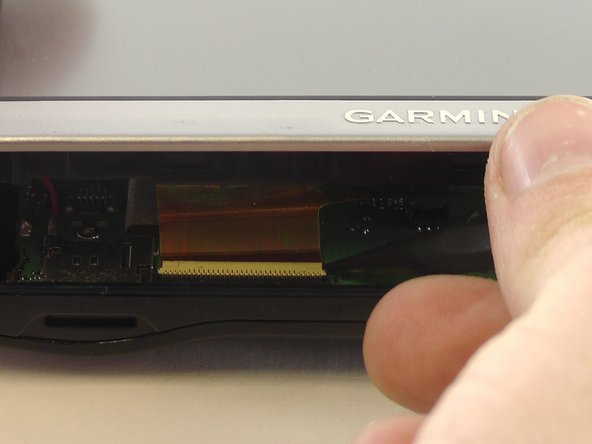
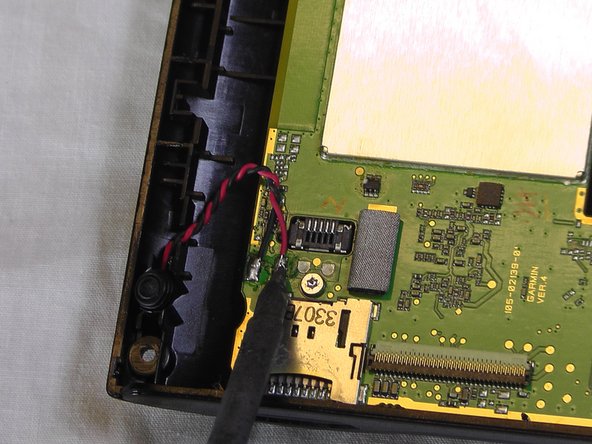
    • Use your tweezers to flip back the tab of the ZIF (Zero Insertion Force) Connector, that is used to keep the ribbon cable in place.

    • This releases the ribbon cable separating the two halves of the device.

  6. Garmin Nuvi 2597LMT Motherboard Replacement: 手順 6、 2の画像 1 Garmin Nuvi 2597LMT Motherboard Replacement: 手順 6、 2の画像 2
    • Use your thin spudger to gently lift the speaker off of the sticky pad and away from the casing.

  7. Garmin Nuvi 2597LMT Motherboard Replacement: 手順 7、 2の画像 1 Garmin Nuvi 2597LMT Motherboard Replacement: 手順 7、 2の画像 2
    • Use your soldering iron to disconnect the wires from the motherboard. Disconnect the ground wire (the black one) and the positive wire (the blue one).

    • The soldering iron is very hot and do not touch the wires to anything as it may stick to it when it cools.

    • After you have finished this step and the wire ends have cooled, you can safely set the removed speaker aside.

  8. Garmin Nuvi 2597LMT Motherboard Replacement: 手順 8、 2の画像 1 Garmin Nuvi 2597LMT Motherboard Replacement: 手順 8、 2の画像 2
    • Use your soldering iron to disconnect the wires from the motherboard. Disconnect the ground wire (the black one) and the positive wire (the red one).

    • The soldering iron is very hot and do not touch the wires to anything as it may stick to it when it cools.

  9. Garmin Nuvi 2597LMT Motherboard Replacement: 手順 9、 2の画像 1 Garmin Nuvi 2597LMT Motherboard Replacement: 手順 9、 2の画像 2
    • Use your hands to gently pull the microphone up and out of the casing.

    • After this step is complete, you can safely set the removed microphone aside.

  10. Garmin Nuvi 2597LMT Motherboard Replacement: 手順 10、 2の画像 1 Garmin Nuvi 2597LMT Motherboard Replacement: 手順 10、 2の画像 2
    • Remove the four 4mm width by 5mm length T5 Torx screws using your screwdriver.

  11. Garmin Nuvi 2597LMT Motherboard Replacement: 手順 11、 1の画像 1
    • Use your spudger to gently lift the motherboard out, it just sits in there so you don't have to struggle to get it out.

    • After this step, you can safely set your motherboard aside since it is out of the casing.

終わりに

To reassemble your device, follow these instructions in reverse order.

3 の人々がこのガイドを完成させました。

作成者

2人の作成者と共同で作成されました。

Patrick McNett

メンバー登録日: 10/03/16

887 ポイント

5のガイドは作成済み

チーム

USF Tampa, Team 1-4, Sullivan Fall 2016 USF Tampa, Team 1-4, Sullivan Fall 2016人のメンバー

USFT-SULLIVAN-F16S1G4

4 メンバー

5のガイドは作成済み

3 件のコメント

Very Helpful Patrick. Thank you. Now to replace the voltage regulator I accidentally smoked!!!!

desoto - 返信

Patrick,

Where can one buy motherboards for their Garmin Nuvi 2495 LM?

Sal Baby - 返信

Thanks Patrick. I'm using your guide for reference when opening my Nuvi 2495 LMT. The MicroSD card slot quit latching so I wanted to see if its gummed up or something else. I didn't know where to start aside from removing the screws on back. Now I know where to pry.

Fred Testerman - 返信

コメントを追加

統計データ:

過去 24時間: 0

過去 7 日: 1

過去 30 日: 8

今までの合計 803