メインコンテンツにスキップ

Game Boy Micro Buttons Replacement

必要な工具と部品

  1. Game Boy Micro Buttons Replacement, Remove the Cover: 手順 1、 2の画像 1 Game Boy Micro Buttons Replacement, Remove the Cover: 手順 1、 2の画像 2
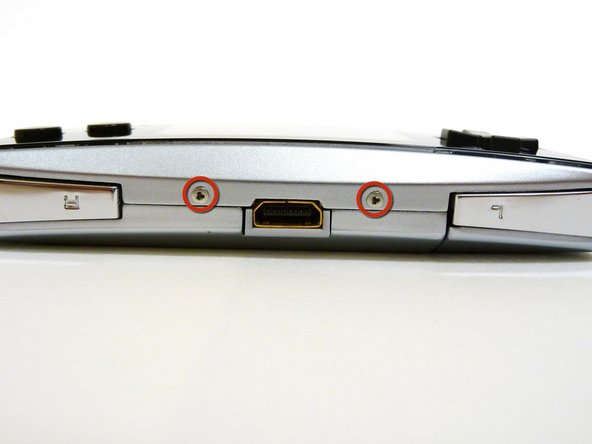
    • Remove the Phillips #00 screw on the side of the Game Boy closest to the directional pad.

    • Once the screw has been loosened, lift the cover off the back of the device.

  2. Game Boy Micro Buttons Replacement, Faceplate: 手順 2、 2の画像 1 Game Boy Micro Buttons Replacement, Faceplate: 手順 2、 2の画像 2
    • Locate the two circular holes on the side of the Game Boy nearest to the directional pad.

  3. Game Boy Micro Buttons Replacement: 手順 3、 3の画像 1 Game Boy Micro Buttons Replacement: 手順 3、 3の画像 2 Game Boy Micro Buttons Replacement: 手順 3、 3の画像 3
    • Straighten the end of a paper clip and push it into each of the circular holes.

    • You may hear a faint click afterwards.

    • Use the paper clip to lever the faceplate off from the unit.

    schlechte erklärung an dieser stelle. ich hab vorsichtig gedrückt. da kam kein klicken also habe ich nach und nach etwas mehr gedrückt. das “klicken” was ich dann gehört habe war dann wie die halterung innen abgebrochen ist…..

    entfernt diesen zusatzpunkt “du solltest ein leichtes klicken hören” daran sollte man sich nicht orientieren weil es blödsinn ist

    BlackLevant - 返信

  4. Game Boy Micro Buttons Replacement, Unscrew the Outer Cover: 手順 4、 2の画像 1 Game Boy Micro Buttons Replacement, Unscrew the Outer Cover: 手順 4、 2の画像 2
    • Remove the two tri-wing screws on the top of the Game Boy and the two screws next to the volume/contrast switch.

    It would be clearer if this were listed as 2 bullet points.

    Spencer W - 返信

  5. Game Boy Micro Buttons Replacement: 手順 5、 3の画像 1 Game Boy Micro Buttons Replacement: 手順 5、 3の画像 2 Game Boy Micro Buttons Replacement: 手順 5、 3の画像 3
    • Remove the three Phillips #00 screws.

    • Remove the two tri-wing screws.

    If the color of the inner plastic discolors, the durability is weakened. Do not remove the screws.

    If it is broken and damaged, there is no way to recover it.

    kimhyojong - 返信

  6. Game Boy Micro Buttons Replacement: 手順 6、 3の画像 1 Game Boy Micro Buttons Replacement: 手順 6、 3の画像 2 Game Boy Micro Buttons Replacement: 手順 6、 3の画像 3
    • Lift the back cover off of the Game Boy.

  7. Game Boy Micro Buttons Replacement: 手順 7、 3の画像 1 Game Boy Micro Buttons Replacement: 手順 7、 3の画像 2 Game Boy Micro Buttons Replacement: 手順 7、 3の画像 3
    • Remove the two Phillips #00 screws from the plastic frame.

    • As you are pulling off the plastic frame, the shoulder buttons and the volume switch may fall out of the device.

    • Underneath each shoulder button is a small spring. Do not lose them.

    Lost a spring, any way to get replacements?

    Thanks.

    Jacob Czarnopys - 返信

  8. Game Boy Micro Buttons Replacement: 手順 8、 2の画像 1 Game Boy Micro Buttons Replacement: 手順 8、 2の画像 2
    • With a spudger, depress the small clip on the lower right corner of the plastic guard.

    • Grab the edges of the plastic frame and lift the frame off the motherboard.

  9. Game Boy Micro Buttons Replacement: 手順 9、 1の画像 1
    • Remove the two gold Phillips #00 screws from the motherboard.

    It's easier and adds less risk of damaging the gold cable to remove the #00 motherboard screw by the d-pad between steps 12 and 13, after the motherboard has been removed from the front plate. This also makes it easier to reassemble if following the steps backwards.

    Spencer W - 返信

  10. Game Boy Micro Buttons Replacement: 手順 10、 2の画像 1 Game Boy Micro Buttons Replacement: 手順 10、 2の画像 2
    • With one hand, gently slide the top left end of the motherboard up and out of the front case.

    • With your other hand, pull out the EMI shield until the tab comes out of the front case.

    • Once the tab is pulled out from the bottom, slide the EMI shield down and out of the device.

    When putting the console back together, it is vital that you remember this step and slide the EMI shield back UNDERNEATH the outer shell of the console. It’s easy to miss, and placing the EMI shield ABOVE the outer shell of the console will result in the motherboard becoming lopsided, making the last piece of the console not slide into place.

    Austin Kelly - 返信

  11. Game Boy Micro Buttons Replacement: 手順 11、 3の画像 1 Game Boy Micro Buttons Replacement: 手順 11、 3の画像 2 Game Boy Micro Buttons Replacement: 手順 11、 3の画像 3
    • The entire motherboard is now accessible.

    • Take extreme care when working with the motherboard to avoid damaging the device and its components.

    • A small ribbon cable connects the start and select buttons to the motherboard. It can rip very easily, so do not pull on it.

    • Lift the motherboard and the front plastic cover assembly off of the front case.

    • Once the front case is removed, the plastic on/off switch will fall out of place.

    what if your start!/select buttons don't work?

    dontspamme123 - 返信

  12. Game Boy Micro Buttons Replacement: 手順 12、 3の画像 1 Game Boy Micro Buttons Replacement: 手順 12、 3の画像 2 Game Boy Micro Buttons Replacement: 手順 12、 3の画像 3
    • When you remove the motherboard from the front case, the start and select buttons may fall out.

    • If the buttons do not fall out, remove them with a pair of tweezers.

  13. Game Boy Micro Buttons Replacement: 手順 13、 3の画像 1 Game Boy Micro Buttons Replacement: 手順 13、 3の画像 2 Game Boy Micro Buttons Replacement: 手順 13、 3の画像 3
    • Without the front case, you will be left with the motherboard and the plastic mount. The LCD screen is attached to the motherboard by a ribbon and can fall off the plastic mount.

    • Using metal tweezers, grab the start/select board and slide it out gently.

  14. Game Boy Micro Buttons Replacement: 手順 14、 2の画像 1 Game Boy Micro Buttons Replacement: 手順 14、 2の画像 2
    • Lift the entire motherboard assembly off the plastic guard.

    • Take caution not to damage any of the gold ribbon cables on the motherboard.

    • The LCD screen is the only thing connecting the motherboard and plastic guard.

  15. Game Boy Micro Buttons Replacement: 手順 15、 2の画像 1 Game Boy Micro Buttons Replacement: 手順 15、 2の画像 2
    • To remove the LCD screen, carefully angle it until it is diagonal to the square hole in the plastic guard and slide it out.

    • It is now possible to remove the entire motherboard assembly from the plastic guard.

  16. Game Boy Micro Buttons Replacement: 手順 16、 3の画像 1 Game Boy Micro Buttons Replacement: 手順 16、 3の画像 2 Game Boy Micro Buttons Replacement: 手順 16、 3の画像 3
    • On the plastic guard, there are two rubber pads that cover the buttons. Remove them.

    • These pads rest on the motherboard and sometimes stick to it. If they do, peel them off.

    • With the rubber pads off, you may use your fingers to remove the buttons to clean or replace them.

    • When returning the buttons to the guard, they have to be put back in exactly the way they were pulled out.

終わりに

To reassemble your device, follow these instructions in reverse order.

9 の人々がこのガイドを完成させました。

作成者

11人の作成者と共同で作成されました。

Jack

メンバー登録日: 01/21/10

396 ポイント

3のガイドは作成済み

チーム

Cal Poly, Team 8-46, Regan Winter 2010 Cal Poly, Team 8-46, Regan Winter 2010人のメンバー

CPSU-REGAN-W10S8G46

5 メンバー

25のガイドは作成済み

3 件のコメント

Buenas abra el modo de reparar o puentear la placa de los botones start y selec ya que el flex se rompió

Good open the way to repairing or bypassing the plate and start buttons selec since the flex broke

Jesus Briones - 返信

Con ayuda de un cúter pela la terminales y solda nuevamente debes verificar si el flex tiene dos placas por ambos lados o solo es una

eshemoc - 返信

Any one know the right size shoulder buttons are for replacement ? Are they the same size as a ds lite R and L button ?

Philip Fuentes - 返信

コメントを追加

統計データ:

過去 24時間: 5

過去 7 日: 46

過去 30 日: 214

今までの合計 26,577