メインコンテンツにスキップ

Galaxy Watch Active2 Core Assembly Removal

必要な工具と部品

  1. Galaxy Watch Active2 Core Assembly Removal, Turn off the watch: 手順 1、 2の画像 1 Galaxy Watch Active2 Core Assembly Removal, Turn off the watch: 手順 1、 2の画像 2
    • Turn off the Galaxy Watch Active2 by pushing and holding the bottom button for approximately 3 seconds. You should feel a short vibration.

    • When the "Power off" symbol appears, tap the center of the screen to make it shut down. You should feel a longer vibration for confirmation.

  2. Galaxy Watch Active2 Core Assembly Removal, Remove the rear screws: 手順 2、 1の画像 1
    • Use a Tri-point Y00 screwdriver to remove the four 4 mm-long screws on the back of the watch.

  3. Galaxy Watch Active2 Core Assembly Removal, Separate the back cover from the housing: 手順 3、 3の画像 1 Galaxy Watch Active2 Core Assembly Removal, Separate the back cover from the housing: 手順 3、 3の画像 2 Galaxy Watch Active2 Core Assembly Removal, Separate the back cover from the housing: 手順 3、 3の画像 3
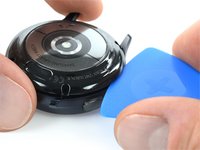
    • Use an opening pick and place it between the plastic back cover and the metal housing near the buttons.

    • Push the opening pick into the gap to separate the back cover from the housing.

    • Don’t remove the back cover all the way yet. There is a cable connecting it to the motherboard.

  4. Galaxy Watch Active2 Core Assembly Removal, Disconnect the sensor array: 手順 4、 2の画像 1 Galaxy Watch Active2 Core Assembly Removal, Disconnect the sensor array: 手順 4、 2の画像 2
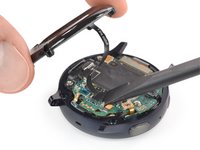
    • Carefully lift the back cover to access the sensor array connector.

    • Use a spudger to disconnect the sensor array from the motherboard.

  5. Galaxy Watch Active2 Core Assembly Removal, Remove the back cover: 手順 5、 1の画像 1
    • Remove the back cover.

  6. Galaxy Watch Active2 Core Assembly Removal, Disconnect the display and speaker: 手順 6、 3の画像 1 Galaxy Watch Active2 Core Assembly Removal, Disconnect the display and speaker: 手順 6、 3の画像 2 Galaxy Watch Active2 Core Assembly Removal, Disconnect the display and speaker: 手順 6、 3の画像 3
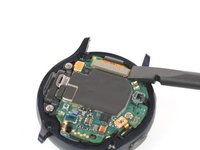
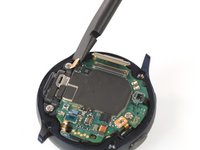
    • Use a spudger to disconnect the display assembly and the speaker.

  7. Galaxy Watch Active2 Core Assembly Removal, Disconnect the barometric sensor, buttons, and mic: 手順 7、 3の画像 1 Galaxy Watch Active2 Core Assembly Removal, Disconnect the barometric sensor, buttons, and mic: 手順 7、 3の画像 2 Galaxy Watch Active2 Core Assembly Removal, Disconnect the barometric sensor, buttons, and mic: 手順 7、 3の画像 3
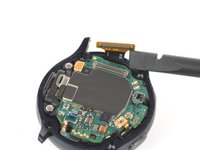
    • Use a spudger to disconnect the barometric sensor, the buttons, and the microphone.

  8. Galaxy Watch Active2 Core Assembly Removal, Lift the core assembly: 手順 8、 2の画像 1 Galaxy Watch Active2 Core Assembly Removal, Lift the core assembly: 手順 8、 2の画像 2
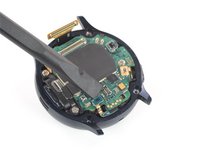
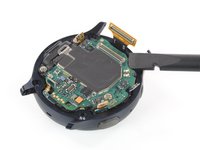
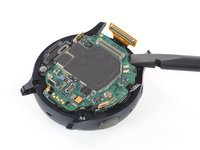
    • Place a spudger underneath the motherboard at the top right next to the display connector.

    • Slightly twist and lever the spudger to loosen the core assembly.

    • It might help to also check the comments below this and the next step if you’re having difficulties.

  9. Galaxy Watch Active2 Core Assembly Removal, Remove the core assembly: 手順 9、 3の画像 1 Galaxy Watch Active2 Core Assembly Removal, Remove the core assembly: 手順 9、 3の画像 2 Galaxy Watch Active2 Core Assembly Removal, Remove the core assembly: 手順 9、 3の画像 3
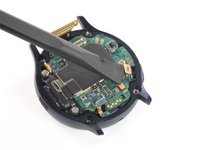
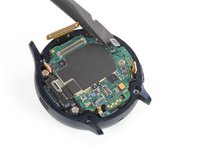
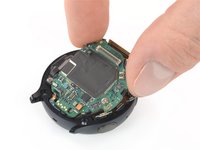
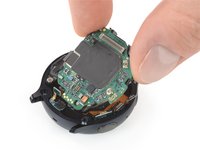
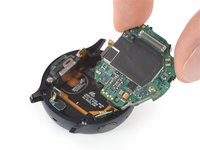
    • Grab the core assembly and carefully slide it out from under the cables.

    • Remove the core assembly.

終わりに

To reassemble your device, follow these instructions in reverse order.

7 の人々がこのガイドを完成させました。

Tobias Isakeit

メンバー登録日: 03/31/14

117,763 ポイント

188のガイドは作成済み

チーム

Tobias Isakeit - Repairability Engineer Tobias Isakeit - Repairability Engineer人のメンバー

Business

1 メンバー

1,082のガイドは作成済み

0 件のコメント

コメントを追加

統計データ:

過去 24時間: 3

過去 7 日: 19

過去 30 日: 118

今までの合計 6,878