メインコンテンツにスキップ

GE Carescape R860 Touch Bezel Assembly Replacement

医療機器
この修理ガイドは医療機器メーカーからの是認を得ておらず、iFixitと医療機器メーカーは提携していません。

必要な工具と部品

  1. GE Carescape R860 Touch Bezel Assembly Replacement, GE Carescape R860 Display Unit Disassembly: 手順 1、 1の画像 1
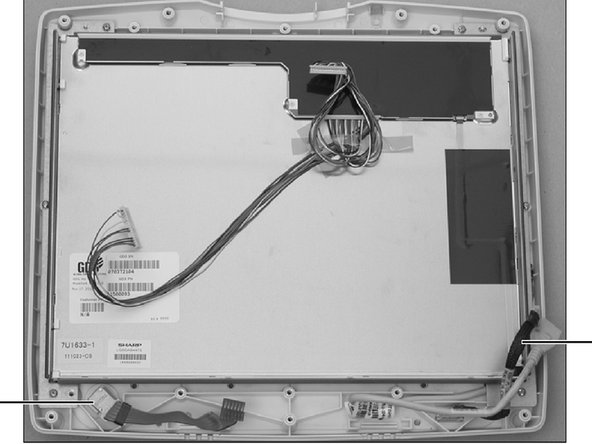
    • Using an opening tool, gently pry the alarm light lens (boxed) from the display unit.

  2. GE Carescape R860 Touch Bezel Assembly Replacement: 手順 2、 1の画像 1
    • Loosen the seven screws that hold the rear housing using a Phillips #0 screwdriver.

    • Remove the rear housing.

  3. GE Carescape R860 Touch Bezel Assembly Replacement: 手順 3、 1の画像 1
    • Cut the cable tie holding the two cables at the lower right side using scissors.

  4. GE Carescape R860 Touch Bezel Assembly Replacement: 手順 4、 1の画像 1
    • Disconnect the touch controller cable.

  5. GE Carescape R860 Touch Bezel Assembly Replacement: 手順 5、 1の画像 1
    • Disconnect the Keypad harness at the Carrier Board.

  6. GE Carescape R860 Touch Bezel Assembly Replacement: 手順 6、 1の画像 1
    • Disconnect the encoder harness from the Carrier Board.

  7. GE Carescape R860 Touch Bezel Assembly Replacement: 手順 7、 1の画像 1
    • Disconnect the speaker harness from the Carrier Board and set the speakers aside.

  8. GE Carescape R860 Touch Bezel Assembly Replacement: 手順 8、 1の画像 1
    • Disconnect the alarm light harness from the Carrier Board.

  9. GE Carescape R860 Touch Bezel Assembly Replacement: 手順 9、 1の画像 1
    • Loosen (do not remove) the five screws at the top edge of the shield just enough to raise it and slide the shield away with a Phillips #0 screwdriver.

  10. GE Carescape R860 Touch Bezel Assembly Replacement: 手順 10、 1の画像 1
    • Loosen the four screws along each side of the shield with a Phillips #0 screwdriver.

  11. GE Carescape R860 Touch Bezel Assembly Replacement: 手順 11、 1の画像 1
    • Remove the four screws at the bottom edge of the shield with a Phillips #0 screwdriver.

  12. GE Carescape R860 Touch Bezel Assembly Replacement: 手順 12、 1の画像 1
    • Slide the shield down to disengage the touch controller harness connector.

  13. GE Carescape R860 Touch Bezel Assembly Replacement, Touch Bezel Assembly: 手順 13、 1の画像 1
    • Remove rear housing and shield (refer to “Display Unit Disassembly”).

  14. GE Carescape R860 Touch Bezel Assembly Replacement: 手順 14、 1の画像 1
    • Disconnect the Blower fan cable (A); remove the p-clip (B) holding the harness to the Carrier board.

  15. GE Carescape R860 Touch Bezel Assembly Replacement: 手順 15、 1の画像 1
    • Disconnect the Carrier board to LCD LVDS harness (22) - two connectors.

  16. GE Carescape R860 Touch Bezel Assembly Replacement: 手順 16、 1の画像 1
    • Remove five LCD shield mounting screws (circled). Do not loosen any screws that are dabbed with sealing compound.

  17. GE Carescape R860 Touch Bezel Assembly Replacement: 手順 17、 2の画像 1 GE Carescape R860 Touch Bezel Assembly Replacement: 手順 17、 2の画像 2
    • Remove the LCD shield and Carrier board assembly from the LCD Touch Bezel assembly.

  18. GE Carescape R860 Touch Bezel Assembly Replacement: 手順 18、 1の画像 1
    • Transfer the Carrier Board to Keypad harness (23) and the Encoder assembly (15) to the new LCD Touch Bezel assembly.

終わりに

To reassemble your device, follow these instructions in reverse order.

作成者

1人の作成者と共同作成されました。

Seth Deming

メンバー登録日: 04/09/20

133 ポイント

1ガイドが承認済み

チーム

Cal Poly, Team S7-G9, Paton Spring 2020 Cal Poly, Team S7-G9, Paton Spring 2020人のメンバー

CPSU-PATON-S20S7G9

3 メンバー

4のガイドは作成済み

0 件のコメント

コメントを追加

統計データ:

過去 24時間: 0

過去 7 日: 0

過去 30 日: 1

今までの合計 148