メインコンテンツにスキップ

FujiFilm FinePix S5100 LCD Screen Replacement

必要な工具と部品

  1. FujiFilm FinePix S5100 LCD Screen Replacement, Battery: 手順 1、 1の画像 1
    • Ensure your camera is in the off position.

    • Orient the camera upside down with the lens facing to the left and the battery compartment facing directly toward you.

    • Open the battery door by pushing down and in the direction of the arrow on the door.

  2. FujiFilm FinePix S5100 LCD Screen Replacement: 手順 3、 1の画像 1
    • Remove four AA batteries from the camera.

  3. FujiFilm FinePix S5100 LCD Screen Replacement, Back Cover: 手順 4、 1の画像 1
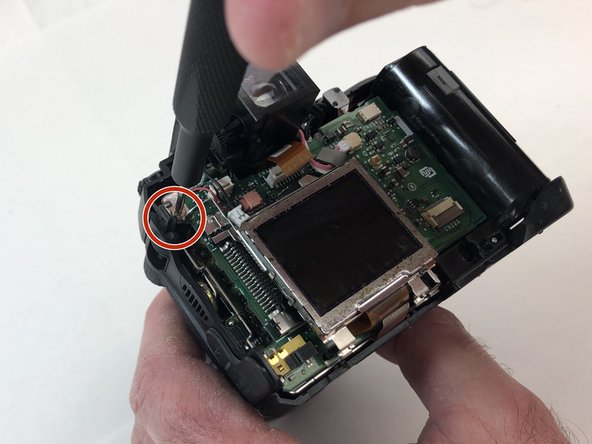
    • Turn the camera so the screen is facing you and the camera lens is facing away from you.

  4. FujiFilm FinePix S5100 LCD Screen Replacement: 手順 5、 3の画像 1 FujiFilm FinePix S5100 LCD Screen Replacement: 手順 5、 3の画像 2 FujiFilm FinePix S5100 LCD Screen Replacement: 手順 5、 3の画像 3
    • Remove two 0.9mm Phillips #000 screws from the right side of the camera.

    • Remove one 0.6mm Phillips #000 screw from the left side of the camera.

    • Remove two 0.6mm Phillips #000 screws from the bottom side of the camera.

    • When replacing the back cover on the camera, there will be an audible click which ensures the cover has completely seated with the rest of the camera.

  5. FujiFilm FinePix S5100 LCD Screen Replacement: 手順 6、 3の画像 1 FujiFilm FinePix S5100 LCD Screen Replacement: 手順 6、 3の画像 2 FujiFilm FinePix S5100 LCD Screen Replacement: 手順 6、 3の画像 3
    • Carefully pull the back cover and separate it from the rest of the camera body.

    • Carefully flip up the top of the tan colored tab to disconnect the ribbon cable and completely remove the back cover.

  6. FujiFilm FinePix S5100 LCD Screen Replacement, LCD Screen: 手順 7、 2の画像 1 FujiFilm FinePix S5100 LCD Screen Replacement, LCD Screen: 手順 7、 2の画像 2
    • Remove the two 1.3mm Phillips #000 screws from the LCD frame.

  7. FujiFilm FinePix S5100 LCD Screen Replacement: 手順 8、 2の画像 1 FujiFilm FinePix S5100 LCD Screen Replacement: 手順 8、 2の画像 2
    • Carefully using your hand, grab the LCD screen and pull upward and away from the motherboard.

    • Carefully using your hand, remove the tan digital tape by disconnecting it from the receiving port.

    • Remove the entire LCD screen from the motherboard.

終わりに

To reassemble your device, follow these instructions in reverse order.

ある他の人がこのガイドを完成しました。

作成者

4人の作成者と共同で作成されました。

Evans

メンバー登録日: 09/16/19

610 ポイント

6のガイドは作成済み

チーム

0 件のコメント

コメントを追加

統計データ:

過去 24時間: 1

過去 7 日: 4

過去 30 日: 8

今までの合計 181