メインコンテンツにスキップ

Fellowes Laminator Jupiter CRC 57018 heating

必要な工具と部品

  1. Fellowes Laminator Jupiter CRC 57018 heating, Opening the cover.: 手順 1、 2の画像 1 Fellowes Laminator Jupiter CRC 57018 heating, Opening the cover.: 手順 1、 2の画像 2
    • Opening the cover : push buttons on the left and right side. The right side has a coil to prevent opening under power and can get stuck.

  2. Fellowes Laminator Jupiter CRC 57018 heating, Cover removal: 手順 2、 1の画像 1
    • remove the 4 flat and 2 screws.

  3. Fellowes Laminator Jupiter CRC 57018 heating, Remove key panel: 手順 3、 2の画像 1 Fellowes Laminator Jupiter CRC 57018 heating, Remove key panel: 手順 3、 2の画像 2
    • Gently remove glued key panel

    • Remove 4 little screws behind the bottom of the panel

  4. Fellowes Laminator Jupiter CRC 57018 heating, Remove inside cover (upside): 手順 4、 3の画像 1 Fellowes Laminator Jupiter CRC 57018 heating, Remove inside cover (upside): 手順 4、 3の画像 2 Fellowes Laminator Jupiter CRC 57018 heating, Remove inside cover (upside): 手順 4、 3の画像 3
    • Remove screws upper side (some markers may be missing)

  5. Fellowes Laminator Jupiter CRC 57018 heating, Remove inside cover(bottom side): 手順 5、 3の画像 1 Fellowes Laminator Jupiter CRC 57018 heating, Remove inside cover(bottom side): 手順 5、 3の画像 2 Fellowes Laminator Jupiter CRC 57018 heating, Remove inside cover(bottom side): 手順 5、 3の画像 3
    • Turn laminator upside down and remove 6 bottom screws

    • When all screws are removed the inside cover can be lifted up

    • Remove the panels with led in front of the orange roll (sorry no picture).

  6. Fellowes Laminator Jupiter CRC 57018 heating, Test Heating resistors: 手順 6、 3の画像 1 Fellowes Laminator Jupiter CRC 57018 heating, Test Heating resistors: 手順 6、 3の画像 2 Fellowes Laminator Jupiter CRC 57018 heating, Test Heating resistors: 手順 6、 3の画像 3
    • You now have access to the inside

    • To measure the heating resistors detach the brown an blue wires leading to the roller assembly. Not the ones coming from the power cable and microswitches.

    • Ohmmeter result:

    • 80 ohm : everything OK

    • 340-350 ohm : main heating circuit (above and under black rollers) broken

    • 100 Ohm : preheating (horizontally between orange and black rollers) broken

  7. Fellowes Laminator Jupiter CRC 57018 heating, Motor and heating assemby removal: 手順 7、 3の画像 1 Fellowes Laminator Jupiter CRC 57018 heating, Motor and heating assemby removal: 手順 7、 3の画像 2 Fellowes Laminator Jupiter CRC 57018 heating, Motor and heating assemby removal: 手順 7、 3の画像 3
    • There are six screws fixing the motor and heating assembly to the bottom. (only two show in picture). Remove them and lift the assembly free

  8. Fellowes Laminator Jupiter CRC 57018 heating, Heating elements: 手順 8、 3の画像 1 Fellowes Laminator Jupiter CRC 57018 heating, Heating elements: 手順 8、 3の画像 2 Fellowes Laminator Jupiter CRC 57018 heating, Heating elements: 手順 8、 3の画像 3
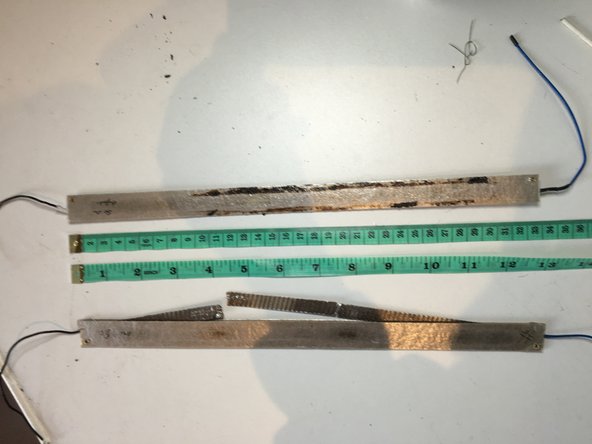
    • Heating elements are fixed on the left and right with two screws

    • And the resistor can be slided out.

    • This diagram helps detecting the faulty resistor.

  9. Fellowes Laminator Jupiter CRC 57018 heating, Missing Spare Parts: 手順 9、 2の画像 1 Fellowes Laminator Jupiter CRC 57018 heating, Missing Spare Parts: 手順 9、 2の画像 2
    • I was unable to find spare resistors. But since I had two identical laminators, both with a broken resistor above the upper black roll, repair was possible.

    • Many thanks if somebody can point to a provider for these spare parts

終わりに

To reassemble your device, follow these instructions in reverse order.

ある他の人がこのガイドを完成しました。

作成者

2人の作成者と共同で作成されました。

jean huens

メンバー登録日: 12/06/14

31 ポイント

1ガイドが承認済み

0 件のコメント

コメントを追加

統計データ:

過去 24時間: 1

過去 7 日: 2

過去 30 日: 9

今までの合計 900