メインコンテンツにスキップ

Eureka SuctionSeal 2.0 Pet Motor Replacement

必要な工具と部品

  1. Eureka SuctionSeal 2.0 Pet Motor Replacement, Dust Cup: 手順 1、 2の画像 1 Eureka SuctionSeal 2.0 Pet Motor Replacement, Dust Cup: 手順 1、 2の画像 2
    • Place the device upright with the brush roller closest to you.

    • Pull up on the latch at the top of the dust cup.

    • Tilt the top of the dust cup forward and pull towards yourself, removing the container from the device.

  2. Eureka SuctionSeal 2.0 Pet Motor Replacement, Brush Roll Cover: 手順 2、 2の画像 1 Eureka SuctionSeal 2.0 Pet Motor Replacement, Brush Roll Cover: 手順 2、 2の画像 2
    • Locate the gray exhaust filter cover at the top of the vacuum's base.

    • Grip the two tabs in the middle of the filter cover and rotate counter-clockwise.

    • Lift the cover away from the vacuum.

  3. Eureka SuctionSeal 2.0 Pet Motor Replacement: 手順 3、 3の画像 1 Eureka SuctionSeal 2.0 Pet Motor Replacement: 手順 3、 3の画像 2 Eureka SuctionSeal 2.0 Pet Motor Replacement: 手順 3、 3の画像 3
    • Pull up and unhook the two front tower latches using two fingers. These are located at the base of the tower.

    • Pull up and unhook the latch on the back of the tower.

    • Firmly lift the vacuum tower up and out of its stand.

    • The exhaust filter cover can be replaced once the tower is removed. It will not affect the steps.

  4. Eureka SuctionSeal 2.0 Pet Motor Replacement: 手順 4、 2の画像 1 Eureka SuctionSeal 2.0 Pet Motor Replacement: 手順 4、 2の画像 2
    • Remove the four 20mm screws on the top of the vacuum head's cover using a JIS 1 screwdriver.

  5. Eureka SuctionSeal 2.0 Pet Motor Replacement: 手順 5、 2の画像 1 Eureka SuctionSeal 2.0 Pet Motor Replacement: 手順 5、 2の画像 2
    • Turn the vacuum head so that the back is facing you.

    • Press the handle release pedal.

    • Rotate the top of the motor cover down while pressing on the pedal release.

    • The motor cover should rotate from an upright position back towards the ground, as it would if the handle were still attached.

  6. Eureka SuctionSeal 2.0 Pet Motor Replacement: 手順 6、 3の画像 1 Eureka SuctionSeal 2.0 Pet Motor Replacement: 手順 6、 3の画像 2 Eureka SuctionSeal 2.0 Pet Motor Replacement: 手順 6、 3の画像 3
    • Locate the two tabs on the back of the cover.

    • Pull up on the tabs and lift the cover away from the device.

  7. Eureka SuctionSeal 2.0 Pet Motor Replacement, Belt Latch Assembly: 手順 7、 2の画像 1 Eureka SuctionSeal 2.0 Pet Motor Replacement, Belt Latch Assembly: 手順 7、 2の画像 2
    • Locate the belt latch assembly. It will be on your right when the brush roll is facing you.

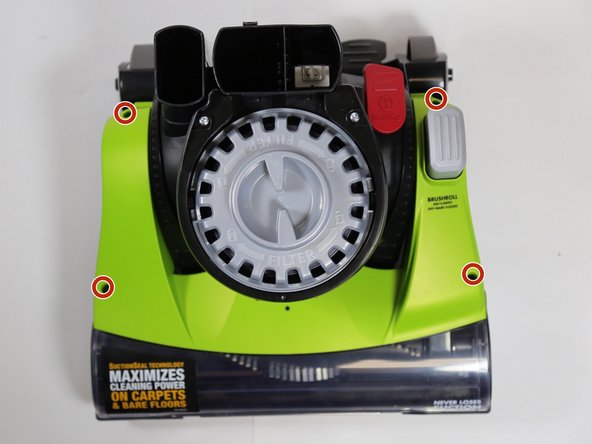
    • Remove the two 20mm screws using a JIS 1 screwdriver.

  8. Eureka SuctionSeal 2.0 Pet Motor Replacement: 手順 8、 1の画像 1
    • Lift up on the belt latch assembly and remove it from the vacuum.

  9. Eureka SuctionSeal 2.0 Pet Motor Replacement, Brush Roll: 手順 9、 3の画像 1 Eureka SuctionSeal 2.0 Pet Motor Replacement, Brush Roll: 手順 9、 3の画像 2 Eureka SuctionSeal 2.0 Pet Motor Replacement, Brush Roll: 手順 9、 3の画像 3
    • Grab the brush roll on both ends.

    • Lift up on the right side of the brush roll.

    • Lift up on the left side of the brush roll, completely removing it from its frame.

    • Separate the brush roll from the belt and remove the brush roll from the vacuum.

  10. Eureka SuctionSeal 2.0 Pet Motor Replacement, Brush Roll Belt: 手順 10、 3の画像 1 Eureka SuctionSeal 2.0 Pet Motor Replacement, Brush Roll Belt: 手順 10、 3の画像 2 Eureka SuctionSeal 2.0 Pet Motor Replacement, Brush Roll Belt: 手順 10、 3の画像 3
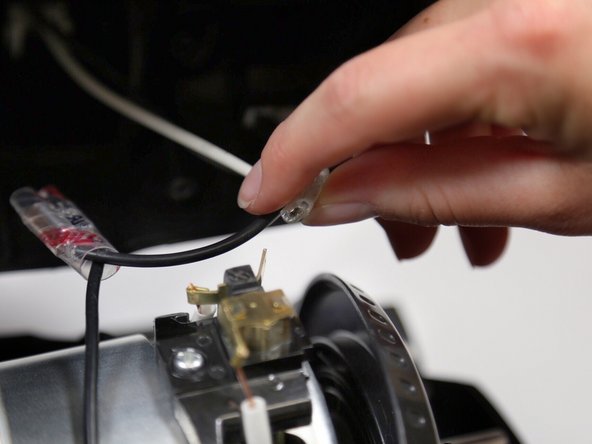
    • Rotate the belt until the front is above the motor shaft.

    • Twist the belt away from you, allowing the narrow side of the belt to slip between the motor shaft and the vertical rod.

    • Separate the belt from the motor shaft.

  11. Eureka SuctionSeal 2.0 Pet Motor Replacement, Motor: 手順 11、 3の画像 1 Eureka SuctionSeal 2.0 Pet Motor Replacement, Motor: 手順 11、 3の画像 2 Eureka SuctionSeal 2.0 Pet Motor Replacement, Motor: 手順 11、 3の画像 3
    • Rotate the motor cover upright until you hear the foot pedal click and the cover won't rotate in either direction.

    • Remove the bottom exhaust filter.

    • Use a 3.0 hex bit screwdriver to remove the two 20mm screws on the top of the dust cup stand.

    • Remove the dust cup stand.

  12. Eureka SuctionSeal 2.0 Pet Motor Replacement: 手順 12、 2の画像 1 Eureka SuctionSeal 2.0 Pet Motor Replacement: 手順 12、 2の画像 2
    • Press the handle release pedal and rotate the motor cover downward until it is fully reclined.

  13. Eureka SuctionSeal 2.0 Pet Motor Replacement: 手順 13、 2の画像 1 Eureka SuctionSeal 2.0 Pet Motor Replacement: 手順 13、 2の画像 2
    • Use a 3.0 hex bit screwdriver to remove the three 20mm screws on the front of the motor cover.

    • The screw holes will only be visible if the motor cover is rotated completely downward.

  14. Eureka SuctionSeal 2.0 Pet Motor Replacement: 手順 14、 2の画像 1 Eureka SuctionSeal 2.0 Pet Motor Replacement: 手順 14、 2の画像 2
    • Flip the vacuum over so that the underside of the device is facing upward.

    • Use a 3.0 Hex bit screwdriver to remove the two 20mm screws on the bottom of the motor cover.

    • The two screw holes will only be accessible if the handle release pedal is still released and the motor cover is rotated downward.

  15. Eureka SuctionSeal 2.0 Pet Motor Replacement: 手順 15、 2の画像 1 Eureka SuctionSeal 2.0 Pet Motor Replacement: 手順 15、 2の画像 2
    • Flip the vacuum so that it is right side up again with the front of the motor cover facing you.

    • Insert either a metal spudger or a plastic opening tool into the right or left side of the cover seam.

    • Pry upward as you move the tool across the cover, separating the top half of the motor cover from the lower half.

    • There will be some audible popping noises from separating the cover.

  16. Eureka SuctionSeal 2.0 Pet Motor Replacement: 手順 16、 2の画像 1 Eureka SuctionSeal 2.0 Pet Motor Replacement: 手順 16、 2の画像 2
    • Grip the exhaust valve at the top of the motor cover.

    • Lift up on the left side of the exhaust valve and then pull the right side upward to pry apart the motor cover.

    • There will be some audible popping noises from separating the cover.

    • Separating the cover takes a firm pull. You may need someone to assist you in pulling the cover apart.

    • When you remove the cover, make sure to keep the cover close to the motor. There is a short wire that connects the top of the cover to the motor. The wire can be damaged if the cover is separated too far.

  17. Eureka SuctionSeal 2.0 Pet Motor Replacement: 手順 17、 3の画像 1 Eureka SuctionSeal 2.0 Pet Motor Replacement: 手順 17、 3の画像 2 Eureka SuctionSeal 2.0 Pet Motor Replacement: 手順 17、 3の画像 3
    • Make sure the vacuum is unplugged before touching any internal components.

    • Grip the white cable that connects the power switch to the motor. Get as close as possible to the motor connection.

    • Pull firmly to separate the cable from the motor.

  18. Eureka SuctionSeal 2.0 Pet Motor Replacement: 手順 18、 3の画像 1 Eureka SuctionSeal 2.0 Pet Motor Replacement: 手順 18、 3の画像 2 Eureka SuctionSeal 2.0 Pet Motor Replacement: 手順 18、 3の画像 3
    • There is a black wire that connects the cover to the motor. Be careful to keep this wire connected and undamaged while removing the motor.

    • Lift up on the left side of the motor.

    • Move the motor to the left, sliding the motor shaft out of its circular casing.

    • Separate the motor completely from the vacuum's base.

終わりに

To reassemble your device, follow these instructions in reverse order.

作成者

3人の作成者と共同で作成されました。

Grayson Clendenon

メンバー登録日: 10/02/17

571 ポイント

5のガイドは作成済み

チーム

Cal Poly, Team S4-G5, Livingston Fall 2017 Cal Poly, Team S4-G5, Livingston Fall 2017人のメンバー

CPSU-LIVINGSTON-F17S4G5

3 メンバー

16のガイドは作成済み

0 件のコメント

コメントを追加

統計データ:

過去 24時間: 0

過去 7 日: 1

過去 30 日: 2

今までの合計 755