メインコンテンツにスキップ

Epson TM-U300 Cutter Blade Replacement

必要な工具と部品

  1. Epson TM-U300 Cutter Blade Replacement, Remove the cutter unit: 手順 1、 3の画像 1 Epson TM-U300 Cutter Blade Replacement, Remove the cutter unit: 手順 1、 3の画像 2 Epson TM-U300 Cutter Blade Replacement, Remove the cutter unit: 手順 1、 3の画像 3
    • Make sure the power supply/interface cables are disconnected before proceeding!

    • Open the print head/ribbon cartridge cover.

    • Remove the two Phillips screws securing the two grounding brackets which hold the cutter unit in place.

    • Set the metal brackets aside.

    • Do not pull on them forcibly – you risk tearing the grounding wires.

    • Remove the cutter, being careful not to tear/pinch the cable coming from it.

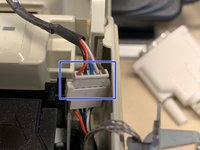
    • Disconnect the cable connecting the cutter to the printer.

  2. Epson TM-U300 Cutter Blade Replacement, Disassemble the cutter: 手順 2、 3の画像 1 Epson TM-U300 Cutter Blade Replacement, Disassemble the cutter: 手順 2、 3の画像 2 Epson TM-U300 Cutter Blade Replacement, Disassemble the cutter: 手順 2、 3の画像 3
    • Caution: The screws are quite soft and easy to strip.

    • Make sure the cutter assembly is oriented so that the motor/gears face you.

    • Remove the three screws holding the two halves in place.

    • Separate the two halves, making sure not to damage the wires.

  3. Epson TM-U300 Cutter Blade Replacement, Remove the blade: 手順 3、 3の画像 1 Epson TM-U300 Cutter Blade Replacement, Remove the blade: 手順 3、 3の画像 2 Epson TM-U300 Cutter Blade Replacement, Remove the blade: 手順 3、 3の画像 3
    • The blade will be accessible after separating the two halves.

    • The blade is sharp! Be careful not to injure yourself.

    • Make sure to note the position the blade is installed in.

    • The toothed edge should be facing the opening for the paper, with the longer of the three notches on the right (assuming the frame is oriented as pictured).

    • Make sure to route the wires coming from the cutter assembly through the groove in the left hinge of the print head cover when reinstalling the assembly into the printer.

終わりに

To reassemble your printer, follow these instructions in reverse order.

作成者

1人の作成者と共同作成されました。

Fifo F

メンバー登録日: 03/12/15

148 ポイント

1ガイドが承認済み

0 件のコメント

コメントを追加

統計データ:

過去 24時間: 1

過去 7 日: 5

過去 30 日: 11

今までの合計 270