メインコンテンツにスキップ

Eee Pad Transformer Prime TF201 Speaker Replacement

必要な工具と部品

  1. Eee Pad Transformer Prime TF201 Speaker Replacement, Opening Your Device: 手順 1、 1の画像 1
    • Power down your device.

    • Place the small suction cup on a corner of the screen and lightly pull up to expose a seam between the screen and case.

  2. Eee Pad Transformer Prime TF201 Speaker Replacement: 手順 2、 3の画像 1 Eee Pad Transformer Prime TF201 Speaker Replacement: 手順 2、 3の画像 2 Eee Pad Transformer Prime TF201 Speaker Replacement: 手順 2、 3の画像 3
    • Insert the plastic opening tool into the seam near the corner of the device.

    • Slowly slide the tool around the perimeter of the device, gradually prying up the screen.

    • It is normal to hear snaps as the spring clips holding the screen in place are released.

    • It is also normal to hear adhesive separating, as a small amount is used to help secure the screen.

  3. Eee Pad Transformer Prime TF201 Speaker Replacement: 手順 3、 3の画像 1 Eee Pad Transformer Prime TF201 Speaker Replacement: 手順 3、 3の画像 2 Eee Pad Transformer Prime TF201 Speaker Replacement: 手順 3、 3の画像 3
    • When the screen is free of all spring clips and adhesive, slowly open the device like a clam shell with the hinge being the left hand side of the device.

    • Do not completely separate the screen from the case by more than a few inches, as they are still connected by three orange ribbon cables.

    • Safely place the device back on the table by laying the screen face down.

    • There will be some slight overlapping of the back of the case over the screen.

  4. Eee Pad Transformer Prime TF201 Speaker Replacement: 手順 4、 2の画像 1 Eee Pad Transformer Prime TF201 Speaker Replacement: 手順 4、 2の画像 2
    • Disconnect the ribbon cable by placing a plastic opening tool under the black plastic tab that is on the opposite side of the port as the ribbon cable.

    • Pry upward until the black tab moves 90 degrees, and gently pull the ribbon cable out of the port.

  5. Eee Pad Transformer Prime TF201 Speaker Replacement: 手順 5、 1の画像 1
    • Place a plastic opening tool under the white plastic tab on one of the ribbon cable ports.

    • Pry upward until the black tab moves 90 degrees, and gently pull the ribbon cable out of the port.

    • Repeat the previous process to remove the other ribbon cable.

  6. Eee Pad Transformer Prime TF201 Speaker Replacement: 手順 6、 1の画像 1
    • Remove the battery (secured by six screws and a white wire connector) by following the removal portion of this battery replacement guide.

    • The device that we wrote this guide for did not come with a battery, so we cannot include it in our own guide steps.

    • The battery is removed during all repairs to protect against short circuits, shocks, and internal damage to the device.

  7. Eee Pad Transformer Prime TF201 Speaker Replacement, Speaker: 手順 7、 3の画像 1 Eee Pad Transformer Prime TF201 Speaker Replacement, Speaker: 手順 7、 3の画像 2 Eee Pad Transformer Prime TF201 Speaker Replacement, Speaker: 手順 7、 3の画像 3
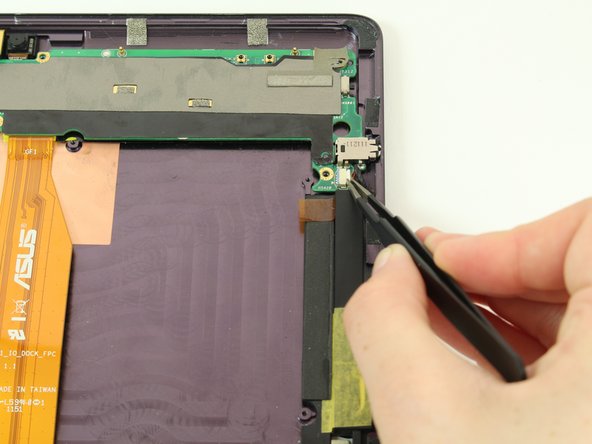
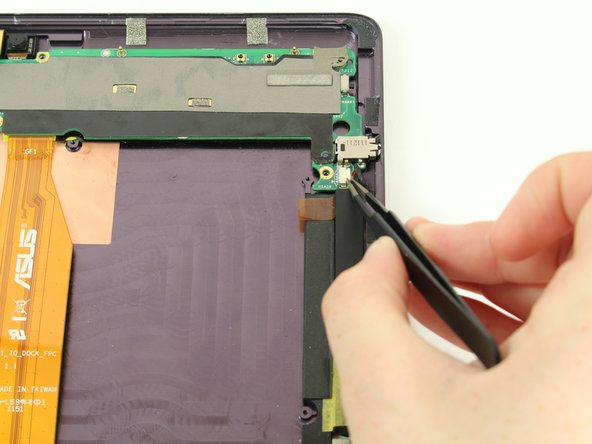
    • Remove the wires connecting the speakers to the motherboard by pushing the small tab until the connection is broken.

    • This may take some finesse to get out, so be careful.

  8. Eee Pad Transformer Prime TF201 Speaker Replacement: 手順 8、 2の画像 1 Eee Pad Transformer Prime TF201 Speaker Replacement: 手順 8、 2の画像 2
    • Use the plastic opening tool to remove the speaker from the back case.

    • There may be some slight resistance due to the glue used to hold the speakers in place.

終わりに

To reassemble your device, follow these instructions in reverse order.

ある他の人がこのガイドを完成しました。

作成者

5人の作成者と共同で作成されました。

David Garcia

メンバー登録日: 10/06/16

322 ポイント

3のガイドは作成済み

チーム

Cal Poly, Team 10-1, Livingston Fall 2016 Cal Poly, Team 10-1, Livingston Fall 2016人のメンバー

CPSU-LIVINGSTON-F16S10G1

2 メンバー

12のガイドは作成済み

コメント 1 件

useful information thank you.

tyishian lieu - 返信

コメントを追加

統計データ:

過去 24時間: 0

過去 7 日: 0

過去 30 日: 0

今までの合計 240