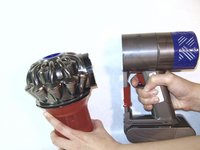
メインコンテンツにスキップ

Dyson v6 Absolute Cyclone Replacement

必要な工具と部品

  1. Dyson v6 Absolute Cyclone Replacement, Bin: 手順 1、 1の画像 1
    • Unplug the device.

  2. Dyson v6 Absolute Cyclone Replacement: 手順 2、 1の画像 1
    • Push down the red lever located on the outside of the bin, next to the device handle, to open the door to the debris bin.

    • Avoid pressing the trigger on the handle opposite the red lever, which activates the motor.

  3. Dyson v6 Absolute Cyclone Replacement: 手順 3、 1の画像 1
    • Push the red lever down a second time to release the debris bin.

    • Avoid pressing the trigger on the handle opposite the red lever, which activates the motor.

  4. Dyson v6 Absolute Cyclone Replacement: 手順 4、 1の画像 1
    • Pull bin away from the cyclone.

  5. Dyson v6 Absolute Cyclone Replacement, Main Body: 手順 5、 1の画像 1
    • Separate the bin from the main body of the device.

  6. Dyson v6 Absolute Cyclone Replacement: 手順 6、 1の画像 1
    • Locate two visible white clips between the main body and the cyclone.

  7. Dyson v6 Absolute Cyclone Replacement: 手順 7、 1の画像 1
    • Use tweezers to pinch the white clips together.

    • Widely hold the tweezers apart to get them to reach between the two white clips.

    • Because the space is tight between the cyclone and the main body, pinching the white clips may require additional effort.

  8. Dyson v6 Absolute Cyclone Replacement: 手順 8、 2の画像 1 Dyson v6 Absolute Cyclone Replacement: 手順 8、 2の画像 2
    • Tilt and pull the main body away from the cyclone.

    • There may be a loud snap when the main body separates from the cyclone.

  9. Dyson v6 Absolute Cyclone Replacement, Cyclone: 手順 9、 1の画像 1
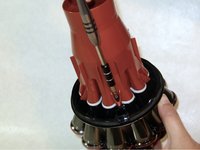
    • Use the spudger to remove the cyclone.

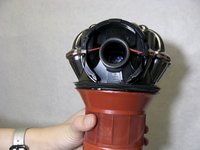
    • Start at the small opening beneath the place where the cyclone connects to the main body.

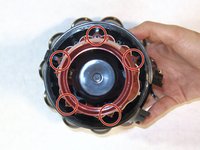
    • Work the spudger around the rim of the red screen filter.

    • You will hear popping noises.

  10. Dyson v6 Absolute Cyclone Replacement: 手順 10、 2の画像 1 Dyson v6 Absolute Cyclone Replacement: 手順 10、 2の画像 2
    • Use a T9 Torx screwdriver to remove five 14mm screws from the edge of the screen filter body.

  11. Dyson v6 Absolute Cyclone Replacement: 手順 11、 1の画像 1
    • Remove the filter screen cover away from the cyclone.

    • Pull down on the black tube inside the cyclone body to remove it from the cyclone.

終わりに

To reassemble your device, follow these instructions in reverse order.

16 の人々がこのガイドを完成させました。

作成者

2人の作成者と共同で作成されました。

Tabitha Espina Velasco

メンバー登録日: 01/23/17

3,594 ポイント

5のガイドは作成済み

チーム

Washington State, Team 1-2, Staggers Spring 2017 Washington State, Team 1-2, Staggers Spring 2017人のメンバー

WSU-STAGGERS-S17S1G2

2 メンバー

23のガイドは作成済み

2 件のコメント

Very helpful presentation. Reassembly was fiddley as the new cyclone was not broken and needed a very firm waggle and push to engage with the motor body. The white clip is not easy to grasp at the same time as the body and the cyclone.
I found three small broken black plastic pieces under the white clip- from the lugs of the old cyclone - that had to be removed, with tweezers, before assembling the body and cyclone.

John Griggs - 返信

Das Zyklon läßt sich noch viel weiter zerlegen!

Tom - 返信

コメントを追加

統計データ:

過去 24時間: 5

過去 7 日: 50

過去 30 日: 179

今までの合計 20,277