メインコンテンツにスキップ

Dynex DX-WBRDVD1 Cleaning The Optical Lens

必要な工具と部品

  1. Dynex DX-WBRDVD1 Cleaning The Optical Lens, Top Cover: 手順 1、 2の画像 1 Dynex DX-WBRDVD1 Cleaning The Optical Lens, Top Cover: 手順 1、 2の画像 2
    • Remove the four 5mm Phillips #1 screws that connect the black outer shell to the silver back of the device.

  2. Dynex DX-WBRDVD1 Cleaning The Optical Lens: 手順 2、 1の画像 1
    • Remove the two 5mm screws on the left and right side panels.

    • There is one screw on each side that secures the cover to the body of the device.

  3. Dynex DX-WBRDVD1 Cleaning The Optical Lens: 手順 3、 1の画像 1
    • Lift the black cover to a 45 degree angle from the rear of the device and pull the cover away entirely.

    • Check that the power cord is not preventing the device from opening or closing.

  4. Dynex DX-WBRDVD1 Cleaning The Optical Lens, Dynex DX-WBRDVD1 Cleaning The Optical Lens: 手順 4、 2の画像 1 Dynex DX-WBRDVD1 Cleaning The Optical Lens, Dynex DX-WBRDVD1 Cleaning The Optical Lens: 手順 4、 2の画像 2
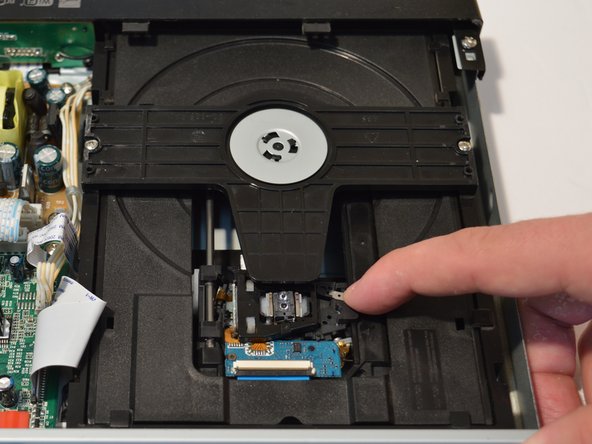
    • To access the optical lens, pull back the optical drive as shown in the pictures located on the two metal rails.

  5. Dynex DX-WBRDVD1 Cleaning The Optical Lens: 手順 5、 2の画像 1 Dynex DX-WBRDVD1 Cleaning The Optical Lens: 手順 5、 2の画像 2
    この手順で使用する道具:
    Microfiber Cleaning Cloths
    $3.99
    購入する
終わりに

To reassemble your device, follow these instructions in reverse order.

3 の人々がこのガイドを完成させました。

作成者

4人の作成者と共同で作成されました。

Caleigh Firth

メンバー登録日: 04/05/18

438 ポイント

3のガイドは作成済み

チーム

0 件のコメント

コメントを追加

統計データ:

過去 24時間: 0

過去 7 日: 5

過去 30 日: 12

今までの合計 595