メインコンテンツにスキップ

DualShock 4 CHU-ZCT2U ボタンの交換

アーカイブされたガイド
このガイドは将来的な使用のためにのみ保存されてます。ご自身の修理作業には更新バージョンをご利用ください。

必要な工具と部品

  1. DualShock 4 CHU-ZCT2U ボタンの交換, アウターシェル: 手順 1、 3の画像 1 DualShock 4 CHU-ZCT2U ボタンの交換, アウターシェル: 手順 1、 3の画像 2 DualShock 4 CHU-ZCT2U ボタンの交換, アウターシェル: 手順 1、 3の画像 3
    • プラスドライバーを使って、6.5mmネジを4本外します。

    • プラスチックの開口ツールを使って、ケースを二つに乖離させます。

    • コントローラー内側に繋がったままのリボンがあります。両ケースを外す際は、シェルを完全に引き抜かないでください。

    When re-asembling, be careful to check that all buttons/triggers are moving correctly. They can get misaligned when prying the two shell halves apart.

    Tale Spinner - 返信

    This part is missing vital information on how to correctly pry the case open. In the 3rd picture you can see there is actually damaged/broken clip already. In order to open the case without damage to the plastic clips inside the controller holding the plastics together you need to insert thin piece of metal between the trigger buttons on each side and push the clip outwards before trying to separate the parts, and if done correctly there is no force needed to pry open the controller. There is actually no necessary need for the clips, but if you want to keep your controller in mint condition without voiding the warranty, take care not to break these clips.

    Ville Närhi - 返信

    Your advice for opening shell was so bad and harmful.

    It's not correct

    Kiarash Moallemi - 返信

    And two more tiny clips to the left and right of the headphone & EXT port. They’re VERY delicate, reckless prying WILL break at least ONE of these.

    Strings Cat - 返信

    I've written a guide for how to find and unlatch the clips

    DualShock 4 CUH-ZCT2Uを開くための重要な作業

    Richard - 返信

  2. DualShock 4 CHU-ZCT2U ボタンの交換: 手順 2、 3の画像 1 DualShock 4 CHU-ZCT2U ボタンの交換: 手順 2、 3の画像 2 DualShock 4 CHU-ZCT2U ボタンの交換: 手順 2、 3の画像 3
    • ピンセットを使ってリボンケーブルをマザーボードポートから引き抜き、両側を完全に分離します。

    If you just want to change the battery, this step is not necessary; it can be done without disconnecting the ribbon cable.

    Tale Spinner - 返信

  3. DualShock 4 CHU-ZCT2U ボタンの交換, バッテリー: 手順 3、 3の画像 1 DualShock 4 CHU-ZCT2U ボタンの交換, バッテリー: 手順 3、 3の画像 2 DualShock 4 CHU-ZCT2U ボタンの交換, バッテリー: 手順 3、 3の画像 3
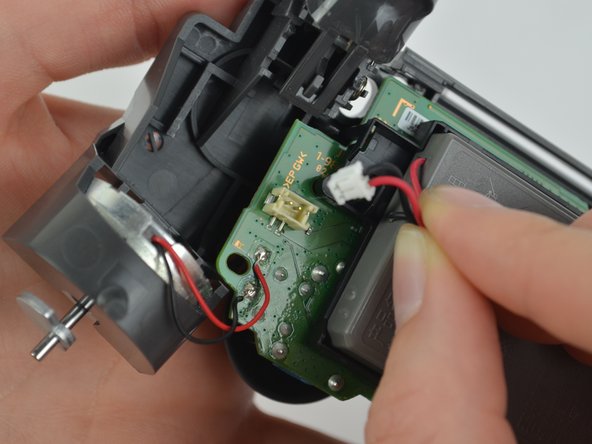
    • マザーボード上にある電源ポートから黒と赤のワイヤの接続を外します。

    • コントローラーから古いバッテリーを取り出します。

    Be extra careful - the power port socket pulled loose from the motherboard for me. I would suggest holding down the socket itself with one tool and gradually loosening the plug from the port.

    tylertemple - 返信

    Hey i have a question. When i plug my usb into the port the yellow color shows and that means its charging right? Because i left it overnight and i for sure know that it was yellow the whole time. But it didnt charge a single bit.

    Help - 返信

  4. DualShock 4 CHU-ZCT2U ボタンの交換: 手順 4、 2の画像 1 DualShock 4 CHU-ZCT2U ボタンの交換: 手順 4、 2の画像 2
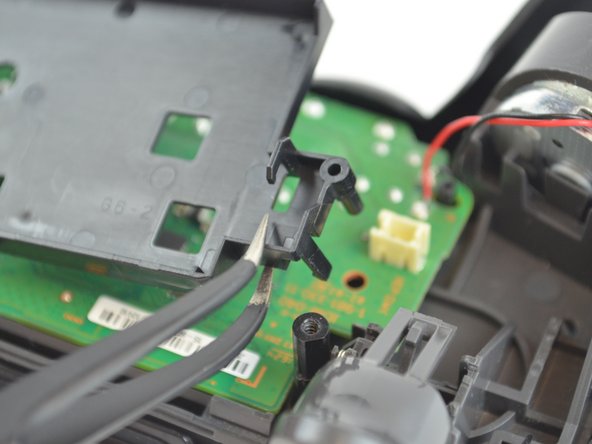
    • プラスネジ ドライバーを使って、マザーボードをコントローラーの内部構造に接続している6.43mmネジを外します

    this and the last step arnt necessary you just put the battery back and connect all of it up

    Joe Flores - 返信

  5. DualShock 4 CHU-ZCT2U ボタンの交換: 手順 5、 3の画像 1 DualShock 4 CHU-ZCT2U ボタンの交換: 手順 5、 3の画像 2 DualShock 4 CHU-ZCT2U ボタンの交換: 手順 5、 3の画像 3
    • バッテリーケースをマザーボードから外して、引き抜きます。

  6. DualShock 4 CHU-ZCT2U ボタンの交換, ボタン: 手順 6、 3の画像 1 DualShock 4 CHU-ZCT2U ボタンの交換, ボタン: 手順 6、 3の画像 2 DualShock 4 CHU-ZCT2U ボタンの交換, ボタン: 手順 6、 3の画像 3
    • 2番目のリボンケーブルを引き抜いて、外側のケース上部から内部パーツを外します。

  7. DualShock 4 CHU-ZCT2U ボタンの交換: 手順 7、 3の画像 1 DualShock 4 CHU-ZCT2U ボタンの交換: 手順 7、 3の画像 2 DualShock 4 CHU-ZCT2U ボタンの交換: 手順 7、 3の画像 3
    • 矢印ボタン、シェイプボタン、Playstationホームボタンを固定しているゴムパッドを取り外します。

    • この手順の後、一部のボタンが脱落する可能性があるため、フロント側のケースカバーを裏返さないでください。

  8. DualShock 4 CHU-ZCT2U ボタンの交換: 手順 8、 2の画像 1 DualShock 4 CHU-ZCT2U ボタンの交換: 手順 8、 2の画像 2
    • ピンセットで古いボタンを取り出して、新しいものに交換してください。

終わりに

デバイスを再組み立てする際は、これらの手順を逆の順番に従って作業を進めてください。

41 の人々がこのガイドを完成させました。

以下の翻訳者の皆さんにお礼を申し上げます:

en jp

100%

Midori Doiさんは世界中で修理する私たちを助けてくれています! あなたも貢献してみませんか?
翻訳を始める ›

作成者

4人の作成者と共同で作成されました。

Michelle Joseph

メンバー登録日: 10/09/17

1,762 ポイント

3のガイドは作成済み

チーム

USF Tampa, Team S1-G5, Leahy Fall 2017 USF Tampa, Team S1-G5, Leahy Fall 2017人のメンバー

USFT-LEAHY-F17S1G5

3 メンバー

22のガイドは作成済み

2 件のコメント

Where can I buy cuh zct2e spares from please
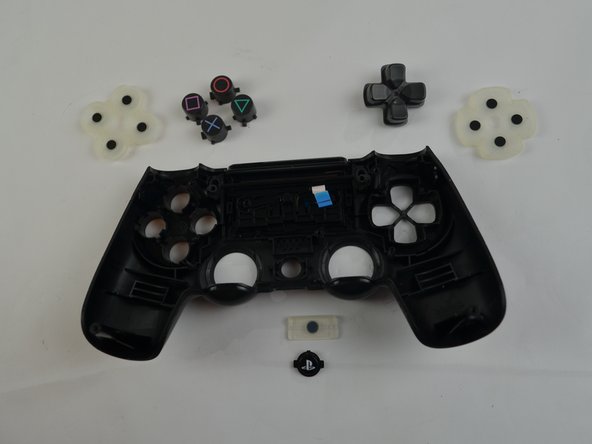
Paramdeep Dhaliwal - 返信

Can’t see an updated guide, and this one worked perfectly fine. Used to replace the buttons on a knock-off DualShock 4 from AliExpress. Construction was largely the same, only devoid of a screw anchoring the battery cradle. Would argue this was an extremely easy repair!

Casey - 返信

コメントを追加

統計データ:

過去 24時間: 13

過去 7 日: 47

過去 30 日: 339

今までの合計 28,041