はじめに
If your tablet's camera is having issues with its display, or is cracked, then you can use this guide to replace it. You will need a prying tool to remove the backplate, as well as a Phillips #00 screwdriver to remove screws. You may also want to use adhesive tape to further secure components after the replacement. With this in-depth guide, you will be able to fully replace your Dragon Touch Y88X Plus camera.
-
-
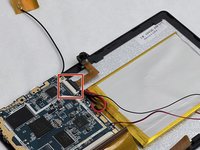
First, start by removing the backplate from the device using your IFixit opening tool.
-
-


To reassemble your device, follow these instructions in reverse order.
2 の人々がこのガイドを完成させました。

チーム

UMass Dartmouth, Team 1-4, Petersen Fall 2023 UMass Dartmouth, Team 1-4, Petersen Fall 2023人のメンバー
UMASSD-PETERSEN-F23S1G4
4 メンバー
4のガイドは作成済み