メインコンテンツにスキップ

Disassembly of the Huawei P Smart 2019

必要な工具と部品

  1. Disassembly of the Huawei P Smart 2019, Disassembly of the Huawei P Smart 2019: 手順 1、 3の画像 1 Disassembly of the Huawei P Smart 2019, Disassembly of the Huawei P Smart 2019: 手順 1、 3の画像 2 Disassembly of the Huawei P Smart 2019, Disassembly of the Huawei P Smart 2019: 手順 1、 3の画像 3
    • Turn off the phone and remove the SIM Tray.

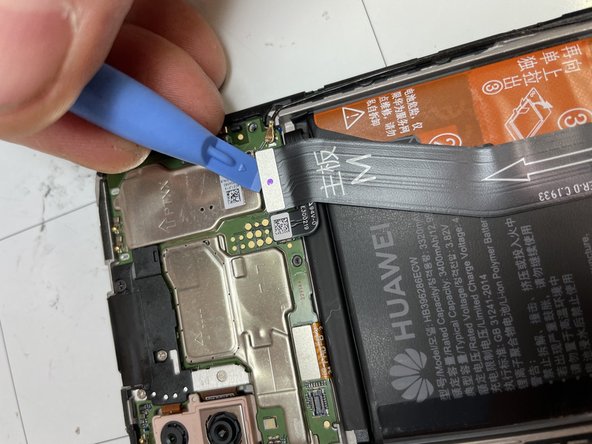
    • Use a thin tool to insert it into the slot and try to remove the back cover from the body.

    • When you lift the cover, be careful not to damage the flat cable of the fingerprint sensor.

  2. Disassembly of the Huawei P Smart 2019: 手順 2、 3の画像 1 Disassembly of the Huawei P Smart 2019: 手順 2、 3の画像 2 Disassembly of the Huawei P Smart 2019: 手順 2、 3の画像 3
    • Remove the black tape.

    • Remove the white adhesive covering the screw.

    • Remove the 3 screws securing the cover connectors.

  3. Disassembly of the Huawei P Smart 2019: 手順 3、 3の画像 1 Disassembly of the Huawei P Smart 2019: 手順 3、 3の画像 2 Disassembly of the Huawei P Smart 2019: 手順 3、 3の画像 3
    • In the next steps you will have to unclip 4 connectors: those of the battery, the touch id, the display and the motherboard.

    • To make your work easier, unclip the connectors in this order:

    • Battery connector

    • Touch ID connector

    • Display connector

    • Motherboard connector

  4. Disassembly of the Huawei P Smart 2019: 手順 4、 3の画像 1 Disassembly of the Huawei P Smart 2019: 手順 4、 3の画像 2 Disassembly of the Huawei P Smart 2019: 手順 4、 3の画像 3
    • Unplug the display connector.

    • Unplug the battery connector.

    • Unplug connector of the lower logic board.

  5. Disassembly of the Huawei P Smart 2019: 手順 5、 1の画像 1
    • If you are replacing the display, I suggest you temporarily hook the connector that goes from the display to the lower logic board and then that of the battery and see if the new touchscreen display works.

  6. Disassembly of the Huawei P Smart 2019: 手順 6、 3の画像 1 Disassembly of the Huawei P Smart 2019: 手順 6、 3の画像 2 Disassembly of the Huawei P Smart 2019: 手順 6、 3の画像 3
    • Unplug the connector.

    • Unscrew the 3 screws of the cover.

    • Remove the bracket.

  7. Disassembly of the Huawei P Smart 2019: 手順 7、 3の画像 1 Disassembly of the Huawei P Smart 2019: 手順 7、 3の画像 2 Disassembly of the Huawei P Smart 2019: 手順 7、 3の画像 3
    • Unplug the front camera connector and remove it.

    • Unplug the two connectors of the rear cameras.

    • Remove the rear cameras.

  8. Disassembly of the Huawei P Smart 2019: 手順 8、 2の画像 1 Disassembly of the Huawei P Smart 2019: 手順 8、 2の画像 2
    • Remove the 4 motherboard retaining screws.

    • Remove the motherboard.

  9. Disassembly of the Huawei P Smart 2019: 手順 9、 3の画像 1 Disassembly of the Huawei P Smart 2019: 手順 9、 3の画像 2 Disassembly of the Huawei P Smart 2019: 手順 9、 3の画像 3
    • Use a hair dryer to heat the glue and remove the speaker.

    • Use a hair dryer to heat the glue and remove the front light sensors.

    • Use a hair dryer to heat the glue and remove the flat cable from the power button and the volume button.

  10. Disassembly of the Huawei P Smart 2019: 手順 10、 3の画像 1 Disassembly of the Huawei P Smart 2019: 手順 10、 3の画像 2 Disassembly of the Huawei P Smart 2019: 手順 10、 3の画像 3
    • Remove the screws from the speakerphone and bottom logic board cover.

    • Remove the speaker and cover.

    • Unplug the cable.

  11. Disassembly of the Huawei P Smart 2019: 手順 11、 3の画像 1 Disassembly of the Huawei P Smart 2019: 手順 11、 3の画像 2 Disassembly of the Huawei P Smart 2019: 手順 11、 3の画像 3
    • Unhook the lower logic board and remove it.

    • Use a hair dryer to heat the glue and remove the vibration motor.

    • Use a hair dryer to heat the glue and remove the battery.

  12. Disassembly of the Huawei P Smart 2019: 手順 12、 1の画像 1
    • If you are replacing the full frame display, transport all components to the new display.

終わりに

To reassemble the device, follow these instructions in reverse order.

11 の人々がこのガイドを完成させました。

以下の翻訳者の皆さんにお礼を申し上げます:

it en

100%

これらの翻訳者の方々は世界を修理する私たちのサポートをしてくれています。 あなたも貢献してみませんか?
翻訳を始める ›

作成者

3人の作成者と共同で作成されました。

Smilzo

メンバー登録日: 11/09/13

11,276 ポイント

39のガイドは作成済み

5 件のコメント

Grazie, hai spiegato molto semplicemente i passaggi e grazie a te ora sono riuscito a sistemare il mio smartphone !

Top

ale89-71 - 返信

Salve, dovrei sostituire un display completo di frame su un huawei p smart 2019, vorrei sapere esattamente quale colla usare per la scheda madre? Ho notato che nel vecchio frame ci sono due gocce di colla, che sembra pasta termica. Attendo una risposta

Salvatore Angelo - 返信

Ciao.quella che vedi non è colla ma ti confermo è pasta termica che serve per tenere a contatto le parti del processore,in questo caso cpu e gpu in contattato con L’ alluminio così che il calore si possa trasmettere ed essere dissipato.

se non hai della pasta termica puoi riutilizzare quella esistente che dovrebbe essere sufficiente,la togli dal vecchio frame e la metti sul nuovo,poi parte della pasta sarà rimasta già sulla scheda logica. Nel caso che la vuoi comprare cerca pasta termica si usa nei pc in genere,ma eviterei la spesa a meno che non rilevi problemi di surriscaldamento in seguito alla riparazione . Buon lavoro

Smilzo -

Buongiorno,

mi è caduto Huawei P Smart 2019, vetro tutto crepato, ma il touch funziona perfettamente.

Quindi consigli di cambiare solo il vetro? è difficile?

grazie

sallabriscola - 返信

Ciao purtroppo vetro e display sono incollati insieme e conviene comprare tutto già assemblato possibilmente comprensivo di frame così non dovrai incollare niente ma soltanto spostare tutti i componenti sul nuovo corpo display ,così tornerà il telefono come nuovo.

buon lavoro

Smilzo -

コメントを追加

統計データ:

過去 24時間: 8

過去 7 日: 89

過去 30 日: 367

今までの合計 17,176