メインコンテンツにスキップ

Disassembly Guide

必要な工具と部品

  1. Disassembly Guide, Battery: 手順 1、 3の画像 1 Disassembly Guide, Battery: 手順 1、 3の画像 2 Disassembly Guide, Battery: 手順 1、 3の画像 3
    • Locate the battery housing cover on the bottom of your camera.

    • Place a finger on the textured portion of the battery housing cover.

    • Slide the cover in the direction that the arrow is pointing.

  2. Disassembly Guide: 手順 2、 2の画像 1 Disassembly Guide: 手順 2、 2の画像 2
    • Use your finger to pivot the orange tab away from the battery.

  3. Disassembly Guide: 手順 3、 1の画像 1
    • Pull the battery out of the housing with your fingers.

  4. Disassembly Guide, Motherboard: 手順 4、 2の画像 1 Disassembly Guide, Motherboard: 手順 4、 2の画像 2
    • Remove the two 4mm Hex screws that connect the grip to the camera with a Hex head screwdriver.

    • Remove the two Phillips screws to the left of the hex screws with a Phillips head screwdriver:

    • One 2mm screw

    • One 3mm screw

    • Remove the grip from the front of the camera by pulling it away from the lens and then away from the camera.

    שני ברגים משושה t5

    חיים פלס - 返信

  5. Disassembly Guide: 手順 5、 1の画像 1
    • Remove the following three Philips screws from the flash release side of the camera with a Philips Head screwdriver:

    • One 2.5mm screw

    • One 4.5mm screw

    • One 1.75mm screw

    Disasemblying my camera I can say that some of the screw lenths are not correct, (some of them just a few milimeters, but other a have a big mistake). Just consider that and take note of every screw you took off. You will be very pleased later. =)

    Emilio del Bosque Sevilla - 返信

    שני הקטנים נראים גודל אחד

    חיים פלס - 返信

  6. Disassembly Guide: 手順 6、 1の画像 1
    • Remove the following three Philips screws from the bottom of the camera with a Philips Head screwdriver:

    • One 3.25mm screw

    • One 2.5mm screw

    • One 2.75mm screw

    אני חושב שמידות הברגים אינם נכונות

    חיים פלס - 返信

  7. Disassembly Guide: 手順 7、 2の画像 1 Disassembly Guide: 手順 7、 2の画像 2
    • Rotate the LCD screen away from the camera.

  8. Disassembly Guide: 手順 8、 1の画像 1
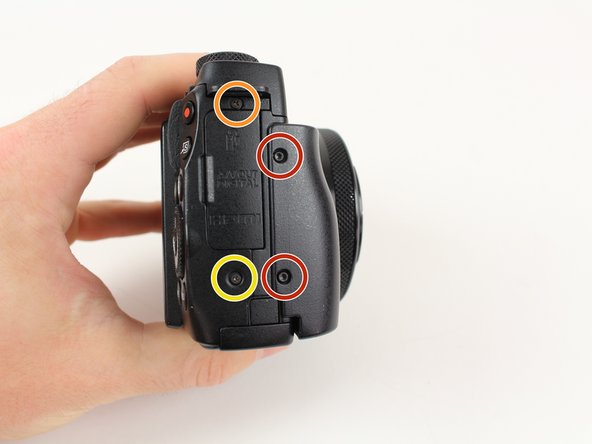
    • Remove the following four Phillips screws securing the back panel with a Philips Head screwdriver:

    • Two 3 mm screws

    • One 2mm screw

    • One 2.5 mm screw

    In step 8, I would say (disemblying my camera) that both screws on the top are 4mm. And the ones on the bottom are 2,5mm.

    Emilio del Bosque Sevilla - 返信

    זה נכון שיש שלוש גדלים שונים, אבל הגודל שכתוב לא נכון

    חיים פלס - 返信

    2mm screw (orange) goes in bottom right

    Michael Amor - 返信

  9. Disassembly Guide: 手順 9、 1の画像 1
    • Lift the back casing up far enough to expose the ribbon cables.

  10. Disassembly Guide: 手順 10、 2の画像 1 Disassembly Guide: 手順 10、 2の画像 2
    • Use a plastic spudger to gently release the locking tab holding the ribbon cable, closest to the edge of the camera, in place.

    • Repeat this process for the second ribbon cable to the right.

    • Carefully lift the back casing away from the camera.

  11. Disassembly Guide: 手順 11、 1の画像 1
    • Carefully lift the back casing away from the camera.

  12. Disassembly Guide: 手順 12、 2の画像 1 Disassembly Guide: 手順 12、 2の画像 2
    • Remove the five Phillips screws that are attached to the copper plate with a Philips Head screwdriver:

    • Two 3mm screws

    • Two 1.5mm screws

    • One 4mm screw

    • Lift the copper plate away from the camera.

  13. Disassembly Guide: 手順 13、 3の画像 1 Disassembly Guide: 手順 13、 3の画像 2 Disassembly Guide: 手順 13、 3の画像 3
    • Remove the following three Phillips screws securing the silver plate with a Philips Head screwdriver:

    • Two 2.9mm screws on the front of the camera

    • One 1.8mm screw on the bottom of the camera

    • Lift the silver plate away from the camera.

  14. Disassembly Guide: 手順 14、 2の画像 1 Disassembly Guide: 手順 14、 2の画像 2
    • Use the plastic spudger to lift up both sides of the ribbon cable from its connector pins.

    • The male end is on the left and the female end is on the right. The right side of the cable is notched.

  15. Disassembly Guide: 手順 15、 3の画像 1 Disassembly Guide: 手順 15、 3の画像 2 Disassembly Guide: 手順 15、 3の画像 3
    • Use the flat end of the plastic spudger to rotate the black plastic locking tab towards the ribbon cable.

    • Insert the pointed end of the plastic spudger into a small hole on the side of the ribbon cable and pull the ribbon cable out of its housing.

    • Use the flat end of the plastic spudger to pry the ribbon cable connector from the motherboard.

    • Both ribbon cables should be removed after this step.

  16. Disassembly Guide: 手順 16、 2の画像 1 Disassembly Guide: 手順 16、 2の画像 2
    • Release the flash by sliding the flash release towards the lens.

    • The flash release is located on the side of the camera closest to the lens.

  17. Disassembly Guide: 手順 17、 2の画像 1 Disassembly Guide: 手順 17、 2の画像 2
    • Remove the following two Phillips screws from the flash cavity with a Philips Head screwdriver:

    • Remove the 2mm screw to the right of the flash.

    • Remove the 2.5mm screw to the left of the flash.

  18. Disassembly Guide: 手順 18、 2の画像 1 Disassembly Guide: 手順 18、 2の画像 2
    • Remove the 2.5mm Phillips screw from the front plate with a Phillips head screwdriver.

    • Pull up on the top portion of the camera to separate the top casing from the camera body.

    • Make sure the flash is up. Otherwise the top casing will not release.

    Remove 3mm screwfo connector ports . Now , not step 24

    Dufour - 返信

    I think there’s still 1 screw between the remote jack and A/V output need to remove to remove before can pull up on the top portion. I have the photo if you add on. Regards, Rez

    rez abellana - 返信

  19. Disassembly Guide: 手順 19、 2の画像 1 Disassembly Guide: 手順 19、 2の画像 2
    • Remove the 3.5mm Phillips screw from the grey tab on the top of the camera with a Philips Head screwdriver.

    • Rotate the camera so the back panel is facing you.

    • Remove the 1.4mm Phillips screw from the sliver tab near the top of the camera with a Philips Head screwdriver.

    אין צורך להוציא את הבורג הקטן

    חיים פלס - 返信

  20. Disassembly Guide: 手順 20、 2の画像 1 Disassembly Guide: 手順 20、 2の画像 2
    • Use the flat end of the plastic spudger to release the plastic retaining clip on the side plate closest to the lens.

    • Rotate the side plate closest to the lens toward the lens of the camera and then pull the plate away from the camera.

  21. Disassembly Guide: 手順 21、 3の画像 1 Disassembly Guide: 手順 21、 3の画像 2 Disassembly Guide: 手順 21、 3の画像 3
    • Release the plastic locking tab of the upper ribbon cable with the plastic spudger.

    • Pull the top ribbon cable from its mount with the fine tip metal tweezers.

    • Remove the bottom ribbon cable with the fine tip metal tweezers by pulling it toward the flash switch side of the camera.

    • The bottom ribbon cable does not have a locking tab; it simply slides in and out.

  22. Disassembly Guide: 手順 22、 1の画像 1
    • Pull the front plate off the camera body.

    • It should slide off easily. If it does not, ensure that all screws and ribbon cables from previous steps have been removed or disconnected.

  23. Disassembly Guide: 手順 23、 1の画像 1
    • Remove the rubber dust cover from the camera by moving the hooks away from the three prongs holding them in place and then pulling the cover away from the camera.

  24. Disassembly Guide: 手順 24、 2の画像 1 Disassembly Guide: 手順 24、 2の画像 2
    • Remove the following two Phillips screws from the side of the camera with the three connector ports with a Phillips head screwdriver:

    • One 2.5mm screw

    • One 3.3mm screw

    • Pull the metal shield away from the camera.

  25. Disassembly Guide: 手順 25、 3の画像 1 Disassembly Guide: 手順 25、 3の画像 2 Disassembly Guide: 手順 25、 3の画像 3
    • Use the plastic spudger to remove the ribbon cable from the motherboard by placing the spudger under the ribbon cable connector and pulling up.

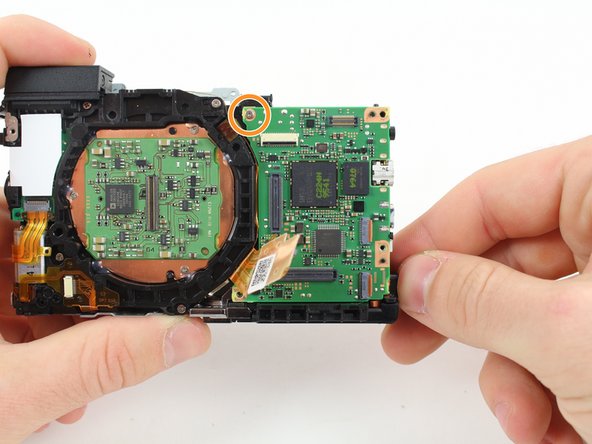
    • Remove the 2.8mm screw from the motherboard.

    • Do not try to remove the motherboard from the camera yet.

    • Carefully rotate the motherboard upward.

    • Use the plastic spudger to remove the ribbon cable from the bottom of the motherboard by placing the spudger under the ribbon cable connector and pulling up.

  26. Disassembly Guide: 手順 26、 1の画像 1
    • Lift the motherboard away from the camera.

  27. Disassembly Guide, Lens: 手順 27、 3の画像 1 Disassembly Guide, Lens: 手順 27、 3の画像 2 Disassembly Guide, Lens: 手順 27、 3の画像 3
    • Lay the camera on a flat surface while performing these steps because removing the frame causes the camera to fall apart.

    • Remove the four 4.25mm Philips screws from the silver frame that surrounds the lens of the camera with a Philips Head screwdriver.

    • Remove the frame by lifting straight up.

  28. Disassembly Guide: 手順 28、 1の画像 1
    • Separate the lens from the other components of the camera.

  29. Disassembly Guide, Disassembly Guide: 手順 29、 1の画像 1
    • You have disassembled the Canon PowerShot G1 X Mark II!

終わりに

To reassemble your device, follow these instructions in reverse order.

7 の人々がこのガイドを完成させました。

作成者

5人の作成者と共同で作成されました。

Ryan Dunn

メンバー登録日: 01/12/16

573 ポイント

3のガイドは作成済み

チーム

Cal Poly, Team 70-2, Forte Winter 2016 Cal Poly, Team 70-2, Forte Winter 2016人のメンバー

CPSU-FORTE-W16S70G2

4 メンバー

4のガイドは作成済み

5 件のコメント

Surely these are JIS screws not Phillips. A Phillips screwdriver will chew the heads up.

maico61 - 返信

I have an LCD display problem and would like to disassemble it, the guide does not cover anything to do with the LDC assembly, otherwise a very good guide. I’ll attempt it anyway once I feel like a risk.

Alan Cattalon - 返信

Fabuloso. La pantalla de mi camara canon gx1 cuando la invertias se apagaba. Lo que he hecho fue comprar un cable ribbon nuevo en aliexpress y substituirlo. Asunto arreglado por 7euros.

En este tutorial, falta como desmontar la pantalla. Para hacerlo debes retirar los tornillos de la pantalla con delicadeza, despegar el cable con delicadeza y montar la pantalla otra vez.

MIGUEL A. MARTINEZ GOMEZ - 返信

hola miguel angel, cual es ese cable? podrias enlazarlo, mi pantalla da fallos y debe ser ese ribbon. gracias!

alvarezrodriguezrc -

Thanks for this great guide ! I need to disassemble and clean the external flash connector in the top portion of the camera because of some dirt and even corrosion - I found no way how to do this, I removed all screws but I was not able to remove the metallic structure. Any idea to take this apart ? thanks in advance...

M Df - 返信

コメントを追加

統計データ:

過去 24時間: 0

過去 7 日: 5

過去 30 日: 26

今までの合計 10,000