メインコンテンツにスキップ

Disassembling

必要条件のみ
この修理ガイドは、他のガイドの前提条件として使用されます。それ自体は不完全で、単独で使用されることはありません。

必要な工具と部品

  1. Disassembling, Disassembling: 手順 1、 1の画像 1
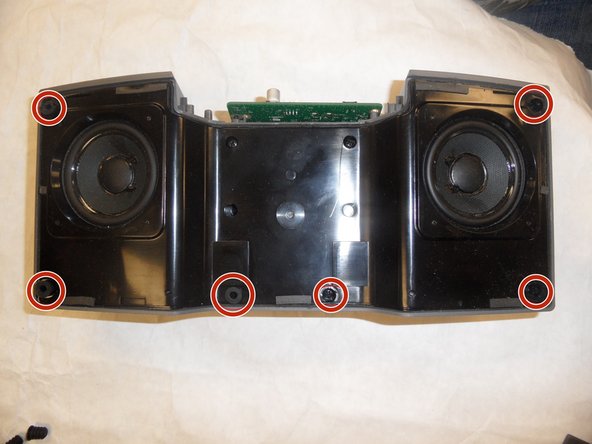
    • Remove six 10 mm length screws from the bottom panel of the SoundDock.XT using a #1 Phillips screwdriver.

  2. Disassembling: 手順 2、 1の画像 1
    • Remove the Front Panel, use a #2 Phillips screwdriver to remove the two 6.5 mm length front panel screws located under the bottom cover (highlighted in red circles in the photo).

  3. Disassembling: 手順 3、 1の画像 1
    • Next, use a plastic opening tool to slide under the edge of the front cover. Start edge located at the top of the left or right speaker and work your way around the speaker. Remove the front cover.

  4. Disassembling: 手順 4、 2の画像 1 Disassembling: 手順 4、 2の画像 2
    • Use a wide nose tweezer to remove six rubber grommets from the front of the SoundDock XT.

    • Using pointed tweezers may damage the rubber grommet.

  5. Disassembling: 手順 5、 1の画像 1
    • Use a #2 screwdriver to remove the six 8.5 mm length screws from the speaker cover.

  6. Disassembling: 手順 6、 1の画像 1
    • Using a metal spudger, slide between the outer case and the front speaker cover. Work your way around the cover and remove the speaker cover. You now have access to the speakers.

    • Using the metal spudger may damage the plastic speaker cover.

終わりに

To reassemble your device, follow these instructions in reverse order.

2 の人々がこのガイドを完成させました。

作成者

3人の作成者と共同で作成されました。

Tarissa Miller

メンバー登録日: 10/01/15

218 ポイント

1ガイドが承認済み

チーム

IUPUI, Team 1-4, Hagerty Fall 2015 IUPUI, Team 1-4, Hagerty Fall 2015人のメンバー

IUPUI-HAGERTY-F15S1G4

5 メンバー

3のガイドは作成済み

0 件のコメント

コメントを追加

統計データ:

過去 24時間: 0

過去 7 日: 0

過去 30 日: 0

今までの合計 95