メインコンテンツにスキップ

Disassembling Translucent Rubber Flashlight Battery Power Component

  1. Disassembling Translucent Rubber Flashlight Battery Power Component, Disassembling Translucent Rubber Flashlight Battery Power Component: 手順 1、 1の画像 1
    • Remove light mechanism from body containing battery. Twist light bulb (red circle) counterclockwise while holding base of flashlight (black circle).

  2. Disassembling Translucent Rubber Flashlight Battery Power Component: 手順 2、 1の画像 1
    • Angle body of flashlight until two AA batteries fall out. Store battery components.

  3. Disassembling Translucent Rubber Flashlight Battery Power Component: 手順 3、 1の画像 1
    • Pull off rubber chassis of flashlight. Peel back rubber on battery side of flashlight first (red circle). Grip remaining rubber (black circle) and pull off plastic/metal body in direction counter to opening.

  4. Disassembling Translucent Rubber Flashlight Battery Power Component: 手順 4、 1の画像 1
    • Remove metal apparatus containing button switch first by bending piece in arc shape. Carefully pull out clipped tip as shown.

  5. Disassembling Translucent Rubber Flashlight Battery Power Component: 手順 5、 2の画像 1 Disassembling Translucent Rubber Flashlight Battery Power Component: 手順 5、 2の画像 2
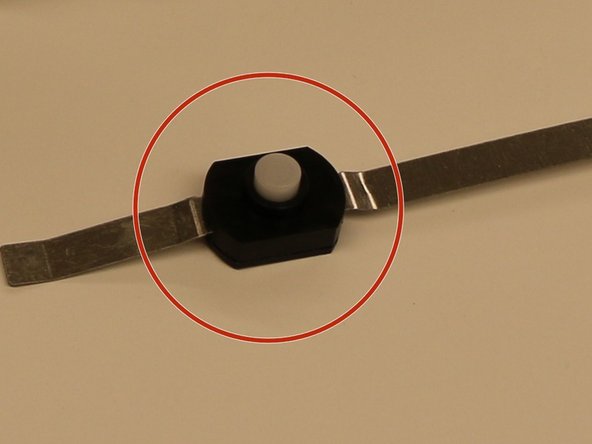
    • Using the freed tip, detach the bottom of the metal switch connected to the spring of the grounded/negative end where the AA batteries are located (circle).

    • Push metal end into square hole so clip detaches from battery spring (circle). Pull out rest of clip avoiding spring, so metal switch freed from body.

  6. Disassembling Translucent Rubber Flashlight Battery Power Component: 手順 6、 2の画像 1 Disassembling Translucent Rubber Flashlight Battery Power Component: 手順 6、 2の画像 2
    • Spring connected to flashlight base removed using tip of metal switch (circle) hooking and pulling into opening.

    • Initiate battery switch disassembly (circle).

  7. Disassembling Translucent Rubber Flashlight Battery Power Component: 手順 7、 3の画像 1 Disassembling Translucent Rubber Flashlight Battery Power Component: 手順 7、 3の画像 2 Disassembling Translucent Rubber Flashlight Battery Power Component: 手順 7、 3の画像 3
    • The switch mechanism disassembly removes the button attached to the lid (red circle) from the grooves (blue circle) containing the switch components.

    • Next, remove the spring first and then metallic, grooved pressure plate which contained the spring (red circle) using hand.

    • Finally, remove metal connections of battery switch by lifting holes (red circle) off containment piece.

  8. Disassembling Translucent Rubber Flashlight Battery Power Component: 手順 8、 1の画像 1
    • The battery components of translucent flashlight completely disassembled.

終わりに

To reassemble your device, follow these instructions in reverse order.

5 の人々がこのガイドを完成させました。

作成者

3人の作成者と共同で作成されました。

Phillip Phung

メンバー登録日: 01/19/12

624 ポイント

9のガイドは作成済み

チーム

Cal Poly, Team 8-18, Maness Winter 2012 Cal Poly, Team 8-18, Maness Winter 2012人のメンバー

CPSU-MANESS-W12S8G18

4 メンバー

12のガイドは作成済み

コメント 1 件

thanks a lot that really help. especially the on off switch 2 spring part. mine was a rear switch though

John Doe - 返信

コメントを追加

統計データ:

過去 24時間: 1

過去 7 日: 7

過去 30 日: 28

今までの合計 2,096