メインコンテンツにスキップ

Disassembling Sony Ericsson QuickShare T630 Phone Enclosure

必要な工具と部品

  1. Disassembling Sony Ericsson QuickShare T630 Phone Enclosure, Sony Ericsson QuickShare T630 Phone Enclosure: 手順 1、 1の画像 1
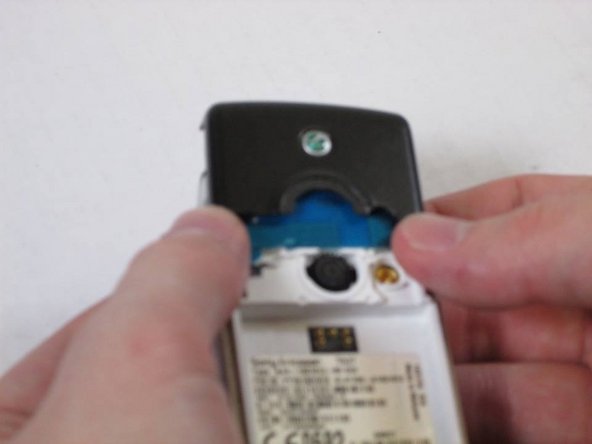
    • Begin the disassembly by placing your Sony Ericsson QuickShare T630 on a flat surface.

  2. Disassembling Sony Ericsson QuickShare T630 Phone Enclosure: 手順 2、 2の画像 1 Disassembling Sony Ericsson QuickShare T630 Phone Enclosure: 手順 2、 2の画像 2
    • Slide the protective panel on the backside of the phone downward and remove it entirely, revealing the battery underneath.

  3. Disassembling Sony Ericsson QuickShare T630 Phone Enclosure: 手順 3、 1の画像 1
    • Slide the battery upward to remove.

  4. Disassembling Sony Ericsson QuickShare T630 Phone Enclosure: 手順 4、 2の画像 1 Disassembling Sony Ericsson QuickShare T630 Phone Enclosure: 手順 4、 2の画像 2
    • Remove the rubber plug located near the camera by gently prying upward with your fingers.

    • Gently lift the camera shield after removal of the rubber plug.

  5. Disassembling Sony Ericsson QuickShare T630 Phone Enclosure: 手順 5、 2の画像 1 Disassembling Sony Ericsson QuickShare T630 Phone Enclosure: 手順 5、 2の画像 2
    • Pry the remaining panel to loosen its contact to the phone using a spudger.

    • Slide the panel upward to remove it completely.

    • These steps will require a slight appliance of force.

  6. Disassembling Sony Ericsson QuickShare T630 Phone Enclosure: 手順 6、 1の画像 1
    • Slide the aerial upward to remove it.

  7. Disassembling Sony Ericsson QuickShare T630 Phone Enclosure: 手順 7、 2の画像 1 Disassembling Sony Ericsson QuickShare T630 Phone Enclosure: 手順 7、 2の画像 2
    • Remove the four screws located at each corner of the device.

  8. Disassembling Sony Ericsson QuickShare T630 Phone Enclosure: 手順 8、 2の画像 1 Disassembling Sony Ericsson QuickShare T630 Phone Enclosure: 手順 8、 2の画像 2
    • Gently lift and remove the front panel of the phone after removing the screws.

  9. Disassembling Sony Ericsson QuickShare T630 Phone Enclosure: 手順 9、 3の画像 1 Disassembling Sony Ericsson QuickShare T630 Phone Enclosure: 手順 9、 3の画像 2 Disassembling Sony Ericsson QuickShare T630 Phone Enclosure: 手順 9、 3の画像 3
    • This step is NOT required for joystick maintenance or keypad maintenance and replacement! Continue on to step 10 if you are attempting to achieve either of these goals.

    • Slowly lift the screen to reveal the green circuit ribbon connecting the screen to the phone.

    • Gently pull the ribbon from the circuit.

    • Remove the now disconnected screen.

  10. Disassembling Sony Ericsson QuickShare T630 Phone Enclosure: 手順 10、 3の画像 1 Disassembling Sony Ericsson QuickShare T630 Phone Enclosure: 手順 10、 3の画像 2 Disassembling Sony Ericsson QuickShare T630 Phone Enclosure: 手順 10、 3の画像 3
    • Remove the keyboard by slowly pulling it away from the circuit board.

    • There are no direct connections between the keyboard and phone.

    • These are all of the parts covered in this disassembly that make up the Sony Ericsson QuickShare T630.

終わりに

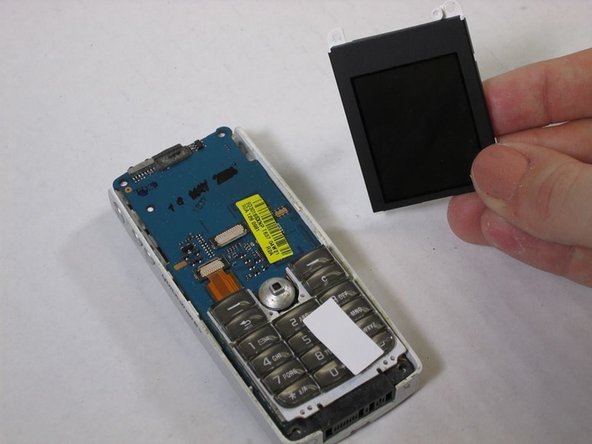
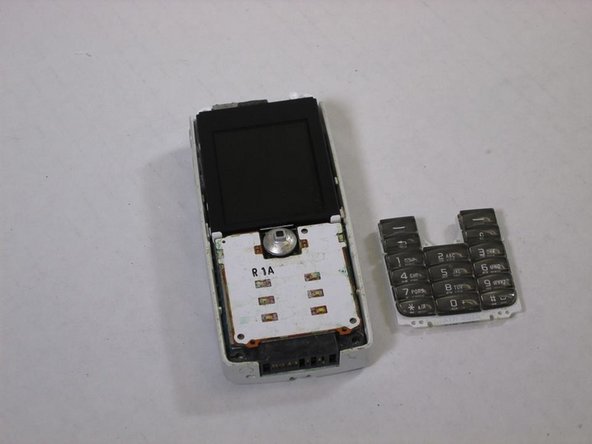
To reassemble your device, follow these instructions in reverse order.

2 の人々がこのガイドを完成させました。

作成者

7人の作成者と共同で作成されました。

Christine Becker

メンバー登録日: 10/28/13

101 ポイント

1ガイドが承認済み

チーム

University of Maine, Team 1-13, Diaz Fall 2013 University of Maine, Team 1-13, Diaz Fall 2013人のメンバー

UMAINE-DIAZ-F13S1G13

3 メンバー

14のガイドは作成済み

0 件のコメント

コメントを追加

統計データ:

過去 24時間: 0

過去 7 日: 2

過去 30 日: 13

今までの合計 3,512