はじめに
Disassembling the mouse is very easy and should take about 10-15 minutes.
必要な工具と部品
-
-
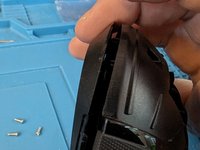
Use the tweezers to lift the bottom slider, if you use your nails you might just lift the slider, instead of all the glue with the slider.
-
-
-
-
Remove all 4 screws.
-
There is 1 at the bottom under the slider.
-
The top ones are under the letter A from BASILISK and the other one between the EE from HYPERSPEED.
-
The last one is on top of the last 4 digits of the IFETEL number.
-
-
-
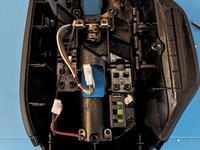
First remove battery, after that, lift it from the bottom using your nail or a prying tool from the gap at the bottom. Open it carefully, since there are wire connectors. Carefully disconnect from the plastic to avoid damage, DO NOT PULL FROM THE WIRES.
-
-
-
If you need to remove the board, you need a 00 Philips bit for the screws on the board and a 1 Philips bit for the screws on the side buttons, other than that, you have full access to the board.
-


To reassemble your device, follow these instructions in reverse order.
3 の人々がこのガイドを完成させました。
